Customers
Creating customers from the KRISP POS
A transaction can be tied to a customer. Adding a customer will prove to be useful when you're later on dealing with a customer's transaction issues or studying customer data and buying patterns.
You can search for a customer name to add, but if it's not yet in your contact list, then here's how you can create a new customer:
- From the cart, click on New customer. A popup to create a new customer will appear.
-
Fill out the information needed on the popup (a customer can either be an individual or a company. Identify them correctly using the slider).

Filling out other tabs:
You will see tabs below the popup. Enter in all the mandatory fields and, if applicable, other optional details.
Tabs Description Address Different address types include: Billing, residential, shipping, etc. Contacts Alternate persons to call if customer is unavailable. This is required for on-account as person noted here will be permitted to pick up the goods on the customers behalf. Friends & Family Used to associate entities like customers, employees, contacts, suppliers. Loyalty Details if the customer belongs to a loyalty program. Preferences Customer's preferred store, currency, and language. Can also set if customer wants to receive marketing campaigns. -
Click Save to save new customer.
- The customer is then displayed on the cart and it's now automatically added.
Creating customers from the admin
Customers can be created in admin and KRISP POS. When a customer is created at KRISP POS, the entity type will be defaulted to Customer.
Creating new customers from the admin:
- Go to menu.
- Go to Relationships > Customers.
- Click the Add button.
-
This will bring you to a form. Complete the form's required fields and sections.
Filling out the form:
You will see a left sidebar so you can navigate through the form. Enter in all the mandatory fields and, if applicable, other optional details.
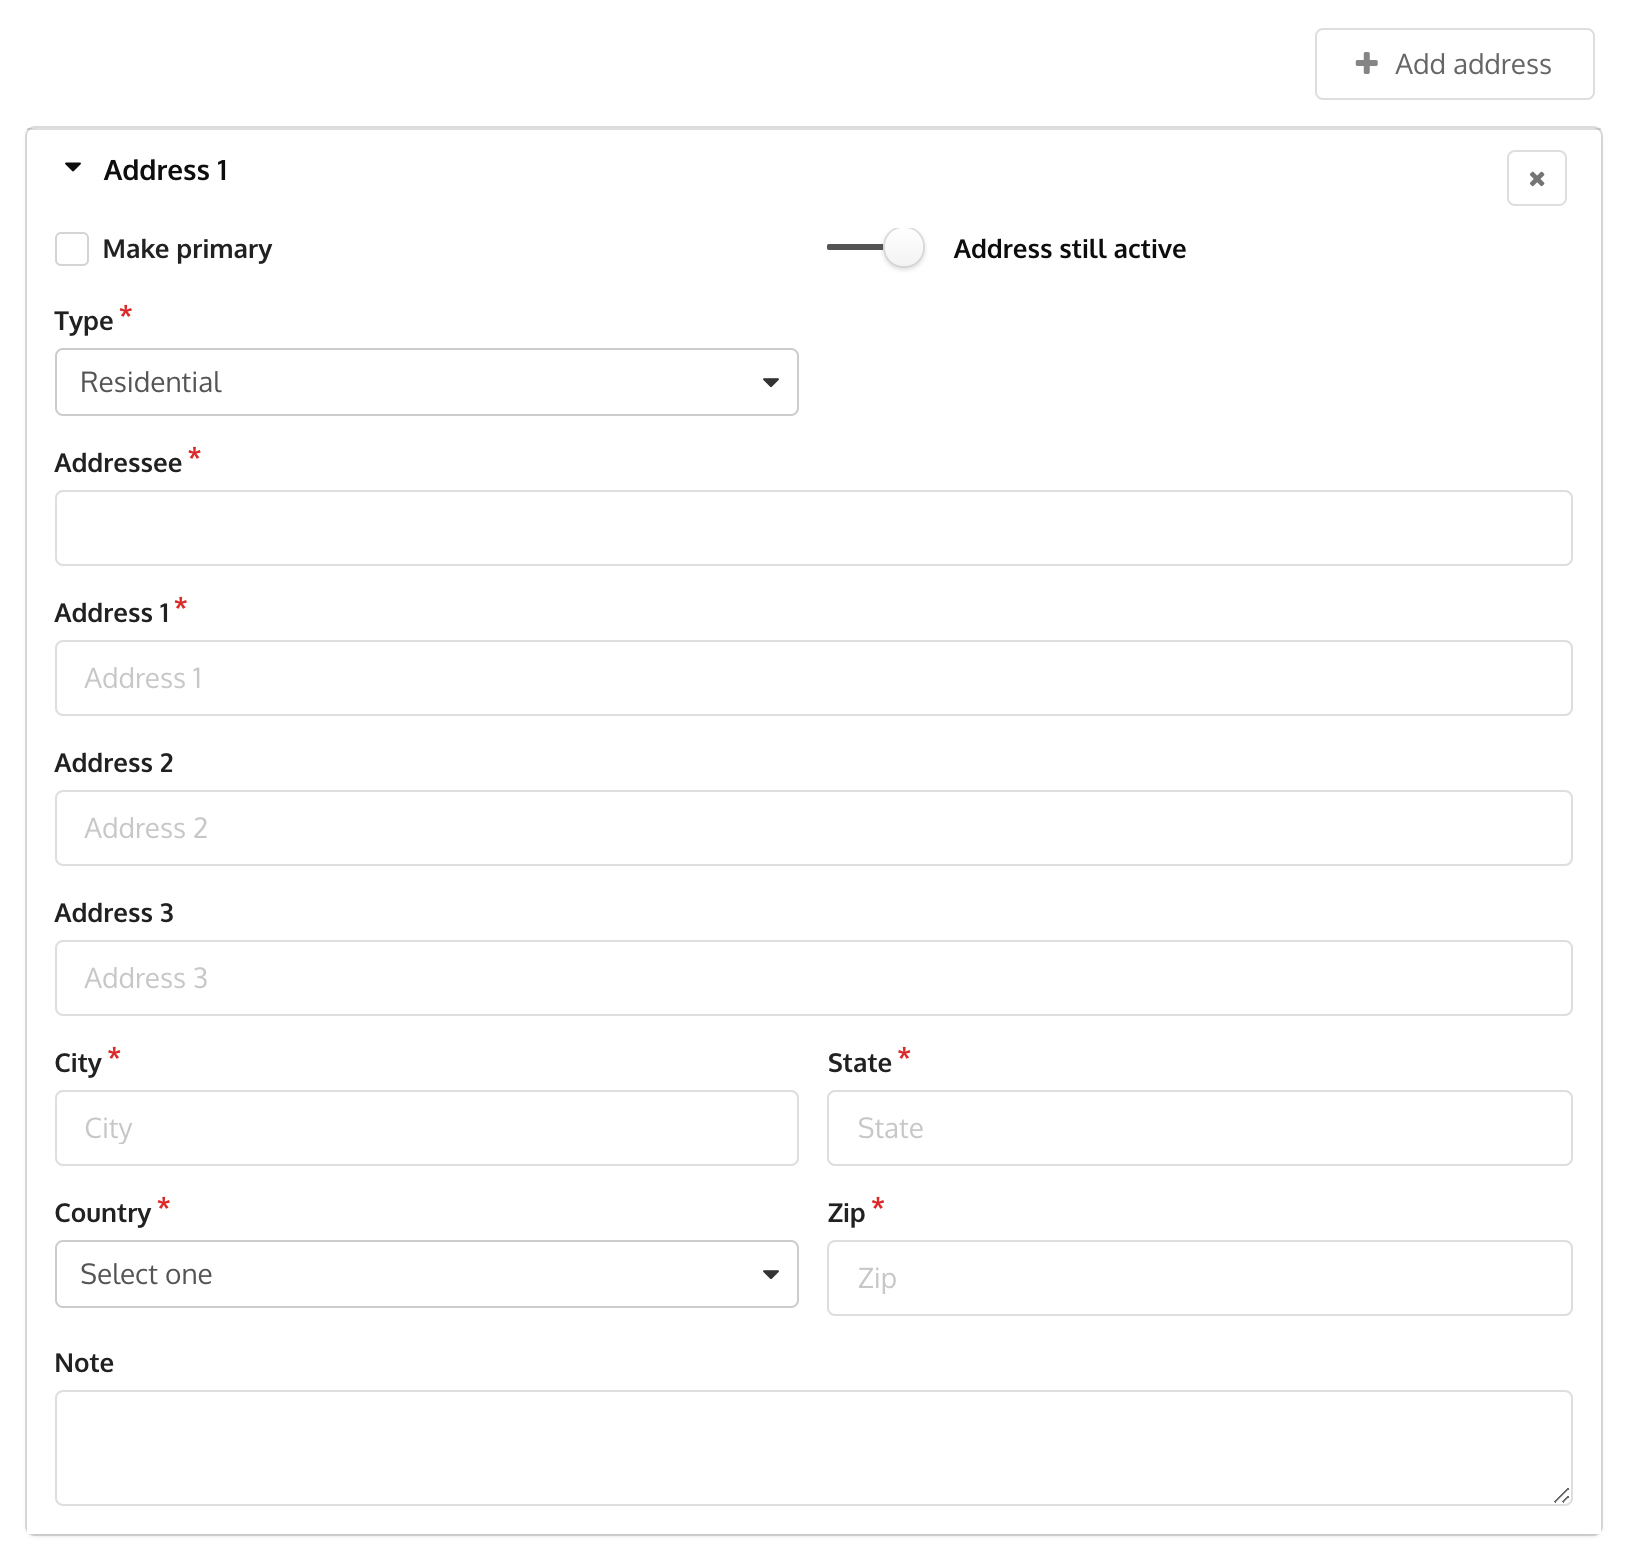
Sections Description General Enter in All the mandatory values and if applicable, other optional details. Address Where you can add their addresses. Contact Alternate persons to call if customer is unavailable. Required for on account as person noted here will be allowed to pick up the goods on the customers behalf. Credit Where you add on account details, if applicable. Loyalty Where you can add or change their price level and loyalty details. Friends and family Details of friends and family. General section:
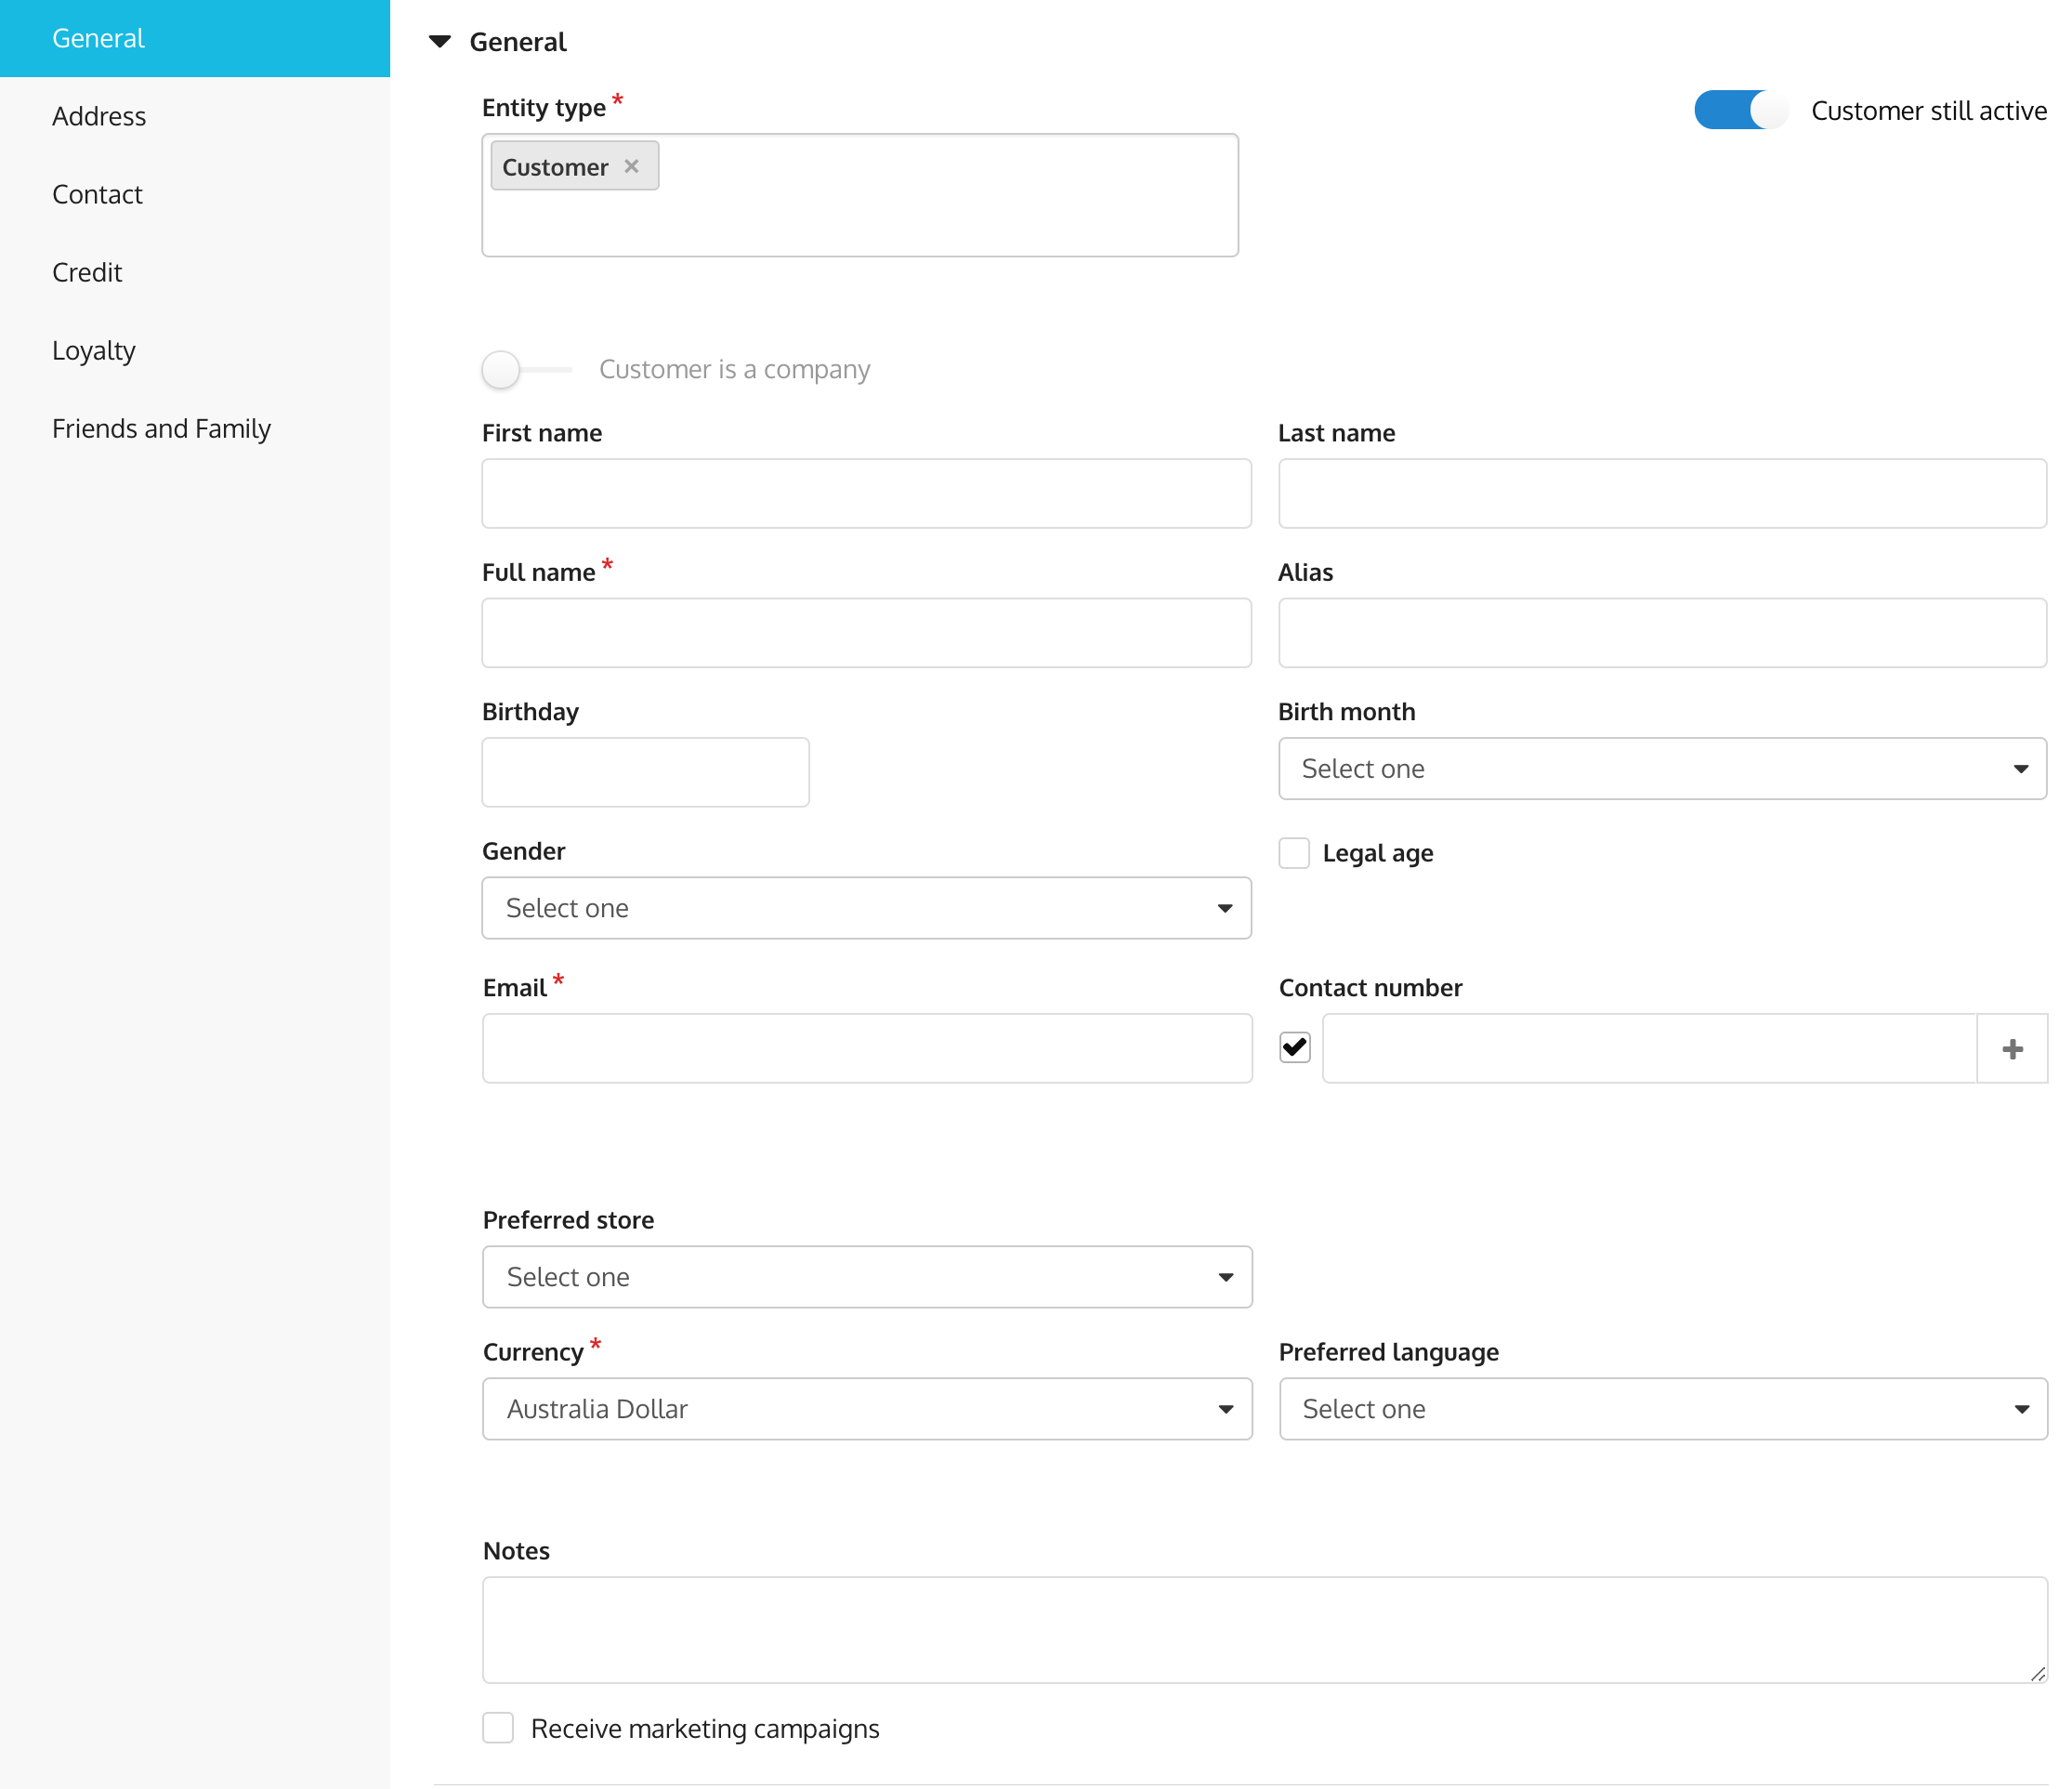
When adding an customer, the entity type is defaulted to Customer. Add any additional entity types that will be applicable to this employee. A customer can also be an employee and a supplier.
Address section:
Contact section:

Credit section:
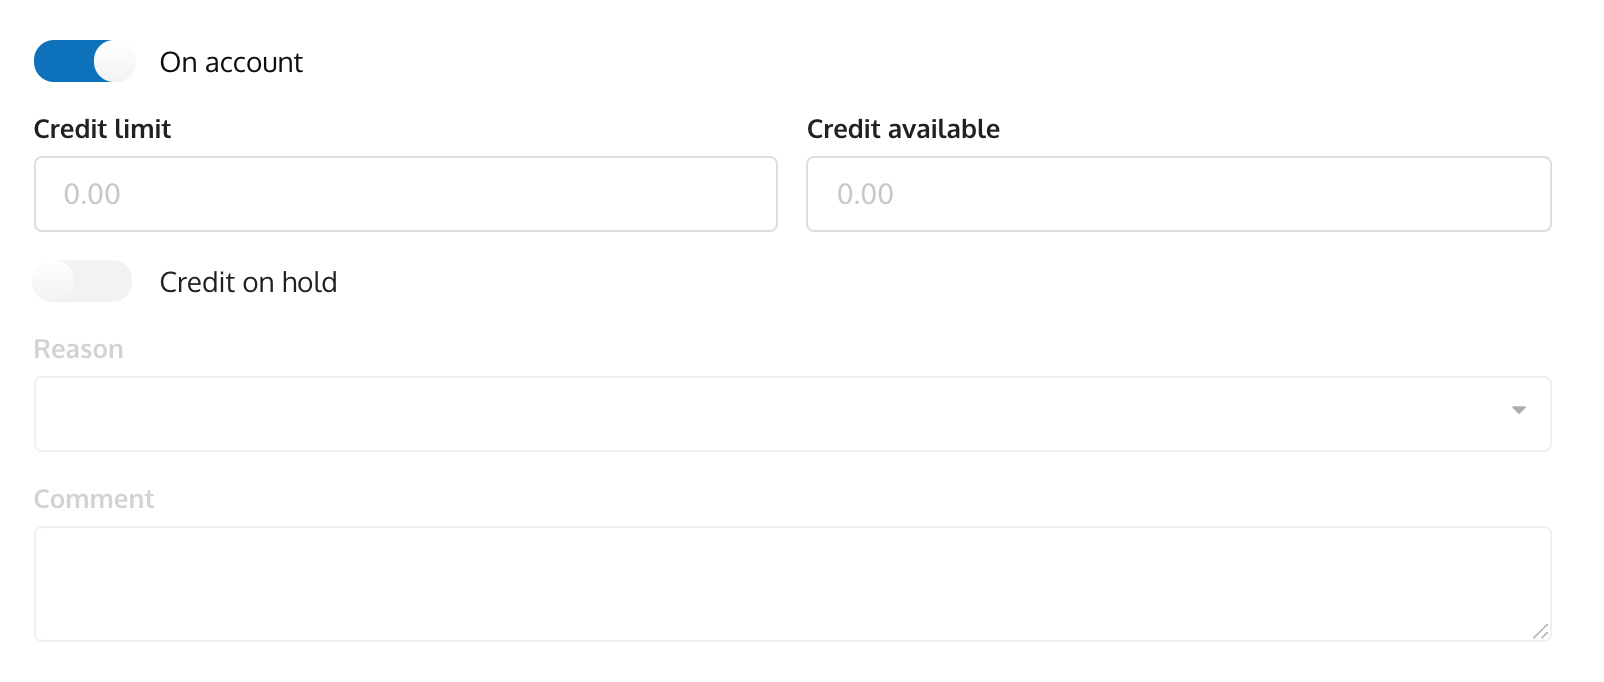
- On Account: Enable the On account slider if this customer is an on account customer. Enter in a credit amount where a credit threshold is required.
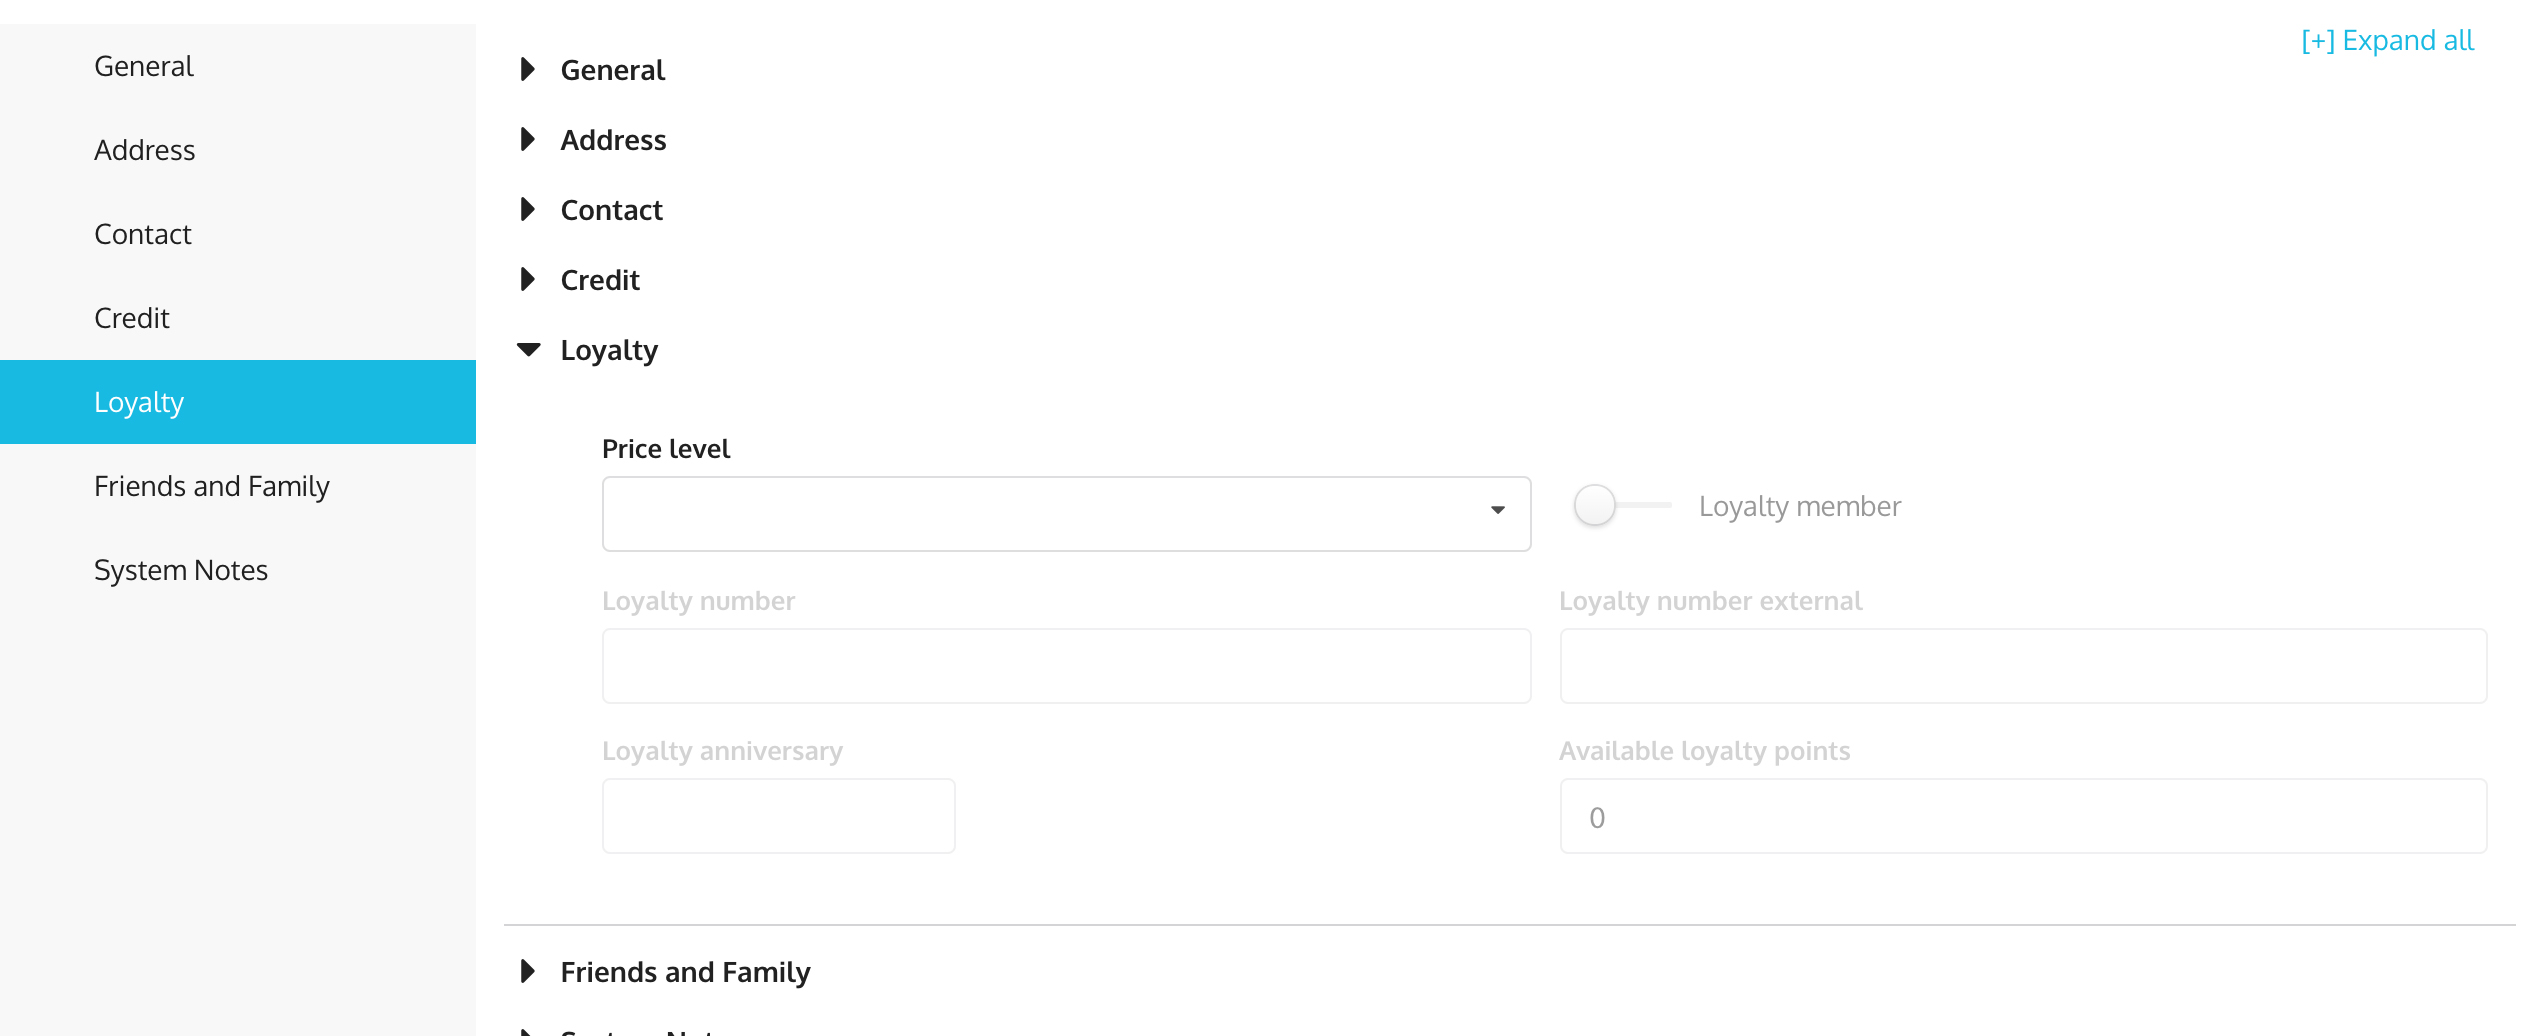
Loyalty section:
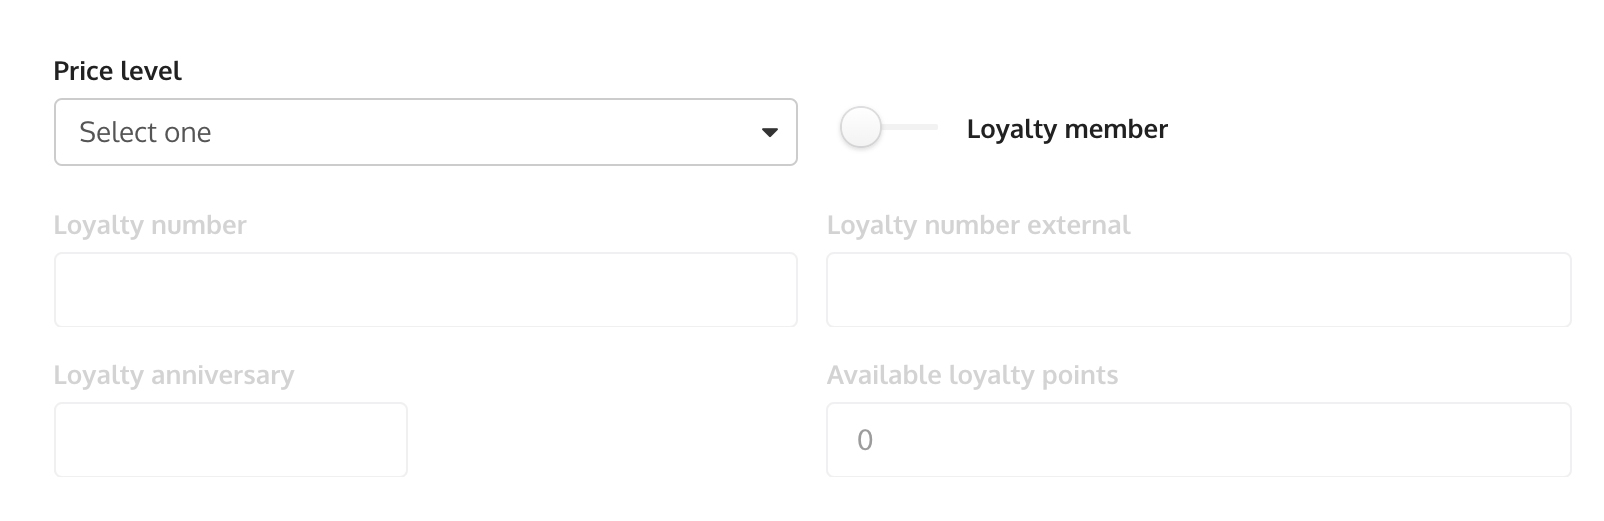
- Price Level: Choose a price level which this customer will belong to.
- Loyalty Member: If this customer will belong to a loyalty program, move the slider towards loyalty member. Upon saving, the loyalty number will be automatically assigned and the customer's loyalty price will automatically be applied to transactions.
Friends and family section:
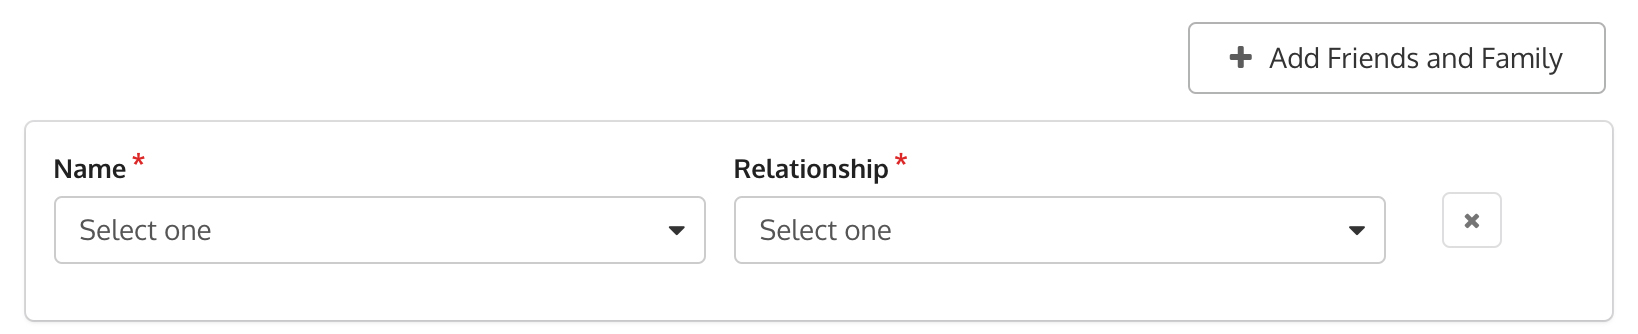
- Name: Choose the name which is related to this customer.
- Relationship: Choose the relationship type.
-
Click the Save button.
Updating customer details
Once a customer has been created and saved, you can still edit and make updates to their details.
To update customer details:
- Find and select a customer by using the search bar (if you want to edit the details of the customer on your cart, you can just click their name).
-
On the search results, click on the open popup icon
 . Make sure you're on the Customers tab.
-
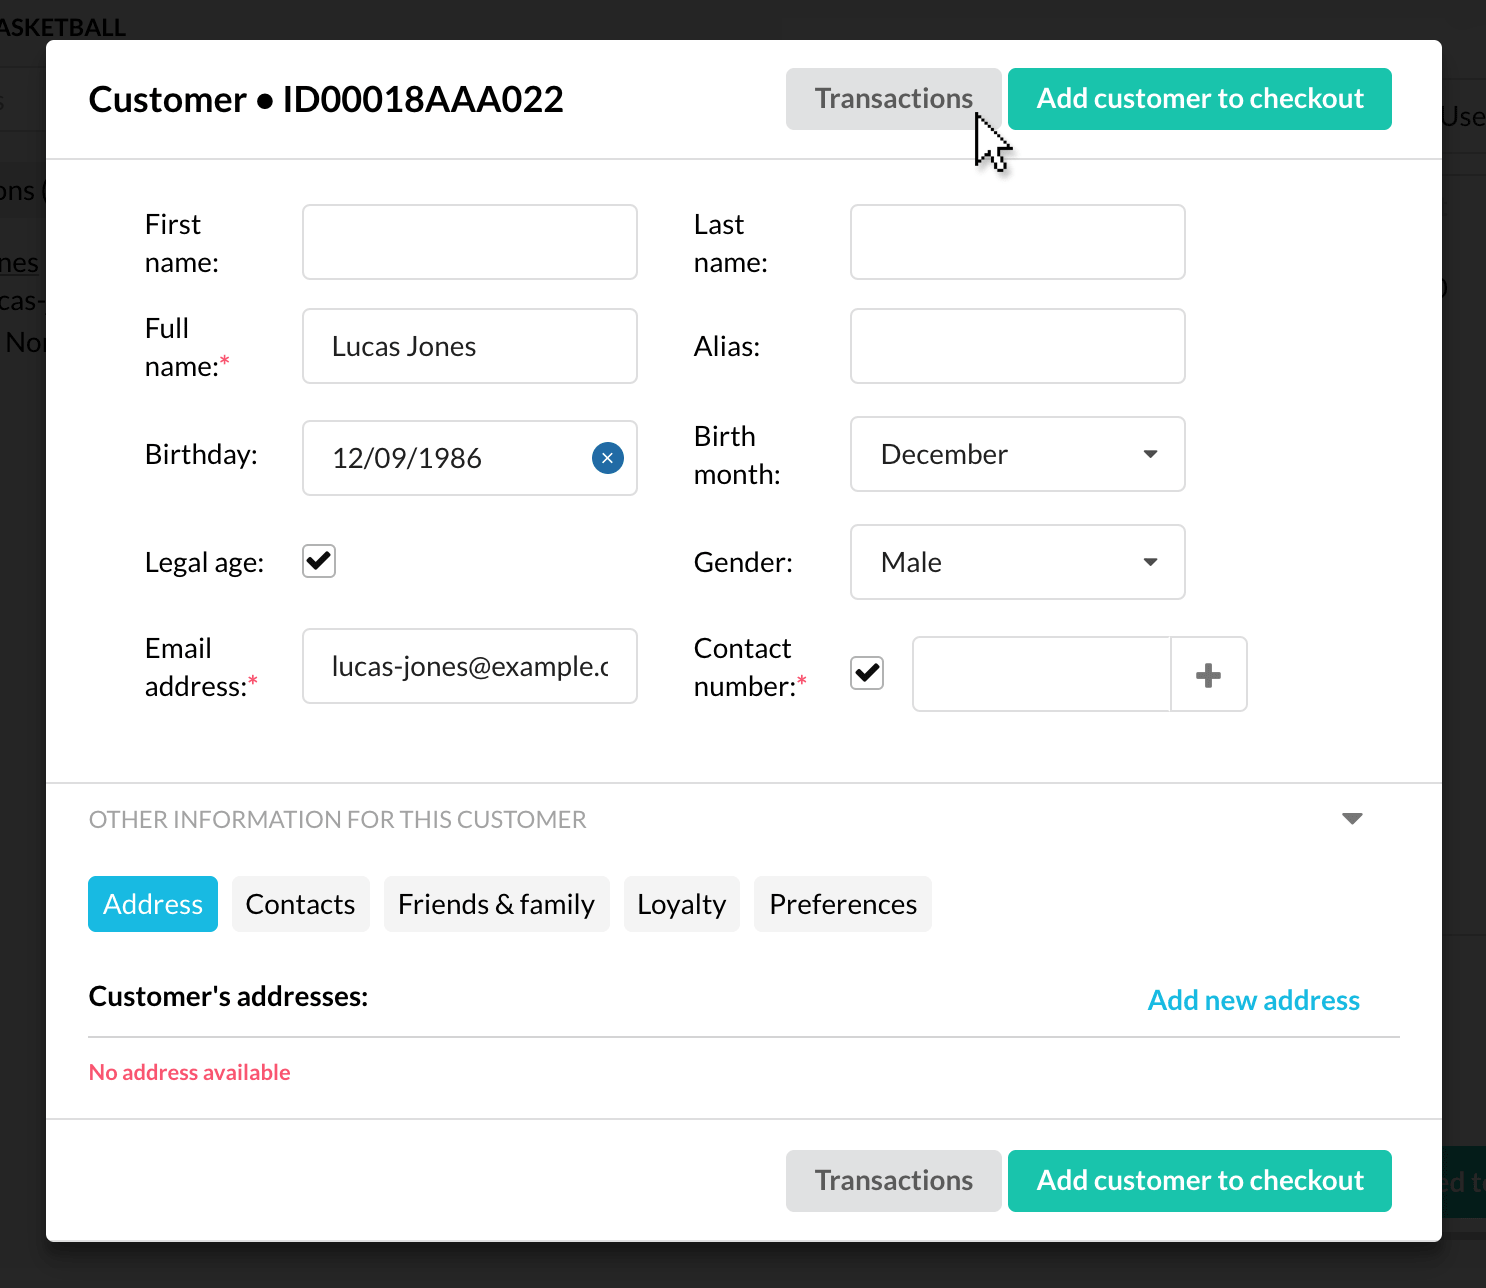
You will then see the customer's information displayed on a popup.
- Click on the text fields that you want to edit or update.
- Click on Save changes to save any updates.
Customer price levels
The item prices displayed on the workspace are default retail pricing for the location. When you add a customer (with their own price level) to the cart, you will see the prices immediately change and reflect the price level of that customer.
Prices will be based on what you set in the admin. Stores usually use this to give discounts to loyal customers and regulars.
Creating a new customer with price level:
- On the KRISP POS, create a new customer by clicking the New customer link on the cart.
- Click on the Loyalty tab.
- Choose a price level from the dropdown.
Changing an existing customer's assigned price level:
You can change this in the admin depending on your permissions:
- Go the menu.
- Go to Relationships > Customer.
- Click the edit icon
 on the right.
 -
You can scroll down or you can click on Loyalty on the left sidebar.
-
Select the preferred price level from the dropdown.
Accessing the price level settings:
If you don't see the desired price level from the dropdown on the KRISP POS, it means it has not been created yet. You can create a new price level or edit an existing one, but make sure you have the right permissions to do so:
- Go the the menu.
- Click Setup > Lists > Price Levels.
- You will see a list of all the price levels here. You can edit available price levels by clicking the edit icon, or you can click Add to create a new one.
This will now be available from the price level dropdown in the KRISP POS and admin.
Customer dashboard
In KRISP POS, the cashiers are able to see detailed information of a customer. It covers the customer’s information, past sale transactions, and different certificates issued by the store.
To view customer details:
- Search for the customer using the search bar.
- On the search results, make sure that the Customers tab is selected.
- Click the open pop up icon beside their name.
You will see a popup with the customer’s information. It includes basic customer information, addresses, contacts, friends and family, loyalty, and preference details of the customer. Here, some customer details can be added and updated.
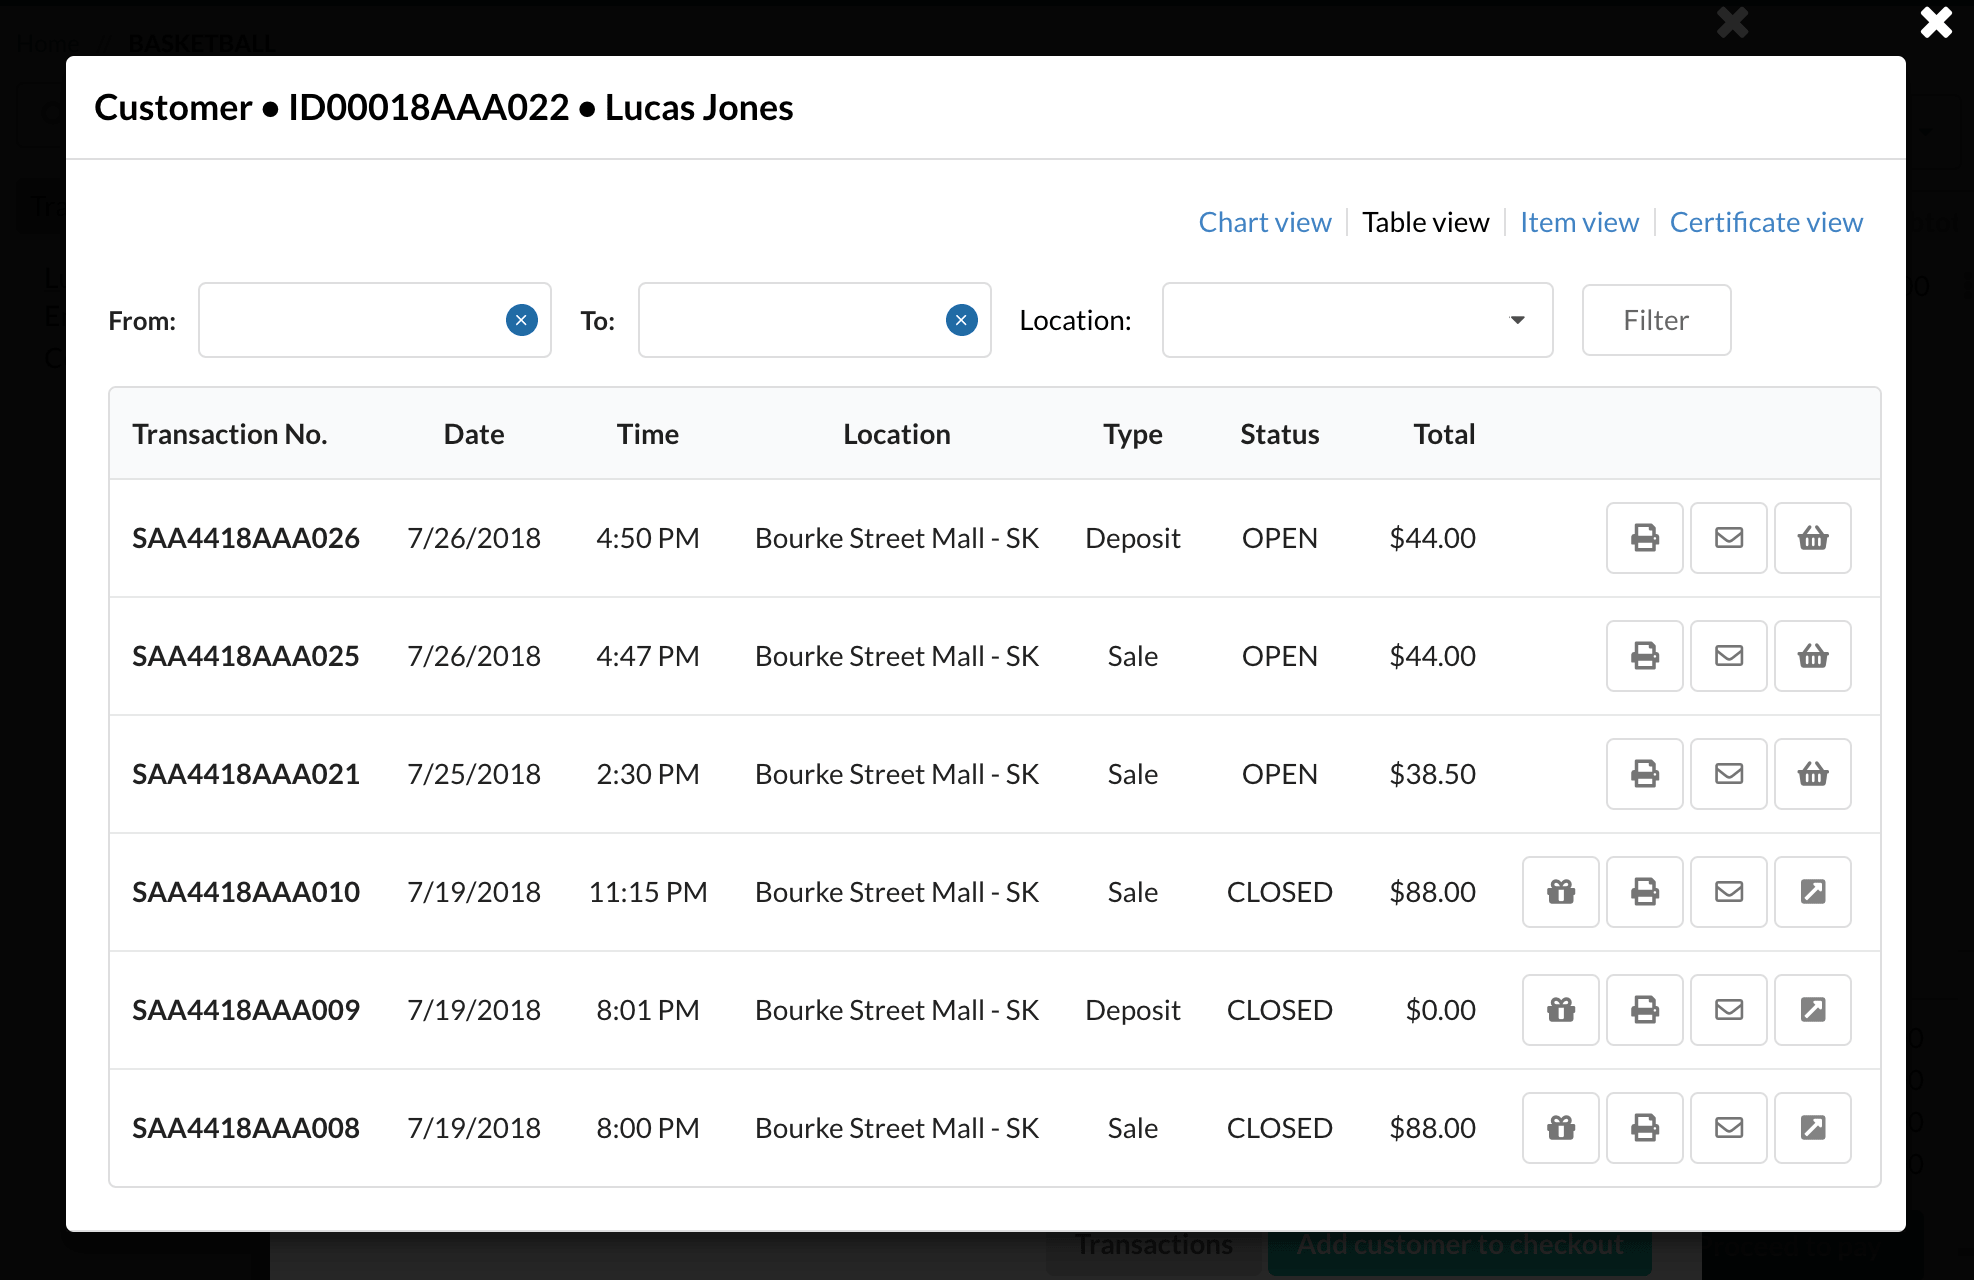
Customer’s past transactions:
To see the past transactions of a customer:
-
From the customer details popup, click the Transactions button.
The customer’s details are presented with four (4) tabs.
-
Chart view: Use the date filters available to filter the data shown. You will see:
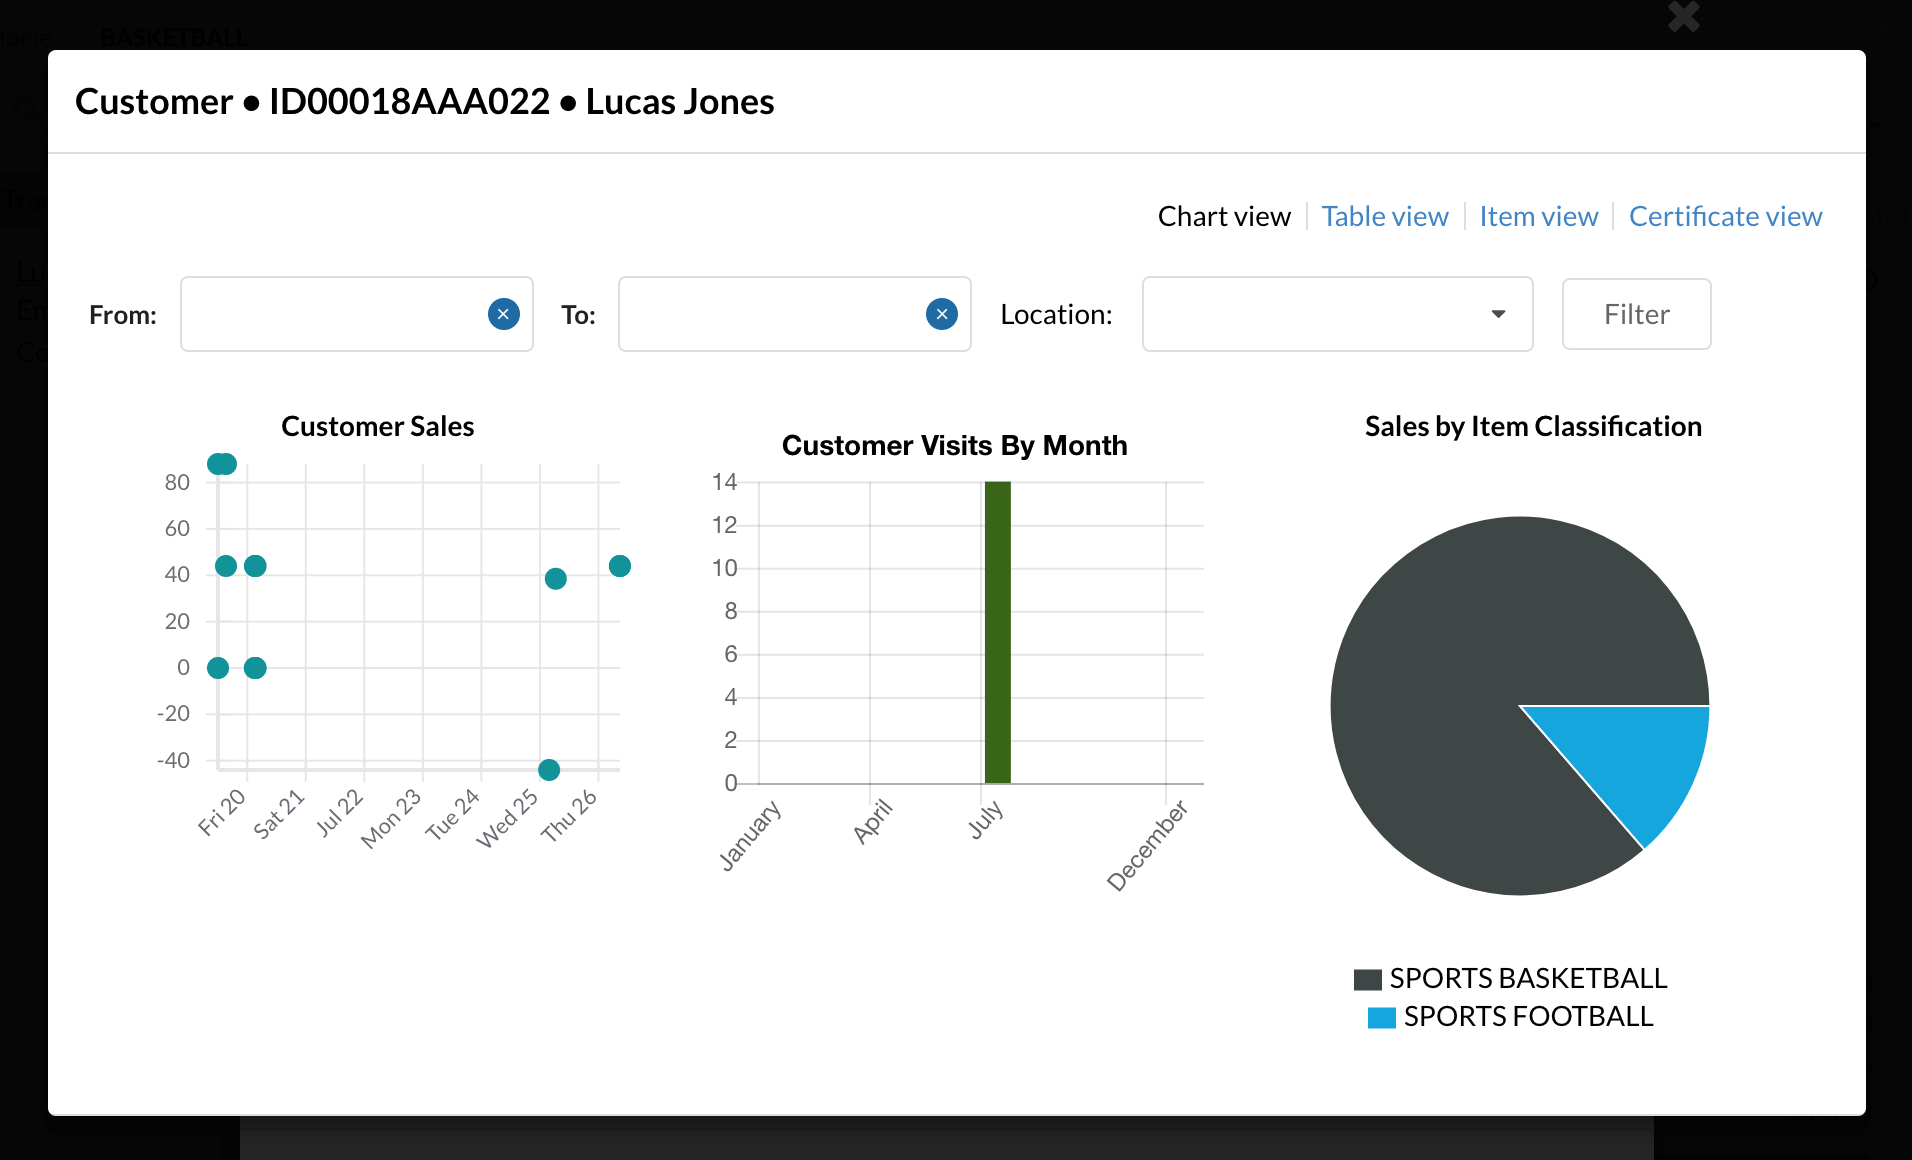
- Customer sales: Shows all the sale transactions recorded against the customer. Each dot represents a transaction. You can click on each dot to bring you to a separate view of the transaction.
- Customer visits by month: Shows the number of transactions recorded against the customer, broken down into months.
- Sales by item classification: Shows the breakdown of items bought by their classifications.
-
Table view: Contains sale transactions of the customer. From here, the cashier can print and email a receipt. Additionally, there are different actions available for a transaction. E.g. print receipt, email receipt, add to cart, etc.
-
Item view: Identifies and groups past items that have been purchased. Additionally, it presents the current retail price, ‘customer’ price, and ‘on-hand’ quantity. The cashier can view the item details, or add the item into the cart.

-
Certificate view: Displays issued gift certificates and credit notes together with the available amount. The cashier can reprint the certificate from here if needed.

On account customer administration
On account denotes the sale of goods or services on credit. You can also record the person picking up the goods on the POS by choosing Add on account reference.

- A customer can ONLY be tagged as an on account customer in the admin, i.e. a customer being added or updated at the POS cannot be tagged as an on account customer.
- Multiple contacts can be added to one customer.
- All contacts for an individual are set to on account reference.
- Only one on account reference can be added in the transaction.
Enabling on account customers:
To setup an on account customer:
- Go to menu.
- Go to Relationships > Customers.
- Find a customer you’d like to edit. Click on the edit icon .
-
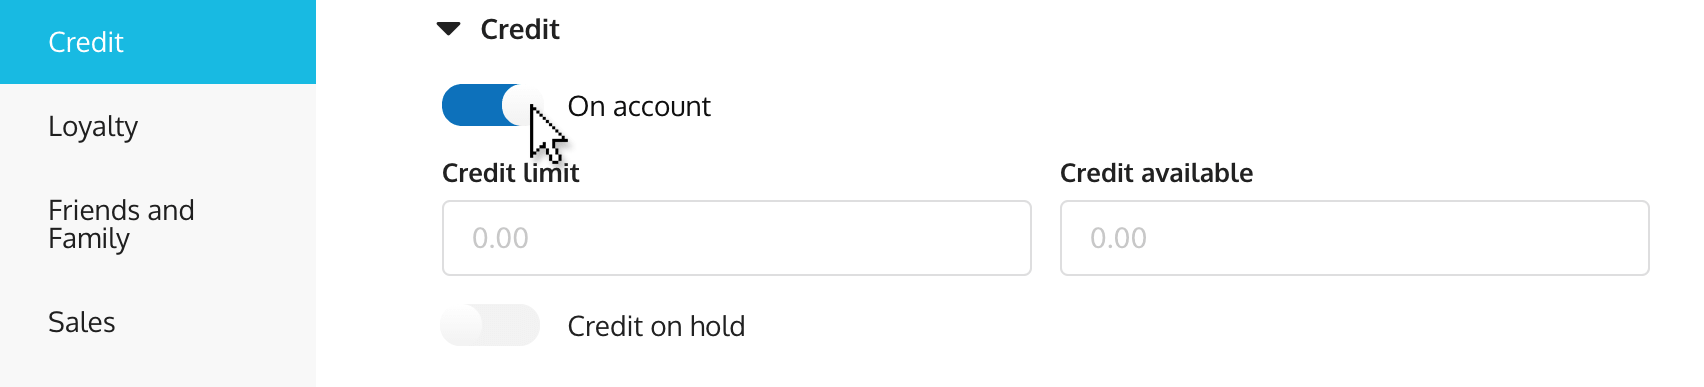
Go to Credit on the left sidebar.
-
Turn on the on account toggle.
- Set the credit limit using the textfield.
- Click Save.
Setting up an on account reference:
- Go to menu.
- Go to Relationships > Customers.
- Find an on account customer you’d like to edit. Click on the edit icon .
- Go to Contact on the left sidebar.
- Click the Add contact button.
- For companies, check the on account checkbox.
- Click Save.