Data and analytics
Admin dashboard
The landing page of KRISP admin is a dashboard. The dashboard is a collection of widgets that give you an overview of key retail operational reports and metrics.

The top section of the KRISP dashboard, referred to as the spotlights, displays total sales, total profit, top performing store, and average customer spend.
Below the spotlights, there are also six widgets pertaining to different reports:
- Top 5 location by sales
- Top 5 items by profitability
- Total sales per location
- Top 5 items by sales volume
- Average customer spend per location
- Top promotions
The six widgets can be presented in tabular, bar chart, line chart, or pie chart. The available display options is determined by the data being presented.
To see the details in a widget, just hover the cursor over it. You can also view the detailed report by clicking View detailed list link.
You can use the search icon on the widgets to narrow down the data displayed. This can be applied on a single widget (including spotlights), or on the entire dashboard.
Global search
The global search enables you to do a quick search. This is available in both the POS and the admin.
POS search:
The search bar in POS covers customers, items, and transactions. Entering three characters will trigger suggested results to appear.
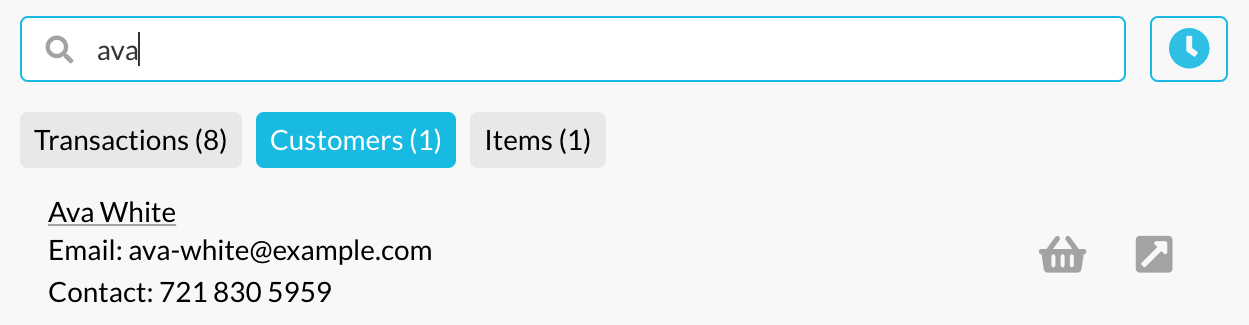
Admin search:
Global admin search enables a search within the admin.

Selecting the result will redirect the user to the results data in view mode. Currently, you can search for:
- Customers: First name, last name, customer ID.
- Supplier: Company name, reference ID.
- Employee: Employee ID, first name, last name.
- Contacts: Contact ID, first name, last name.
- Items: Name.
- Price books: Price book name, price book reference.
- Inventory transfer, adjustment, and count: Reference ID.
- Purchase order, receipt, and return: Reference ID.
- Sale transaction and payment record: Reference ID.
- Promotion: Reference ID, promotion name.
- Task: Reference ID, name.
- Reports: Report ID, name.
- CSV export: Reference ID, name.
- Subsidiary: Name.
- Location: Location name.
- Payment types and currency: Name.
- Devices: Device ID, name.
- Classes and region: Name.
- Hotkey groups: Name.
- Hotkey template: Reference ID, name.
- Matrix definitions: Name.
- Print template: Reference ID, name.
- Loyalties (membership): Membership program.
CSV imports
CSV imports are used to add or update data. You will need to provide a CSV import file with the correct format. To do this:
- Go to menu.
- Go to Integration > Import > Import CSV records.
-
Click on the Add button. You will be redirected to a form you need to fill out:

- Import name: Provide a name for this import.
- Data handling: Choose add or add/update.
- Description: Enter in a description for this import.
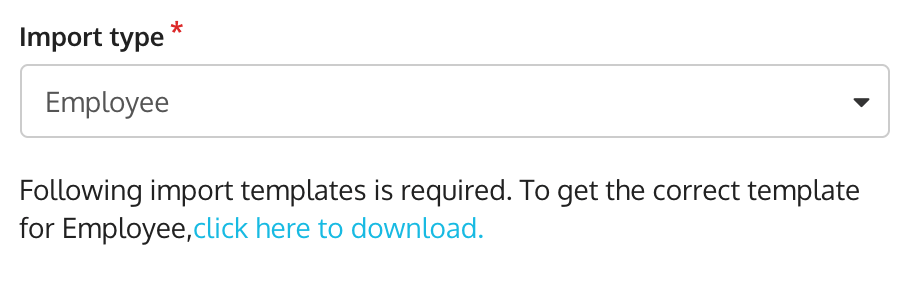
- Import type: Choose from the list of record types.
KRISP Systems provides CSV file formats for each import type. Supplied templates come with sample data. Click the provided link to download the template.
- CSV column delimiter: Choose the column delimiters that you have on your import file.
-
Click on the Upload button and choose your CSV file.
- Click the Save button to process the import at a later stage, or click on Save and start import button to instantly run the import.
Job status:
To view the results or status of your import:
- Go to menu.
- Go to Integration > Import > Job Status.
- You can download the import file from the list of imports performed.
CSV exports
CSV exports are used to extract data from the system in the form of csv. Filters are also available depending to the record.
- Go to menu.
- Go to Integration > Export.
- Click on the Add button.
-
You will be redirected to page that you have to fill out:

- Name: Provide a name for this export.
- Record type: Choose a record type.
- Filters: Set a filter for the record type.
- Predefined tags: Select a column you want to add in the template. You can add multiple column.
- Template: Contains the column within your selected record type.
-
Click the Save button to process the export at a later stage, or click on Save and export button to instantly run the export.
Reports
KRISP reporting provides a very detailed retail data analytics of your business.
To generate reports:
- Go to menu.
- Go to Reports > Reports.
- From the list, select the report you need.
- After selecting a report, just use the filters to change the data that is shown below.
- Click on the Run report button to view the data.
- Click Export CSV if you need to export the report.
KRISP reports include the following:
- Best performing location by total sales: Illustrates best performing locations by total sales (tax inclusive).
- Cashier sales performance: Shows cashiers and sales reps performance.
- Current on hand inventory by item: Illustrates current on hand inventory grouped by item.
- Current on hand inventory by location: Illustrates current on hand inventory grouped by location.
- Customer returns: Shows all items returned by customers.
- Customer sales: Illustrates sales grouped by customers.
- Earnings report summary: Illustrates best performing locations by total sales (tax exclusive).
- Item profitability: Illustrates items sold and their profitability.
- Loss prevention: Tracks register voided items, voided transactions, and item quantity reductions.
- Markdown report (tax exclusive): Illustrates markdown items.
- Promotion performance: Shows the performance of promotions.
- Register summary: Displays all registers, their location, and status.
- Reorder list grouped by item: A consolidated list of items which are at or below their reorder point.
- Reorder list grouped by location: A consolidated list of items which are at or below their reorder point grouped by location.
- Sale payments by location (tax inclusive): Illustrates payments and returns performed at the register grouped by location.
- Sale payments by type (tax inclusive): Illustrates payments made by payment type.
- Sale report summary: Report on sales grouped by subsidiary
- Sales report: Detailed sales reports.
- Sales tax summary (tax exclusive): Illustrates taxes calculated on sale transactions.
- Sales tax summary (tax inclusive): Illustrates taxes calculated on sale transactions.
- Sell through: Illustrates sales for an item as a percentage of items available at the beginning of the selected period, often month (BOM).
- Till cash sale movements: Report on all cash sales related to a till.
- Till non-sale movements: Itemizes cash added or removed from the till outside of sales transactions.
- Till summary: Reports all sale and non-sale movements.
- Trending items: Illustrates best performing items.
Store summary
The store summary report provides a comprehensive overview of a store's activities for a defined date range. To go here:
- Go to menu.
- Go to Reports > Store summary.
This report includes the following sub reports:
- Sale transaction summary: Contains sale count, total sales (ex tax and inc tax).
- Item summary: Contains item count per type, total subtotal, and total final total of all items per type.
- Payment summary: Contains payment type, total payments and total change per payment type.
- Register summary: Contains all movements in the till.
- Sales representative: Contains the name of all sales representative, total subtotal, and total final total per sales representative.
You can use the filters to change your criteria. The report can also be exported by clicking the Export CSV button.
Available store summary report filters enable varied summary reporting including:
- Summarising one (1) or many stores.
- Summarising by date and time ranges.
- Summarising by cashiers and/or register.
Sale transaction
To view past sale transactions:
- Go to menu.
- Go to Sale > Transactions.
- You will see a list of all the sale transactions. Using the available filters, locate the sale transaction you’re looking for.
On the sale transaction details page, you will see different options on the left sidebar:
- General: Shows who bought the item, when the transaction happened, where the location is, how much is the subtotal is, etc.
- Items: Displays the items bought, quantity, and prices.
- Payments: Shows the transaction date, type, amount, and change. This record is connected to the payment of the sale transaction. To view the detailed payment, just click the record.
- Type history: Contains the date and transaction type of the sale transaction.
Sale payment
To view past payment records:
- Go to menu.
- Go to Sale > Payments.
- You will see a list of all the payments. Using the available filters, locate the payment you’re looking for.
On the payment details page, you will see different options on the left sidebar:
- General: Shows who bought the item, when the transaction happened, the location, the subtotal, etc.
- Sale transactions: Displays the information about the payment like currency, amount due, payment, exchange rate, and applied exchange rate amount.