Admin settings and management
Logging in and out of the admin
Admin (back office) functionality is accessed using a username and password. The username will be defined as your email address.
Accessing the admin:
Access to admin functionality is achieved by the following:
- Directly access using your admin URL. It should look something like samplecompany.krispsystems.net/admin.
- On the KRISP POS screen, use the menu to go to an admin page or functionality.
Employee access together with roles and permissions determine your administration access.
Logging out of admin
Click on the logout button to exit admin.
Viewing and filtering data in the admin
Most of the pages in admin will have a filter on the top of the page, so you can filter available data.
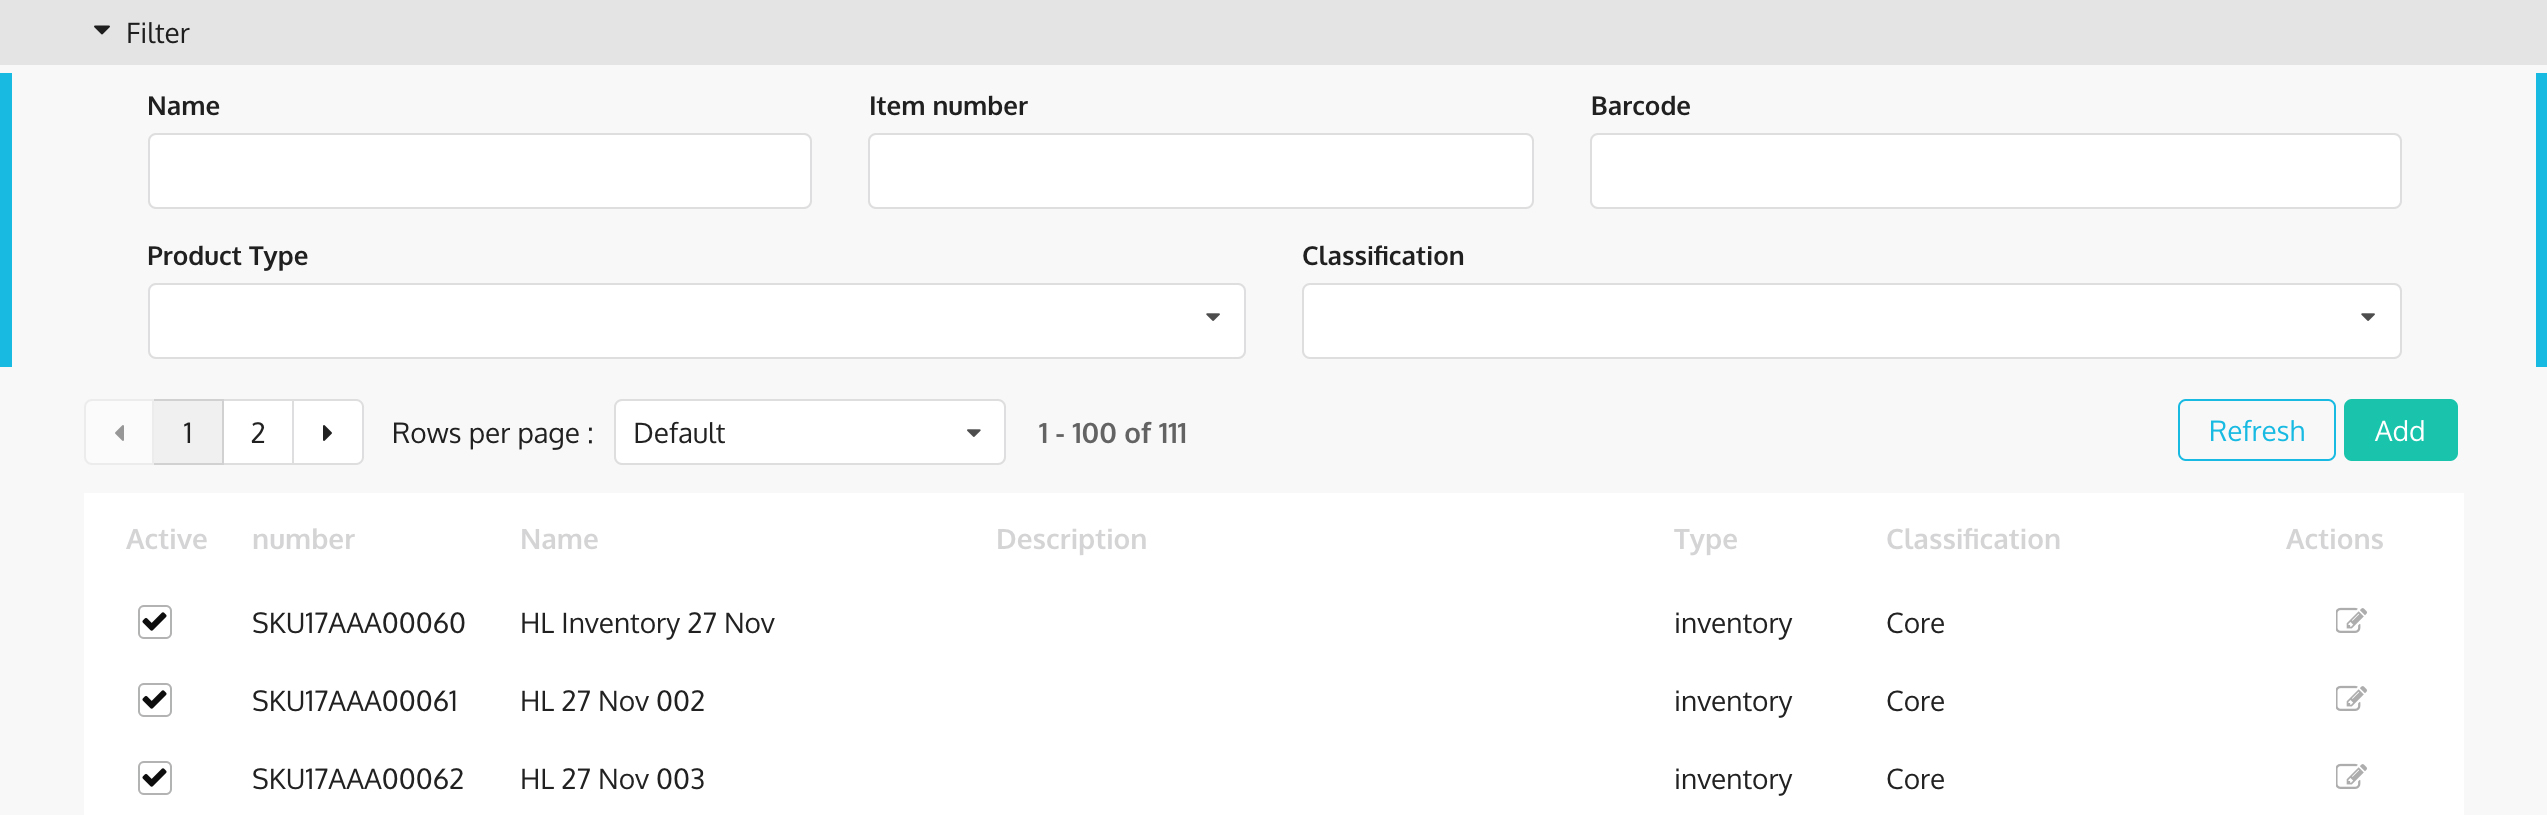
Filtering tables and data:
- Click the collapsed filter area to expand the area.
-
This will expose the filter fields, which you can use to filter the page. The fields will vary depending on the page you're on.
For example, on the Employees page, you can enter in the name, email address, contact number, reference ID , primary location, and price level.
-
The data on the page will automatically refresh every time you change something in the filter area.
Managing subsidiaries
To view or edit existing subsidiaries:
- Go to the menu.
- Go to Setup > Company > Subsidiaries.
- Using the filter options, identify the subsidiary which you want to view or edit.
- Click the edit icon
 on the right. The currency on an existing subsidiary will not be editable.
 - Click the Save button when you're done updating the details.

If you need to create a new one, go to Creating a new subsidiary.
Managing locations
To view and edit existing locations:
- Go to the menu.
- Go to Setup > Company > Locations.
- Using search filters, identify the location which you want to view or edit.
- Click the edit icon on the right. The currency on an existing subsidiary will not be editable.
- Click the Save button when you're done updating the details.
If you need to create a new one, go to Creating a new location.
Managing relationship types
Managing relationship types:
- Go to menu.
- Go to Setup > Lists > Relationship types.
- Find the relationship type you want to edit. Use the filters if needed.
- Click the edit icon on the right side.
- Click the Save button when you're done updating the details.
Managing employees
To view or edit existing employees:
- Go to the menu.
- Go to Relationships > Employee.
-
You will see a list of all the employees created. Using the available filters, you can search for the employee you're looking for. If you need to update or edit an employee's details, you can click on the edit icon
on the right.
- Employee's entity types: If the employee is to become another entity type, you must update the Entity type textfield in order for them to be retrieved from other non-employee entity-related management functions in the admin. Note that employees transacting in KRISP POS will automatically be tagged as a customer.
- Password reset: Click on the Reset password button to prompt a system email to be sent to this employee's email address. This email contains simple steps to set their new password. Alternatively, if the employee forgets their password, there is a link from the login page which allows them to reset the password.
-
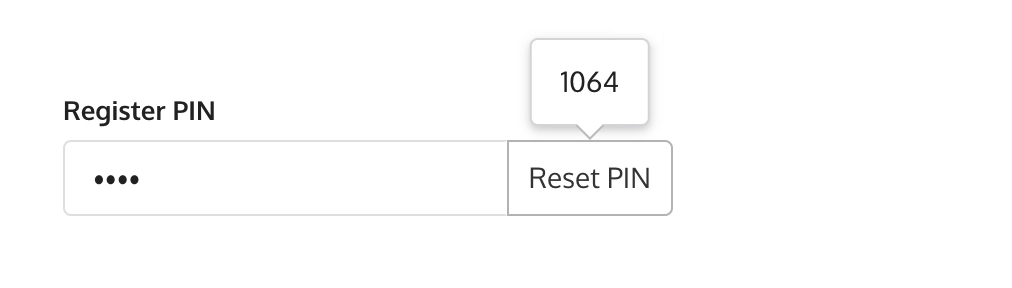
Register PIN: The PIN would be available only after the employee record is saved. Hover on the Reset PIN button to view the PIN number for this employee. As an administrator, you will need to provide this PIN number to the employee. To reset the PIN, just click on the Reset PIN button, then hover over it again to view.
-
Click the Save button after you're done updating the employee details.
If you need to create a new one, go to Creating a new employee.
Deactivating employees
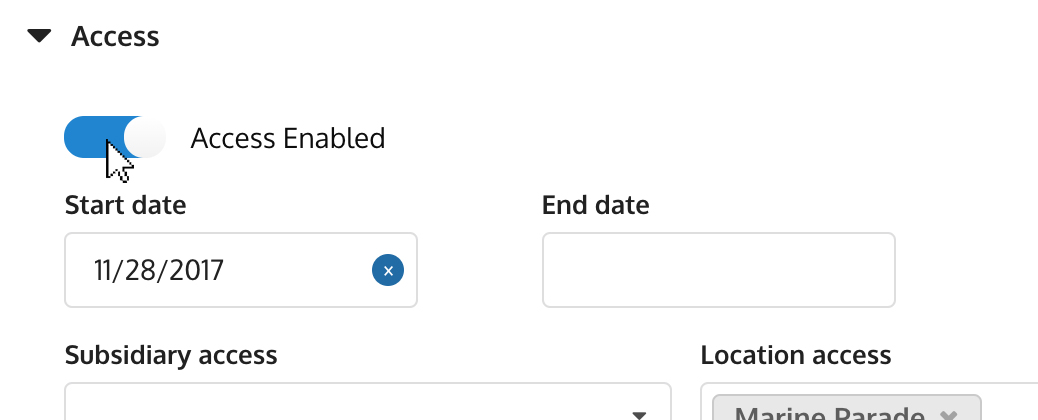
As employees leave your organisation, it is crucial that their access is immediately removed by the administrator. An employee will only have access to the application:
- If their Access enabled toggle is on.
- If their usage date is within the start and end access dates.
Deactivating and removing access:
- Go to the menu.
- Go to Relationships > Employee.
- Click Access on the left sidebar.
-
Turn off the Access enabled toggle.
-
Enter in employee's end date. If an employee is temporary, you can also set the end date beforehand.
- Click on the Save button.
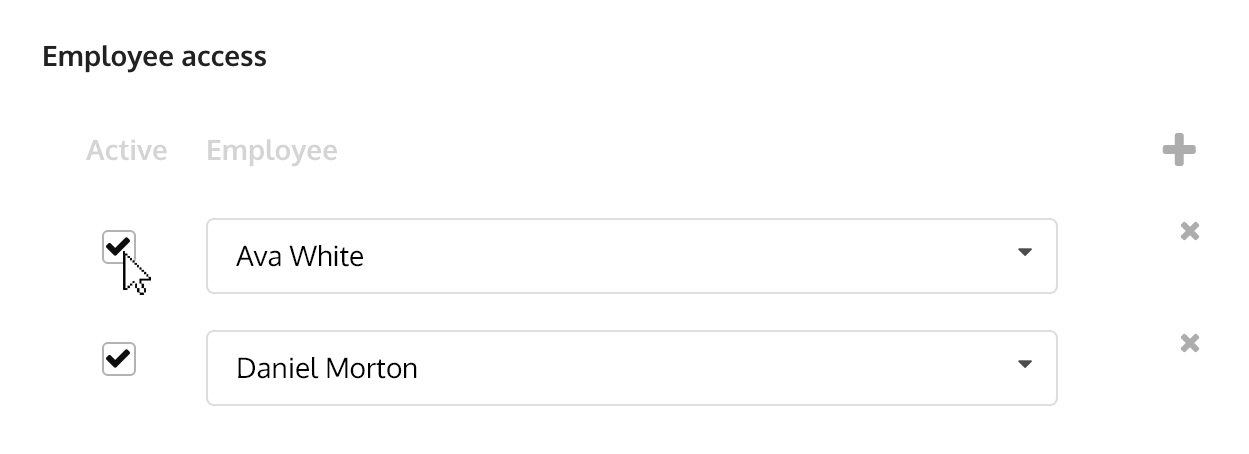
Cleaning up an ex-employee's device access:
- Go to the menu.
- Go to Setup > Device > Devices.
- Find the cash register the ex-employee has access to. Click the edit icon on the right.
- Scroll down to the bottom of the page to the Employee access.
-
Uncheck the Active checkbox, or press X to completely remove access.
-
Press Save button to update the changes.
Managing customers
To view and edit exsiting customers:
- Go to the menu.
- Go to Relationships > Customers.
- Look for the customer you want to edit. Use the filters if needed.
- Click the edit icon on the right.
- Click the Save button when you're done updating the details.
If you need to create a new one, go to Creating customers from the admin.
Managing contacts
To view and edit existing contacts:
- Go to the menu.
- Go to Relationships > Contacts.
- Look for the contact you want to edit. Use the filters if needed.
- Click the edit icon on the right side.
- Click the Save button when you're done updating the details.
If you need to create a new one, go to Creating contacts.
Managing currency and denominations
Currency defines a legal tender. Currencies are defined by their name, code, and symbol. Additionally, currency denominations can be defined. Denominations are primarily used for till management. The application comes pre-loaded with currency definitions. But you can still add or edit existing entries.
To edit existing denominations:
- Go to the menu.
- Go to Setup > Finance > Currencies.
- Find your currency. Note that currencies come predefined in the systems.
- Click the edit icon on the right.
- Under the Denominations section, click the Add denomination button.
-
Provide both the name and the denomination in their respective fields.

-
Repeat this step for all denominations.
- Click the Save button when you're done.
If you need to create a new one, go to Setting up a new currency or denomination.
Managing countries
The application comes pre-loaded with country definitions. But you can still add or edit existing entries.
To edit existing countries:
- Go to the menu.
- Go to Setup > Address > Country.
- You can use the filter to find the country you're looking for.
- Click the edit icon on the right.
- Edit the necessary fields.
- Click Save button once you're done.
If you need to create a new one, go to Setting up a new country.
Managing class groups
To view and edit existing classification groups:
- Go to the menu.
- Go to Setup > Classifications > Groups.
- Look for the classification group you want to edit. Use the filters if needed.
- Click the edit icon on the right side.
- Click the Save button when you're done updating the details.
Managing classes
To view and edit existing classes:
- Go to the menu.
- Go to Setup > Classifications > Classes.
- Look for the class you want to edit. Use the filters if needed.
- Click the edit icon on the right side.
- Click the Save button when you're done updating the details.
If you need to create a new one, go to Creating classifications.
Managing seasons
To manage seasons:
- Go to menu.
- Go to Setup > Classifications > Seasons.
- Choose the season you want to edit. Use the filters if needed.
- Click the edit icon on the right side.
- Click the Save button when you're done updating the details.
Managing facets
To view and edit existing facets:
- Go to the menu.
- Go to Setup > Classifications > Facets.
- Look for the facet you want to edit. Use the filters if needed.
- Click the edit icon on the right side.
- Click the Save button when you're done updating the details.
If you need to create a new one, go to Creating product facets.
Managing brands
To view and edit existing brands:
- Go to the menu.
- Go to Setup > Classifications > Brands.
- Look for the brand you want to edit. Use the filters if needed.
- Click the edit icon on the right side.
- Click the Save button when you're done updating the details.
If you need to create a new one, go to Creating product brands.
Managing regions
To view and edit existing regions:
- Go to the menu.
- Go to Setup > Classifications > Regions.
- Look for the region you want to edit. Use the filters if needed.
- Click the edit icon on the right side.
- Click the Save button when you're done updating the details.
If you need to create a new one, go to Creating location regions.
Managing address types
The app comes with predefined address types. But to view or edit address types:
- Go to the menu.
- Go to Setup > Address > Address types.
- Look for the address type you want to edit. Use the filters if needed.
- Click the edit icon on the right.
- Click the Save button when you're done updating the details.
If you need to create a new one, go to Creating address types.
Managing taxes
- Go to menu.
- Go to Setup > Finance > Tax types.
- Select the tax code, tax group, or tax rate you want to edit.
- If editing, updating the required values.
- Click Save.
If you need to setup taxes, go to Setting up taxes.
Managing suppliers
To view and edit suppliers:
- Go to the menu.
- Go to Relationships > Supplier.
- Using search filters, identify the supplier which you want to view or edit.
- Click the edit icon on the right.
- Update the necessary fields. Note that if a supplier's entity type needs to change, you need to update the Entity type textfield, so they can be retrieved from other non-employee and entity-related management functions in the admin.
- Click the Save button when you're done updating the details.
If you need to create a new one, go to Creating new suppliers.
Managing hotkey groups
To view and edit existing hotkey groups:
- Go to the menu.
- Go to Setup > Classification > Hotkeys.
- You will see the list of existing hotkey groups. Select the hotkey group you want to view or edit.
- Click the edit icon if you want to update the details.
- Click Save button if you made changes.
If you need to create a new one, go to Creating hotkey groups.
Managing matrix and its components
To view and edit matrix:
- Go to the menu.
- Go to Setup > Matrix > Definitions. You can click Names or Values if that's what you need to edit.
-
Find the item you want to edit. Click the edit icon
on the right. -
Update necessary fields.
- Click the Save button when you're done.
If you need to setup a new one, go to Defining a matrix and creating components.
Managing price books
- Go to the menu.
- Go to Products > Price books.
- Select the price book you want to edit.
- If in edit mode, alter values required.
If you need to create a new one, go to Creating price books.
Managing products
To view or edit existing products:
- Go to the menu.
- Go to Product > Items.
- Look for the item you want to edit. Use the filters if needed.
- Click the edit icon on the right side. You will see that location and sub location cannot be edited and will be view-only.
- Click the Save button when you're done updating the details.
If you need to create a new one, go to Creating new products.
Managing bundles
To view and edit existing bundles:
- Go to the menu.
- Go to Product > Items.
- Look for the bundle you want to edit. Use the filters if needed.
- Click the edit icon on the right.
- Click the Save button when you're done updating the details.
If you need to create a new one, go to Creating product bundles.
Managing cash rounding rules
- Go to the menu.
- Go to Setup > Finance > Cash rounding.
- Find the item you want to edit.
- Click the edit icon on the right.
- In edit mode, alter values required.
- Click Save.
If you need to create a new one, go to Setting up cash rounding rules.
Managing promotions
To view and edit existing promotions:
- Go to the menu.
- Go to Concessions > Promotions.
- Look for the promotion you want to edit. Use the filters if needed.
- Click the edit icon on the right side.
- Click the Save button when you're done updating the details.
If you need to create a new one, go to Creating promotions.
Managing credit types
To manage credit types:
- Go to menu.
- Go to Setup > Lists > Credit types.
- Choose a credit type you want to edit. Use the filters if needed.
- Click the edit icon on the right side.
- Click the Save button when you're done updating the details.
Managing KRISP POS devices
To view or edit KRISP POS devices:
- Go to the menu.
- Go to Setup > Device > Device types.
- Look for the device type you want to edit. Use the filters if needed.
- Click the edit icon on the right.
-
If you're editing a register, an option to reset the device will be available. Resetting the device removes the unique 'register device' to 'physical register' relationship, freeing up the register device (and physical register) to be used elsewhere.
Select the Reset option to clear the relationship.
-
Click the Save button when you're done updating the details.
If you need to create a new one, go to Setting up KRISP POS devices.
Managing device types
To manage device types:
- Go to menu.
- Go to Setup > Device > Device types.
- Choose a device type you want to edit. Use the filters if needed.
- Click the edit icon on the right side.
- Click the Save button when you're done updating the details.
Managing task types
To view or edit task types:
- Go to the menu.
- Go to Setup > Lists > Task types.
- Look for the task type you want to edit. Use the filters if needed.
- Click the edit icon on the right.
- Click the Save button when you're done updating the details.
If you need to create a new one, go to Creating task types.
Managing tasks in the admin
To view and edit exsiting tasks:
- Go to the menu.
- Go to Tasks.
- Look for the task you want to edit. Use the filters if needed.
- Click the edit icon on the right.
- Click the Save button when you're done updating the details.
If you need to create a new one, go to Creating tasks.
Preferences management
KRISP preferences are predefined parameters that allow the configuration of the application, as well as look and feel, e.g. cash drawer (till) float, administration inactivity timeout, or tax inclusive / exclusive settings.
Preferences are hierarchical and can be defined at the location, subsidiary, and account levels. Additionally, the predefined system defaults may be available as a base setting. When a setting is not defined, the system will seek a value for the setting by inheritance within the hierarchy.
In summary:
- System default is the top level. When no other setting has been defined, the application will look to apply this setting.
- Account is at the top user level setting, and when a preference is set at this level, by default, the subsidiary and location will inherit these preferences.
- Subsidiary is the middle level, and will inherit the account level setup. You have the option to override what has been set at account level.
- Location is the lowest level, and will inherit the subsidiary level setup. You have the option to override what has been set at subsidiary level.
User preferences listing:
The preference listing illustrated are user defined listings, i.e. it lists all location, subsidiary, or account listings set during user configuration of the account.

Editing user preferences:
- Go to the menu.
- Go to Setup > Company > Preferences.
-
On the preferences page, find the user preference you want to change, and then click Edit.
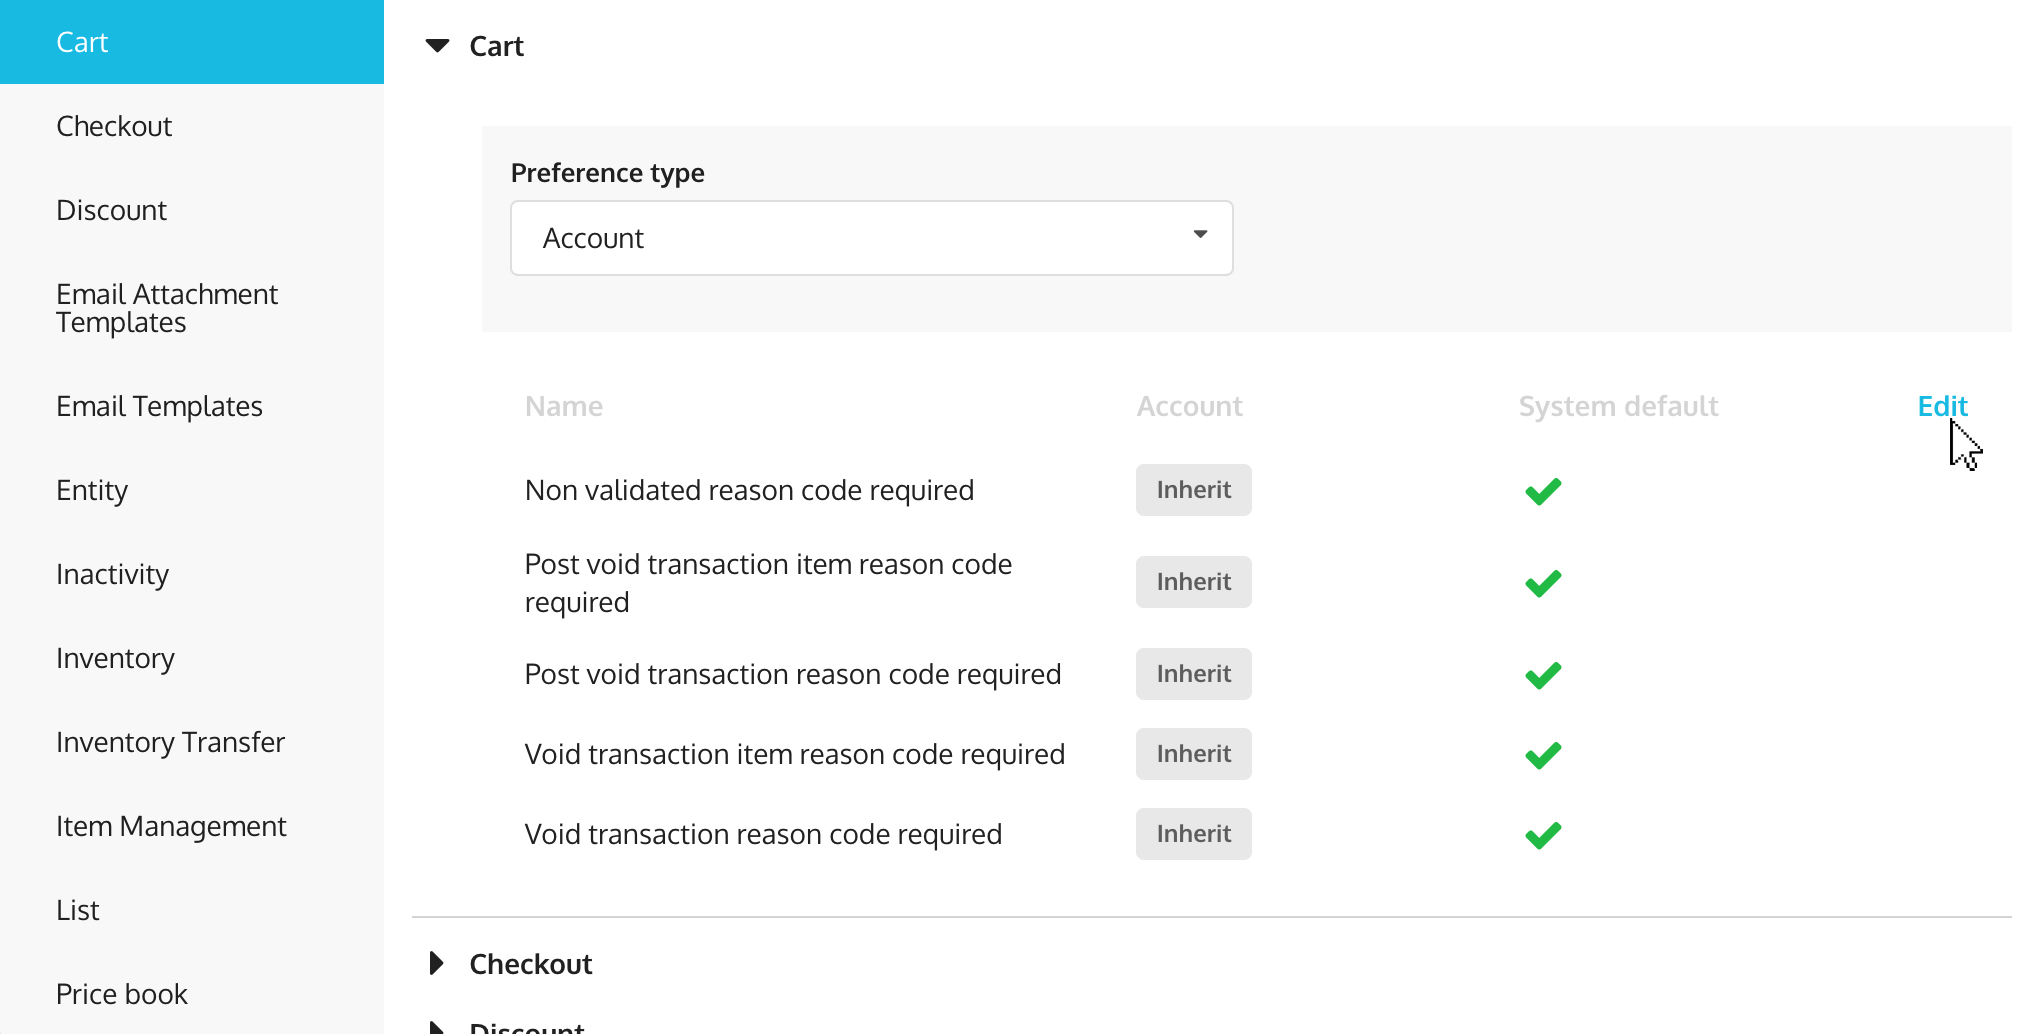
-
You will see each of the preferences listed, with their default values.
-
From the Preference type dropdown, choose either account, subsidiary, or location.
-
If subsidiary is chosen, select a specific subsidiary.
 - If location is chosen, select a specific location.
-
-
Edit the value on each preference line as needed.
- Click the Save button.
List of preferences:
- Cart:
- Non-validated reason code required
- Requiring post-void transaction item reason code
- Post-void transaction reason code required
- Void transaction item reason code required
- Void transaction reason code required
- Checkout
- Defaults on-account transactions to zero
- Discount
- Discount reason code required
- Email attachment templates
- Email attachment template (deposit)
- Email attachment template (layby)
- Email attachment template (on account)
- Email attachment template (pre-order)
- Email attachment template (quote)
- Email attachment template (reserved)
- Email attachment template (sale)
- Email templates
- Email body template (deposit)
- Email body template (layby)
- Email body template (on account)
- Email body template (pre-order)
- Email body template (quote)
- Email body template (reserved)
- Email body template (sale)
- Entity
- Default price level
- Legal age
- Inactivity
- Inactivity idle threshold (seconds)
- Inactivity logout trigger (seconds)
- KRISP POS inactivity idle threshold (seconds)
- KRISP POS inactivity logout trigger (seconds)
- Inventory
- Include back order
- Inventory transfer
- Auto receipt
- Auto receipt hours
- Use status pack
- Use status pick
- Use status ship
- Item management
- Default new item location from default
- Restrict pricebook to currency
- List
- Number of audit log rows in list
- Number of rows in list
- Price book
- Allow current price book update
- Print templates
- Print template (deposit)
- Print template (layby)
- Print template (on account)
- Print template (pre-order)
- Print template (quote)
- Print template (reserved)
- Print template (sale)
- Promotion
- Allow promo coupon stacking
- Allow promo discount stacking
- Allow stacking with transaction promotions
- Apply best promotion
- Receipt printing
- Integrated payment gateway printing
- Print payment gateway merchant receipt
- Register
- Allow $0 sale
- Allow cross subsidiary administration
- Allow editing of deposit
- Allow editing of layby
- Allow fulfillment of unpaid deposit
- Allow fulfillment of unpaid layby
- Allow pickup from alternate subsidiary
- Allow sale done with balance
- Apply the quantity break based on the item's quantity in cart
- Barcode minimum character threshold
- Barcode time threshold (milliseconds)
- Display matrix child items
- Display matrix parent items
- Item drilldown - only show locations with inventory
- KRISP POS hotkey template
- Return - tax line round
- Return - use actual sales price
- Reports
- Customer drilldown transaction history days (today - days)
- System settings
- Default barcode average time per character
- Default barcode minimum barcode length
- Default barcode time before scan test
- KRISP POS internet availability threshold
- KRISP POS internet check delay
- Task management
- Alert on create and change of assignee
- Allow display on the register
- Send alert via email
- Send alert via sms
- Send alert via sms or email (refer to above) of % change
- Send alert via sms or email (refer to above) of 100% (close)
- Set the task to close when the parent task closes
- Tax
- Tax inclusive inline
- Till management
- Allow correction
- Chit template
- Currency
- Denominations configuration
- Float default
- Restrict to an employee
- Shift identification
- Till summary template
Hotkey templates
Hotkey templates allow retailers to organize their items in the workplace. Hotkey templates can be associated with all locations in an account, all locations within a subsidiary, or specifically with a location.
Example: For an organisation that sells different products at different stores, each of these locations will require different hotkeys.
Creating a hotkey template:
To create a template:
- Go to menu.
- Go to Setup > Hotkeys > Templates.
- Click on the Add button.
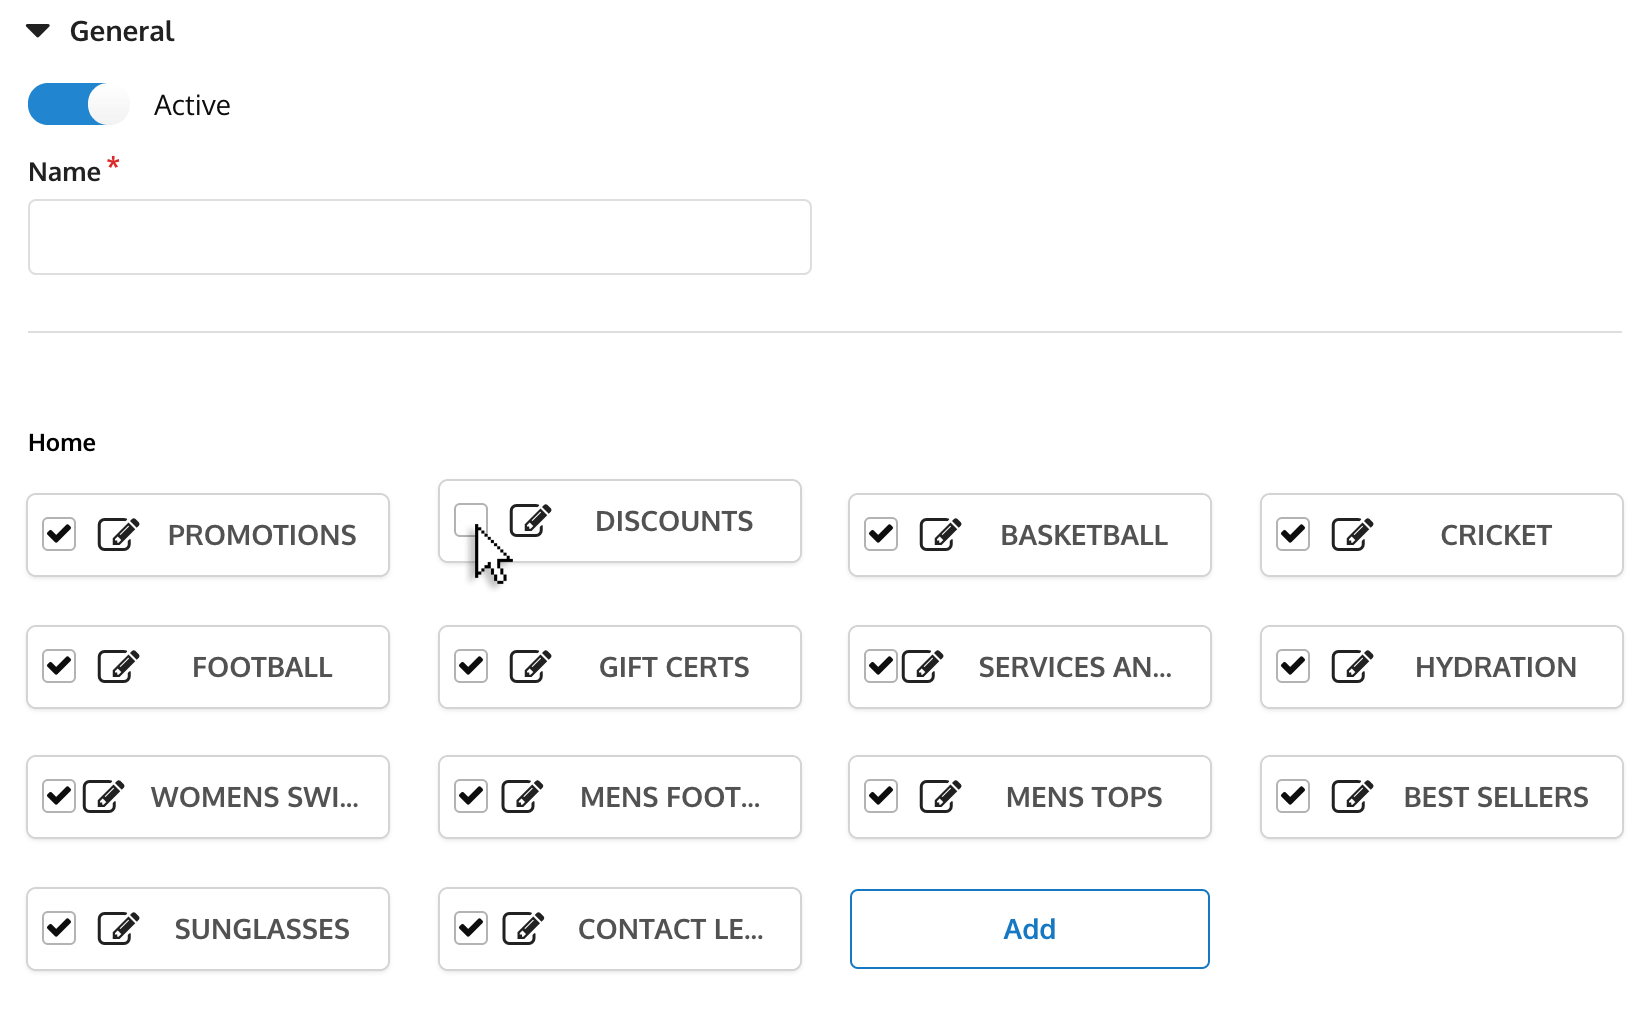
-
By default, all the hotkey groups will be shown when you first create a new template. You can adjust the template as needed.

Adding or removing items and / or classes:
-
If you want to not include a hotkey on the template, just uncheck the checkbox for that group.
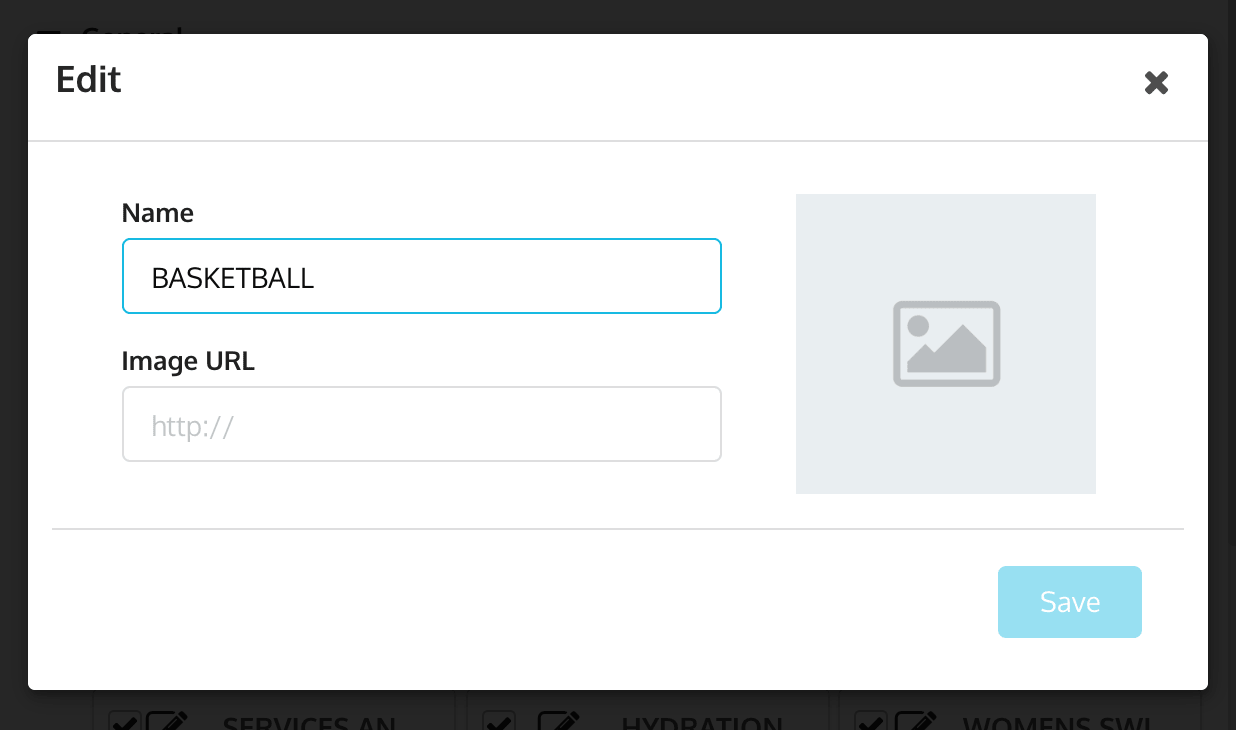
Editing the name and image of the group:
- Click the edit icon beside the name.
-
You can now change the name or image URL of the group.
Similarly, to disallow the item or class from being included in this template, you can just uncheck the box for the item or class.
You can also click on Add to add new items or classes to this hotkey template.

Adding multi-level hotkey templates:
Multi-level hotkey is a hierarchical structure of displaying the items in the workplace. Note that the best practice is to not exceed three levels.
To add a multi-level hotkey:
- Create or edit an existing template.
- Add a new group. This group will be the first level. Choose between item or classification.
- Click Save.
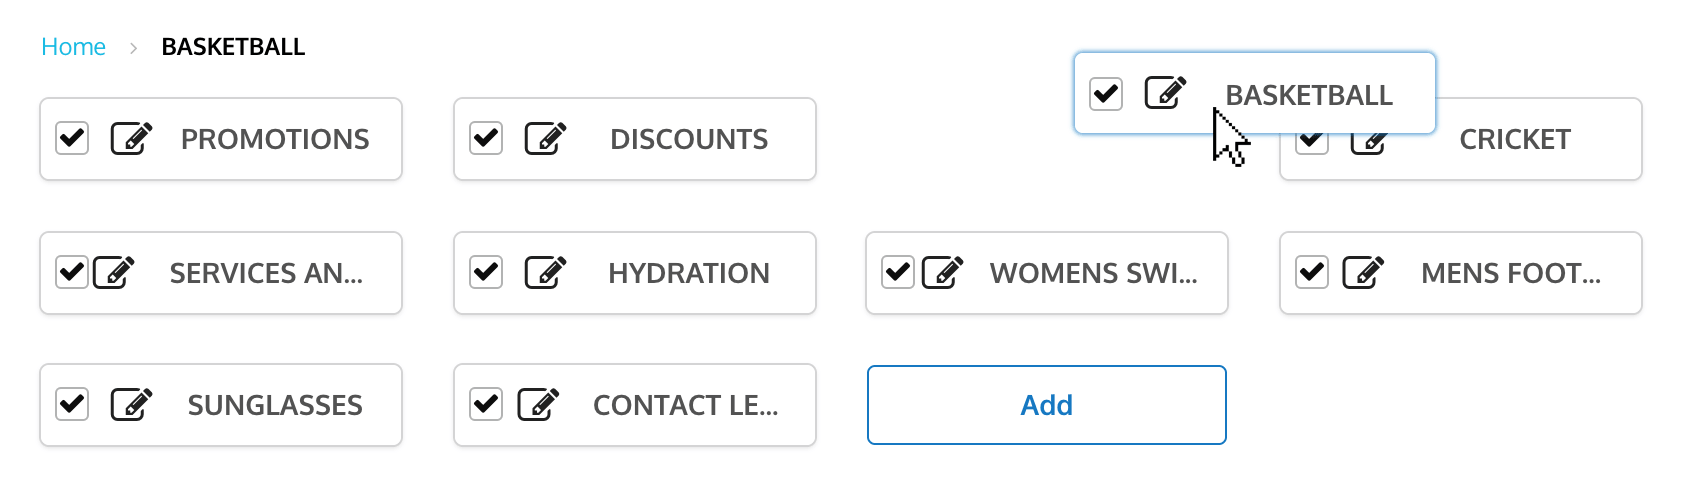
- Click your first level group. You’ll notice that there is a new Add button.
- Click Add to add a new group. This new group will be your second level.
- Same as above, choose item or classification.
- Click Save.
- Repeat the steps until you’ve reached your desired level.
Repositioning:
The hotkeys can be arranged or repositioned by dragging the hotkeys.
-
Click and hold the hotkey you want to reposition.
-
Drag it to the desired place.
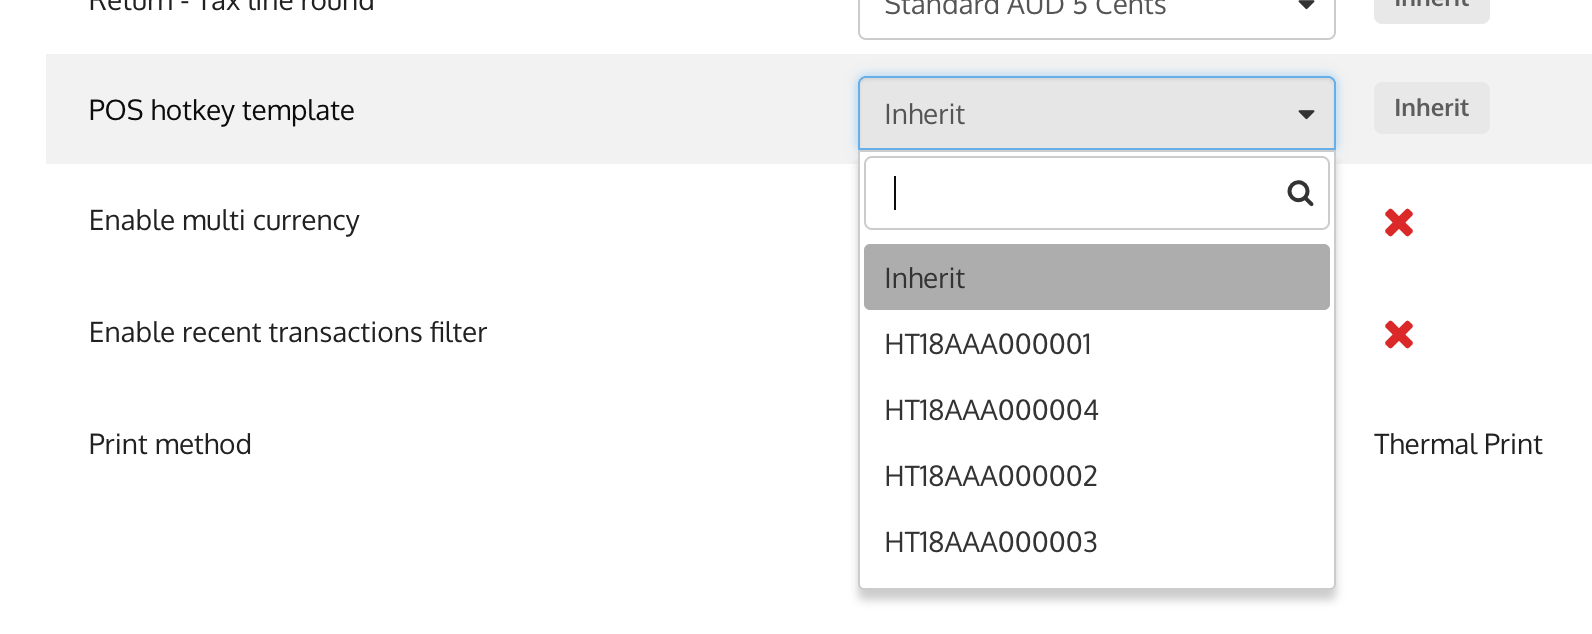
Applying the hotkey template:
After your templates have been defined, you can now apply it on your POS.
- Go to menu.
- Go to Setup > Company > Preferences.
- Select Register from the sidebar.
- Click Edit.
- Find the POS hotkey template.
- You can choose to edit this at the Account, Subsidiary, or Location level.
-
Choose the template that you created from the dropdown.
-
Click Save.
Point-of-sale:
Newly-assigned templates will become available at POS under any of the following conditions:
- The register is started for the first time in a day.
- The cashier forces a re-sync.
- A time greater than 10 minutes has elapsed since the hotkey was applied to the location, and (b) the cashier logs off and logs on.
Loyalty points
Loyalty points are accumulated by a customer when buying items which can earn them points.
Points can be set at the item location level, price level, and on a promotion.
Points = item location multiplier * Price (Loyalty) Level multiplier * Promotion multiplier.
Loyalty multiplier via item location:
To set up a loyalty multiplier:
- Go to menu.
- Go to Product > Items.
- Click the edit icon beside the item.
- Click Item location on the left sidebar.
-
Find the item location you want to edit. Click the edit icon
.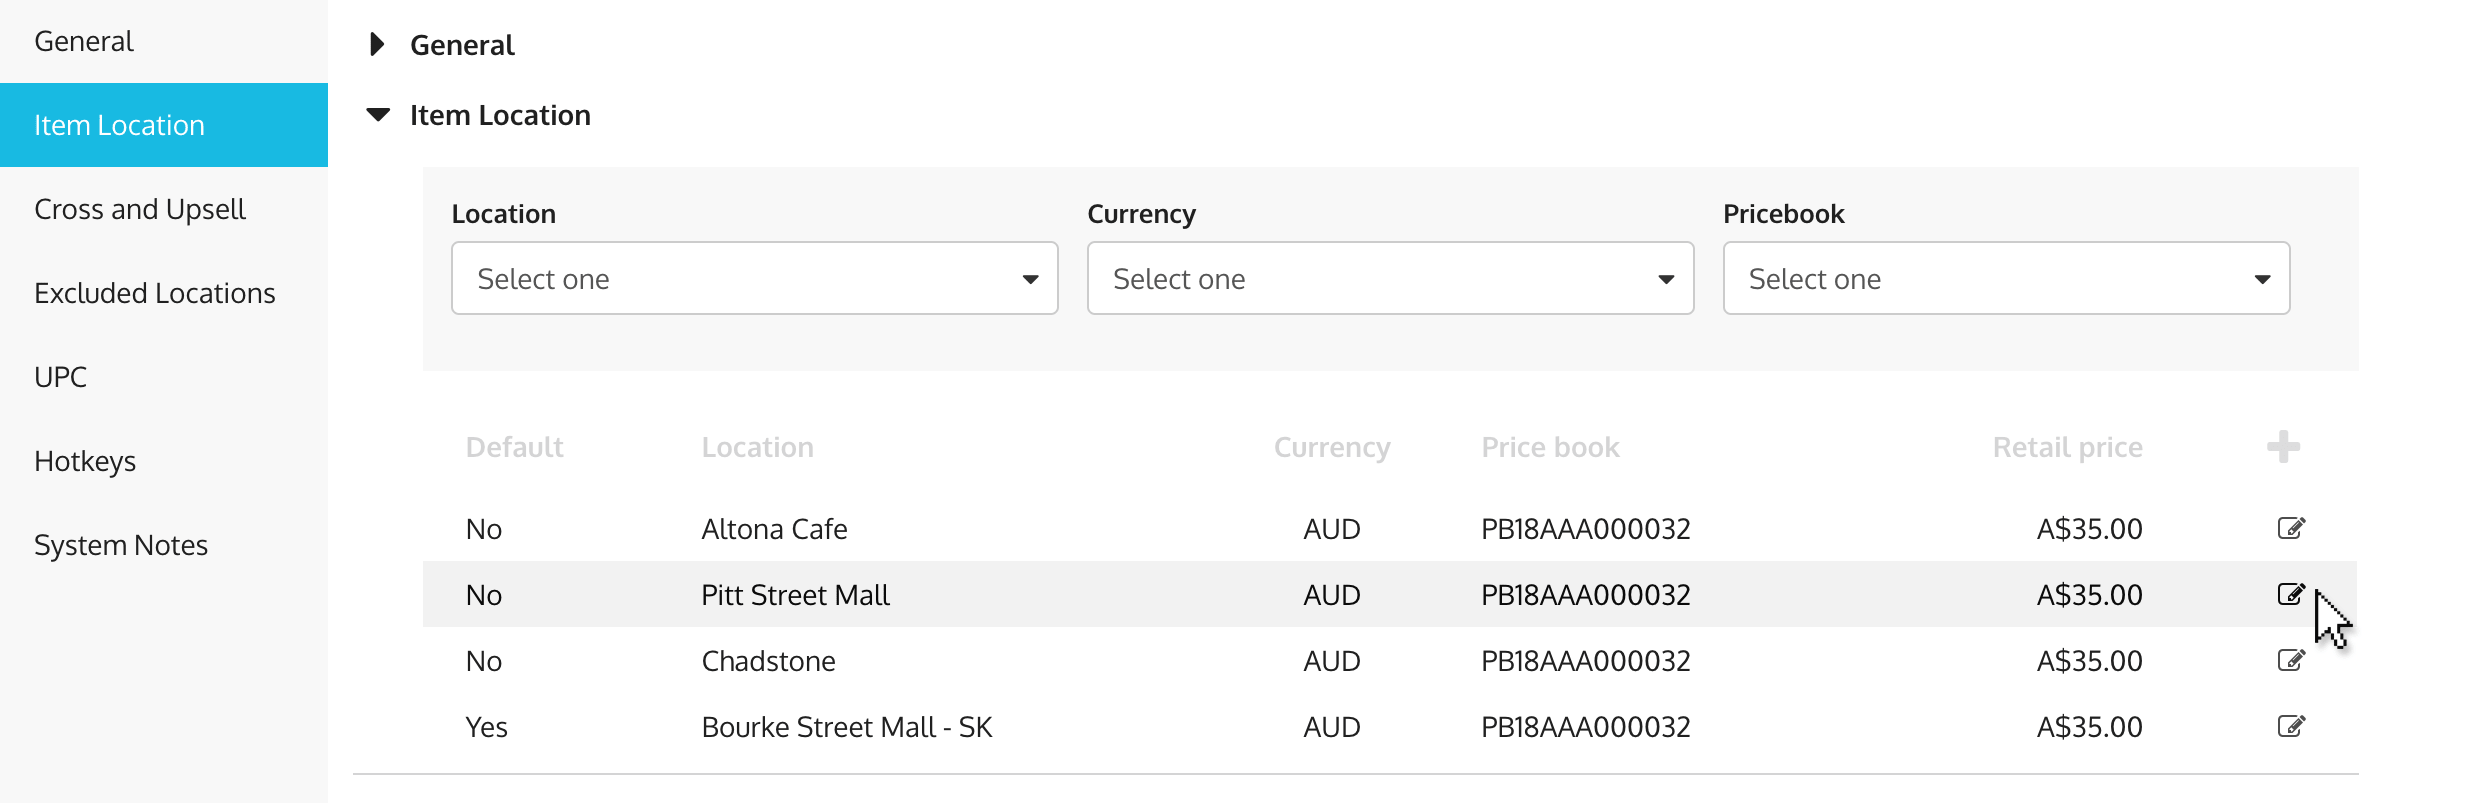
-
In the loyalty multiplier field, enter the multiplier you want applied for the customers.

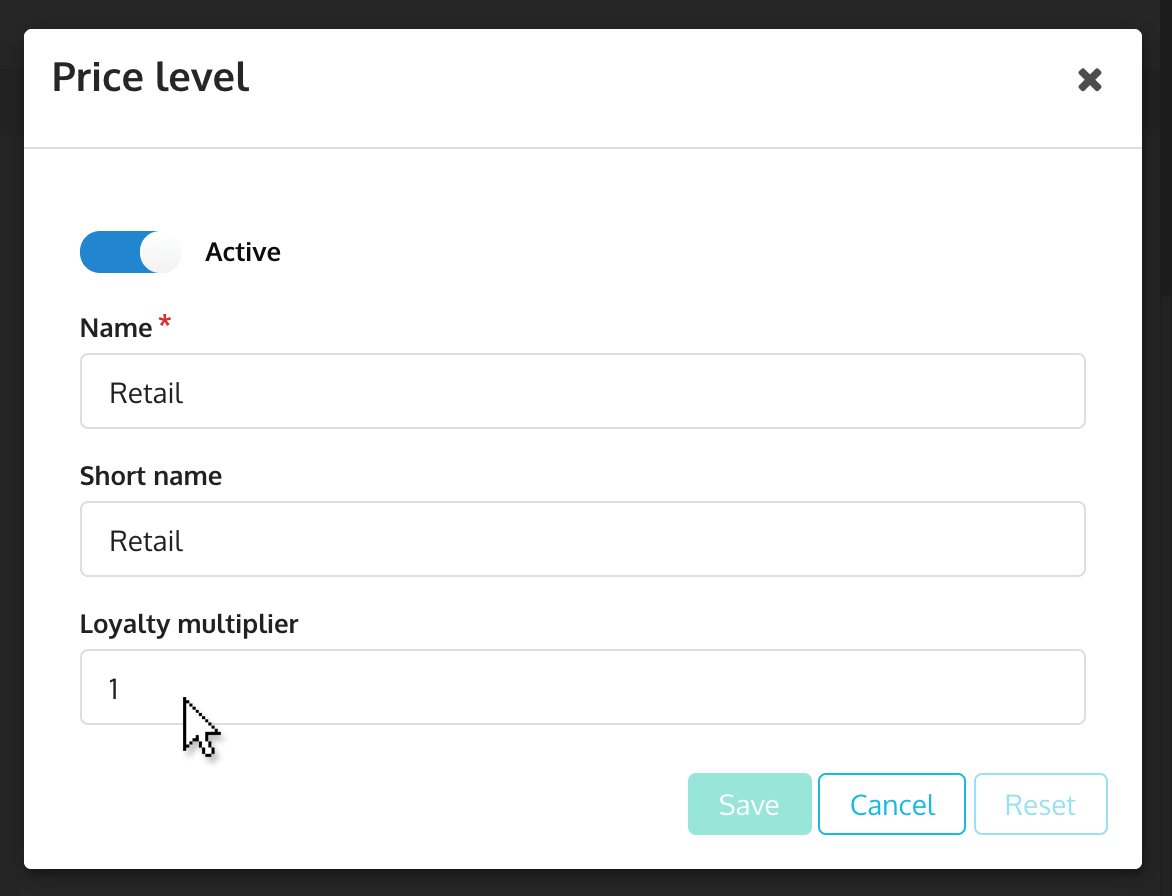
Loyalty multiplier via price levels:
Points can additionally be set on a price level.
- Go to menu.
- Go to Setup > Lists > Price level.
- Click the edit icon for the price level you want to edit.
-
You will see a popup where you can edit the loyalty multiplier field.
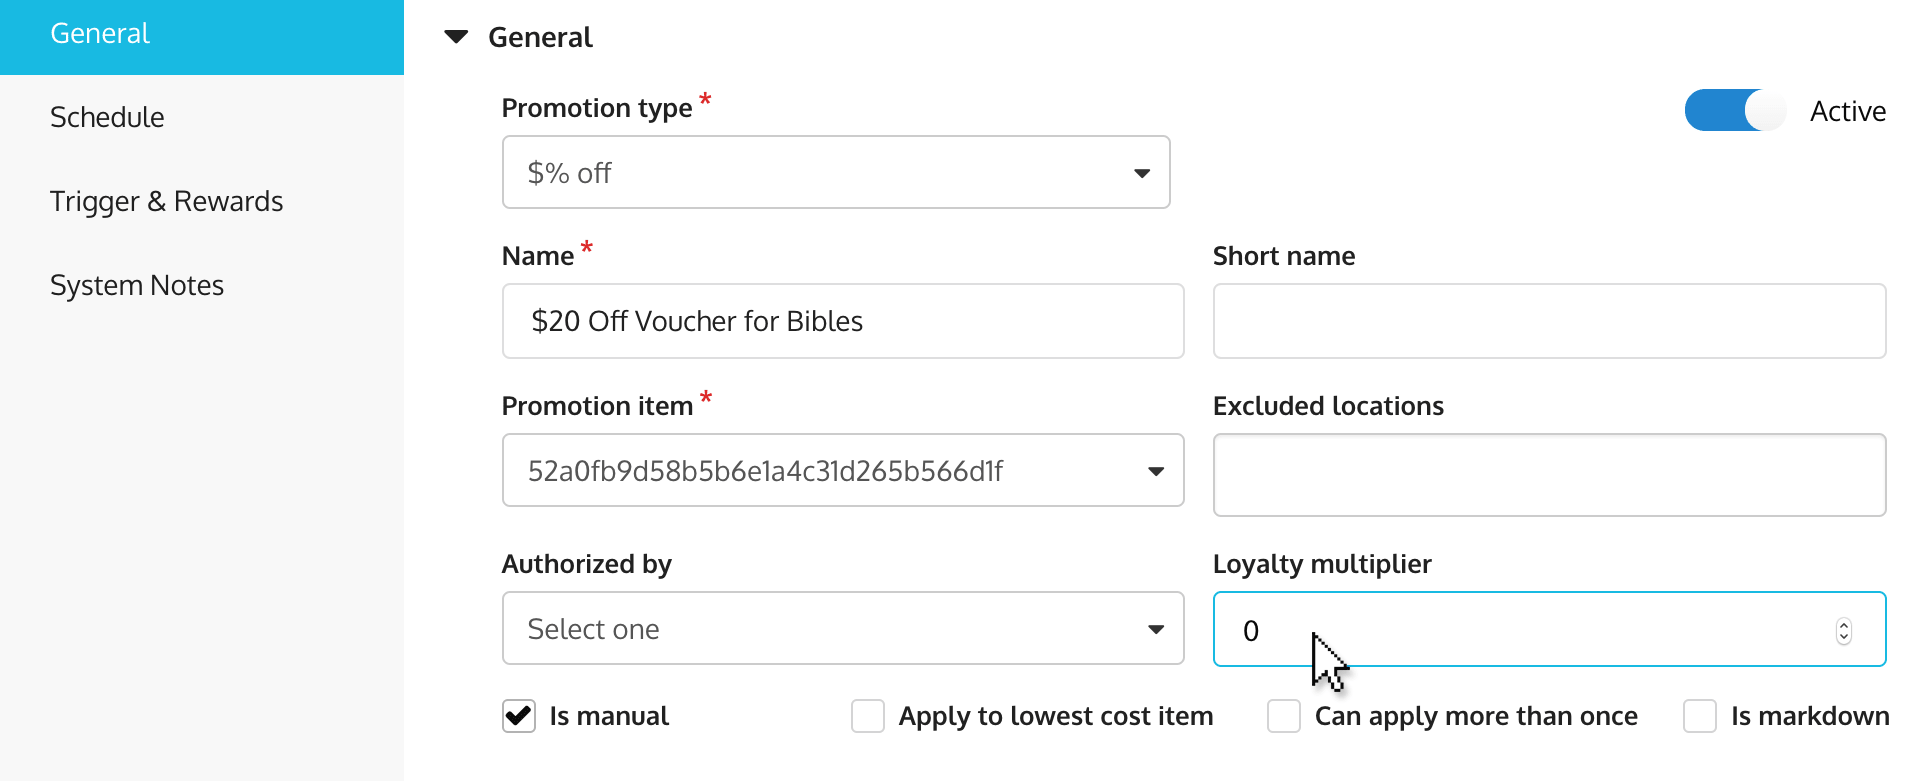
Loyalty multiplier via promotions:
Points can additionally be set on a promotion.
- Go to menu.
- Go to Concessions > Promotions.
- Click General on the left sidebar.
-
Enter preferred multiplier in the the loyalty multiplier field.
Loyalty multiplier on the POS:
On a single transaction line, if the item has multipliers set at the item location, promotion, price level, then the points will be multiplied by each of the multipliers.
Example:
- Item retails for $10
- Loyalty multiplier on item location = 2
- Loyalty multiplier of promotion = 2
- Loyalty multiplier on price level = 3
Total points accumulated on a single transaction for this item will be 120 (10 x 2 x 2 x 3).
Managing effective dates on pricebooks
Prices will only be effective during the period defined in the price book.
A price book without an ‘available to’ date will be active indefinitely. If you need to set an expiry for the price book, edit the price book and set an ‘available to’ date. To view your price books:
- Go to menu.
- Go to Product > Price books.
Exchange rates
Exchange rates are setup:
- When you are purchasing and receiving inventory in a currency that is different from your base currency.
- When you are accepting multiple currencies at the register.
To setup an exchange rate:
- Go to menu.
- Go to Setup > Finance > Exchange rates.
- Click the Add button.
-
You will be redirected to a form that you need to fill out:
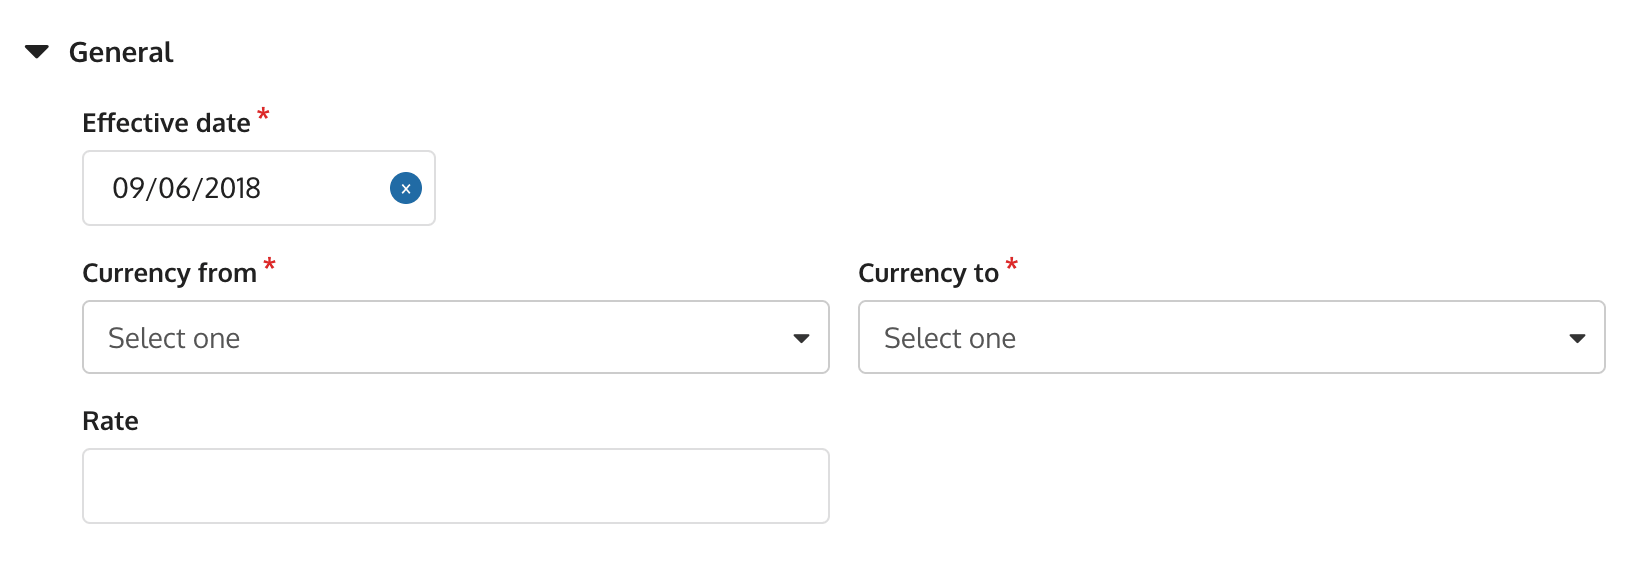
- Effective date: Set a date when the rate is effective.
- Currency from: Set currency from.
- Currency to: Set currency to.
- Rate: Set rate which the amount from ‘currency from’ is equivalent to ‘currency to’.
-
Click the Save button.
Example:
- Currency from: United States Dollar
- Currency to: Philippine Peso
- Rate: 53.49
- For 08/23/18, 1 US Dollar = 53.49 PH Peso
Item locations
Item location details determines:
- Where the specific item can be sold.
- Key attributes of the item at that location.
A few things to note:
- You can define multiple locations for one item.
- You MUST have a minimum of one (1) item location record for each item.
- A default location per currency can be used to identify default item location details.
- Inventory tracked items MUST have one (1) item location record per store.
To add or update an item location details:
- Go to menu.
- Go to Product > Items.
- Click Item location on the left sidebar.
- Find the item location you want from the list. You can also use the filters if necessary. Or click the plus icon
 to add a new item location record.
 -
You will be redirected to a form that you have to fill out. The fields listed below may vary based on the item type.
- Default: Check this to set the location as the primary item location.
- Location: Choose location where the item will be available.
- Price book: Choose price book to set the price of the item.
- MSRP: Set manufacturer suggested retail price.
- Floor price: Lowest price that the seller will accept.
- Tax group: Set tax group for the item.
- Loyalty multiplier: Add loyalty multiplier for the item.
- Cost price: Total cost set by the manufacturer in producing the item.
- Landed cost: Total cost of a landed shipment including purchase price, freight, and other costs up to the port of destination.
- Shipping cost: Cost in transporting an item from the store to the customer’s location.
- Handling cost: Cost implied on consumer other than selling price of product. These includes packaging and the likes.
- Min: Set suggested minimum quantity for the item.
- Max: Set suggested maximum quantity for the item.
- Safety stock: Set an additional quantity of an item in order to reduce the risk that the item will be out of stock.
- Back order quantity: Shows item quantity in pending purchase order (cannot be inputted)
- Back order ETA: Estimated time for the purchase order to received (cannot be edited).
- Last replenishment: Displays the date of last restock (cannot be edited).
Checkboxes:
- Available for pickup: Determines whether the item can be marked for pickup (at later date).
- Available to ship: Determines whether the item can be shipped to the customer.
- Available for transfer: Allows the option for the item to be transfer from one store location to another.
- Allow manual discount: Allows the option for the cashier to apply a manual discount to the item. This is pre-set to true.
- Available on web: Determines if the item is available to be sold on the store’s website.
- Reorder Determine if the store can re-purchase the item.
For discount and coupon:
- Discount percentage: Set a percentage discount for the discount or coupon item to be applied in the cart.
- Discount amount: Set a fix amount markdown for the discount or coupon item to be applied in the cart.
For payment and service charge:
- Charge percentage: Set a percentage charge for every service rendered or goods supplied.
- Charge amount: Set an extra fix amount for every service rendered or goods supplied.
Location tab (display only):
Identifies the location/s and Location attributes associated to the Item Location
- Location: Examples are store and hold locations.
- Available: Available to be sold, excludes any reserved or in transit quantities.
- On hand: Available in store regardless of any reserved or in transit quantities.
- In transit: Quantities currently between locations.
- Average cost: Average cost of the item.
- Total cost: Total cost of the item.
Supplier:
Identifies suppliers of the item to the item location.
-
Click the Save button once required details have been entered.
Managing certificates
Reason code and comments are the only certificate fields that can be manually updated.
- Go to menu.
- Go to Concessions > Certificates.
- Choose the certificate you want to edit. Use the filters if needed.
- Click the edit icon on the right side.
- Click the Save button when you're done updating the details.
Custom tabs
Creating a custom tab:
Custom tabs are used to collate specific fields or render and/or render a specific custom form.
- Go to the menu.
- Go to Admin > Setup > Tools > Custom tabs.
- Click the Add button.
-
Fill out the fields on the form.
On the Type dropdown, you can choose where this custom tab will appear. Currently, you can apply the custom tab On checkout or on Proceed to pay. This will appear as a popup on the POS.

-
Click the Save button.
After saving, you'll notice 2 new options on the left sidebar: Custom fields and Custom forms. Here, you will eventually see the fields and forms that are assigned to this tab.
Remember that when you both have fields and forms assigned to a tab, the custom form will always take precedence.
Managing custom tabs:
To view or edit custom tabs:
- Go to the menu.
- Go to Admin > Setup > Tools > Custom tabs.
- Look for the custom tab you want to edit. Use the filters if needed.
- Click the edit icon on the right.
- Edit the information you want to change.
- Click the Save button when you're done updating the details.
Custom lists
Creating a custom list:
Custom lists are used to create dropdown items available for use in custom fields.
- Go to the menu.
- Go to Admin > Setup > Tools > Custom lists.
- Click the Add button.
-
Fill out the fields on the form.

-
Click the Save button.
Managing custom lists:
To view or edit custom lists:
- Go to the menu.
- Go to Admin > Setup > Tools > Custom lists.
- Look for the custom list you want to edit. Use the filters if needed.
- Click the edit icon on the right.
- Edit the information you want to change.
- Click the Save button when you're done updating the details.
Custom fields
Creating a custom field:
Custom fields enable additional fields to be added to specific document types.
- Go to the menu.
- Go to Admin > Setup > Tools > Custom fields.
- Click the Add button.
-
Complete the form's required fields and sections.
Filling out the form:
You will see a left sidebar so you can navigate through the form.
Sections Description General General information about the custom field. Tab settings Where you can assign the custom field to custom tabs. General section: Enter in details of the custom field.
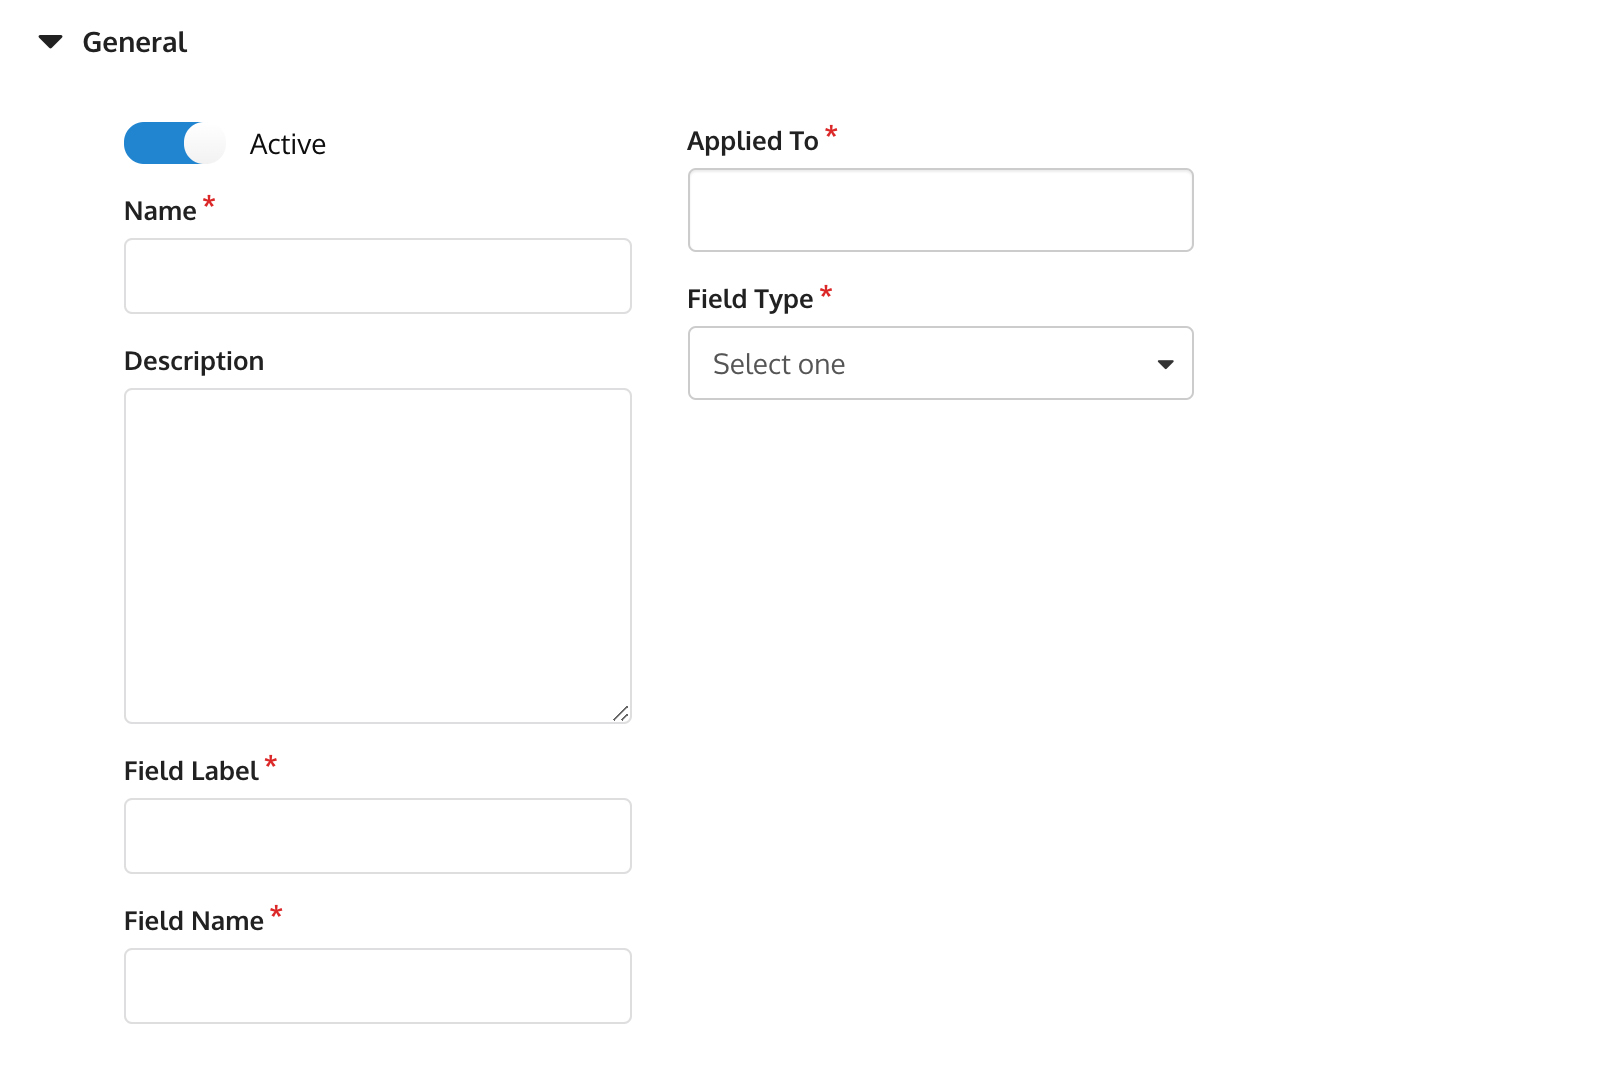
- Active: Indication if this custom field is still working or not
- Multi-select: Available only for field types List or Record. This allows the user to accept multiple values.
- Name: Name of the document.
- Description: Summary of this document.
- Field label: Field display name.
- Field name: The field reference name, i.e. database field reference.
- Applied to: List of document type where we can apply a custom field.
- Field type: List of all data type that we can use.
- Boolean: Yes or no / true or false.
- Currency: Numeric values that can accept decimal places depending on the currency masking applied to the document on which the field is attached.
- Datetime: The user can pick a specific date and time.
- Decimal: Accept numeric values with 6 decimal places.
- Integer: Can only accept a whole number.
- Link: Textfield for URL values.
- List: Dropdown of data. Can be single select or multi-select.
- Record: Dropdown of data depending on the record that you choose. Can be single or multi-select.
- String: Accepts both numeric and text values.
Tab settings:

This is where you assign which tab in the POS the custom field is going to appear.
-
Click the Save button.
Managing custom fields:
To view or edit custom fields:
- Go to the menu.
- Go to Admin > Setup > Tools > Custom fields.
- Look for the custom field you want to edit. Use the filters if needed.
- Click the edit icon on the right.
- Edit the information you want to change.
- Click the Save button when you're done updating the details.
Custom forms
Custom forms lets the user create his own personalized custom fields.
Creating a custom form:
- Go to the menu.
- Go to Admin > Setup > Tools > Custom forms.
- Click Add button
-
Complete the form's required fields and sections.
Filling out the form:
You will see a left sidebar so you can navigate through the form.
Sections Description General General information about the custom form. Markup & validation Customize your form by selecting a template or by making your own. Tab settings Where you can assign the custom form to custom tabs. General section:
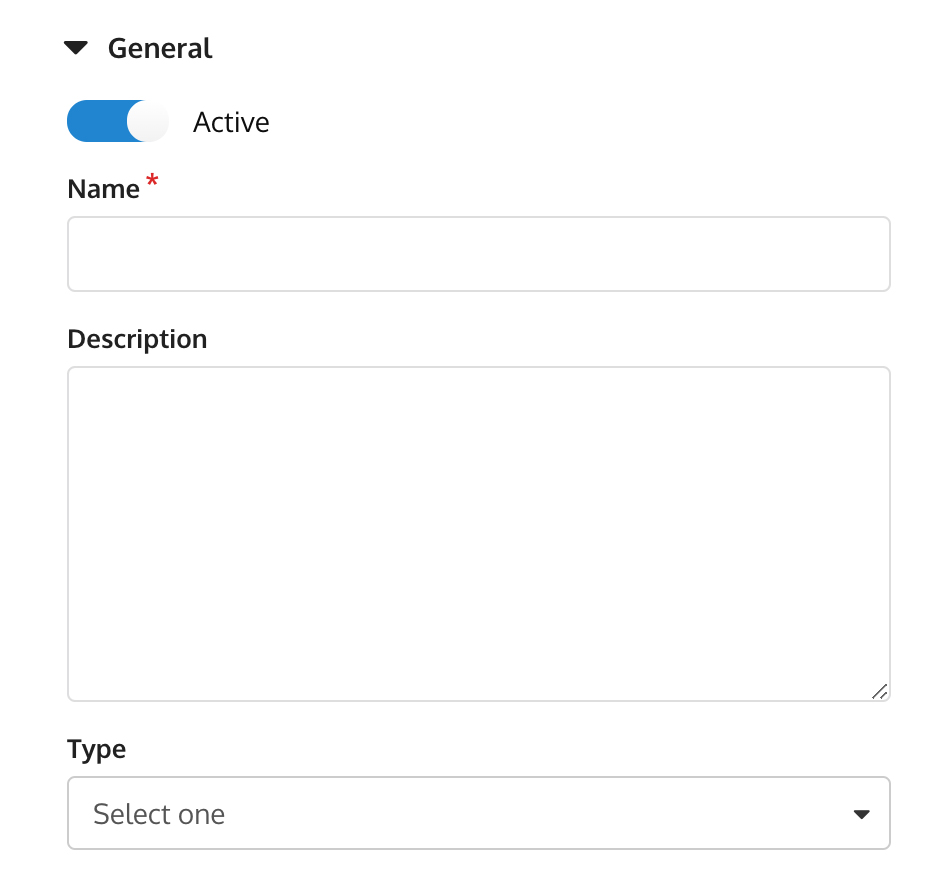
Enter in details of the custom form.

- Active: Set the form active or inactive.
- Name: Name of the document.
- Applied to: List of document types where the custom form will be applied.
Markup & validation section:
In this tab you will see two code editors:
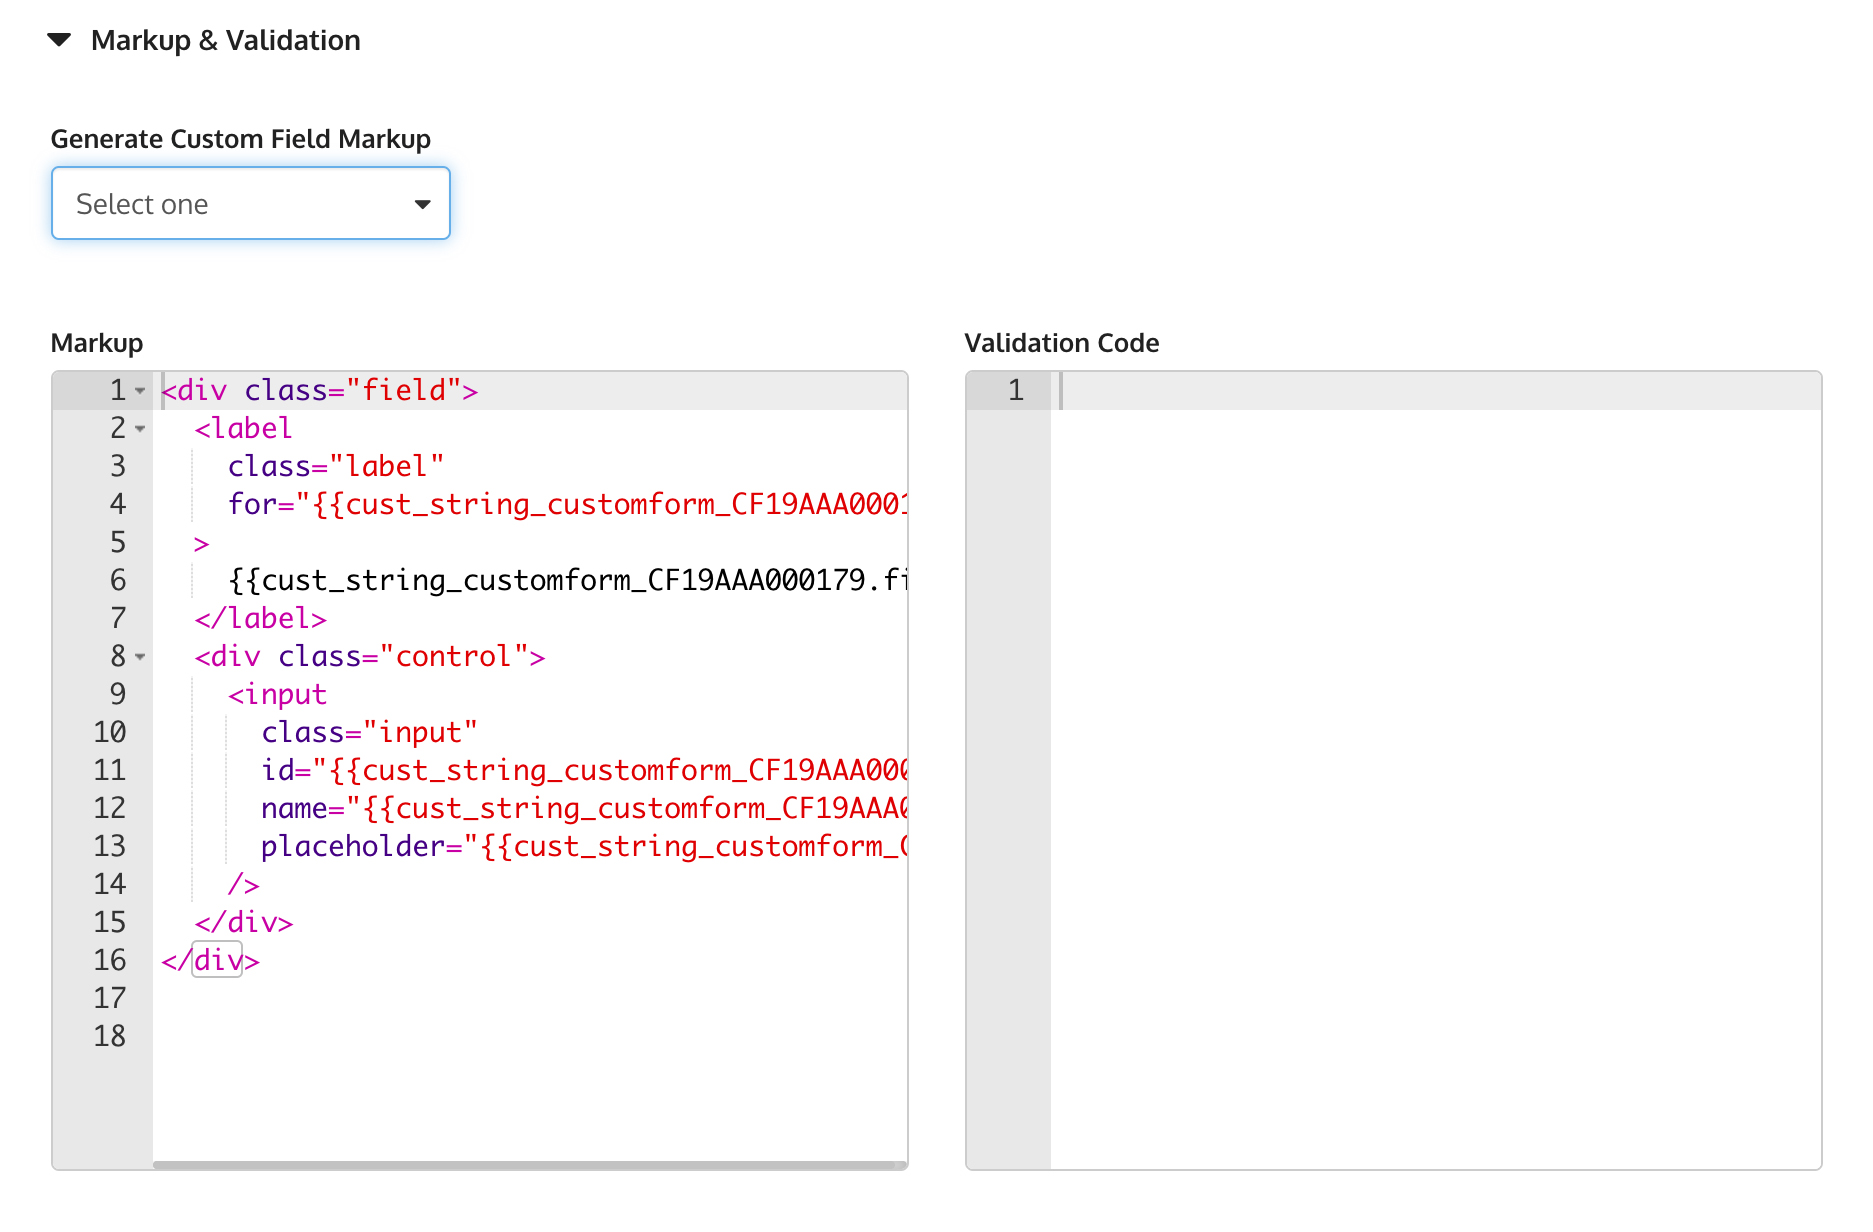
- Markup editor: In this editor you can put your own markup to add custom fields. Or you can add templates by selecting one from the Generate custom field markup dropdown.
- Validation editor: In this editor it will help the user to verify the content s/he inputted.
Tab settings section:
This is where you assign which tab in the POS the custom form is going to appear.

Managing custom forms:
To view or edit custom forms:
- Go to the menu.
- Go to Admin > Setup > Tools > Custom forms.
- Look for the custom form you want to edit. Use the filters if needed.
- Click the edit icon on the right.
- Edit the information you want to change.
- Click the Save button when you're done updating the details.