Setup
Creating a new subsidiary
Typically associated to a company's legal entities, subsidiaries are used to define and manage the association and relationship of data within the application.
The application can be defined for organisations with one or many subsidiaries. Subsidiaries can be used for franchises. A minimum of one (1) subsidiary must be defined:
- Subsidiaries can be hierarchically linked. All organisations must have a primary location (head office) subsidiary defined, i.e. a subsidiary without a parent subsidiary defined.
- They can be defined with their own currency and language.
- They can have multiple contacts and addresses.
- Subsidiaries can be used to segment data for reporting and to restrict access to data based on roles and permissions.
- The 'holding subsidiary' is referred to in the child subsidiary as the parent subsidiary.
Creating subsidiaries:
- Go to the menu.
- Go to Setup > Company > Subsidiaries.
- Click the Add button.
-
This will bring you to a form to create a new subsidiary. Complete the form's required fields and sections.
Filling out the form:
You will see a left sidebar so you can navigate through the form.
Sections Description General General information of the subsidiary. Address Address details of the subsidiary. Contact Contact details of the subsidiary. General section: Enter in details of your company.
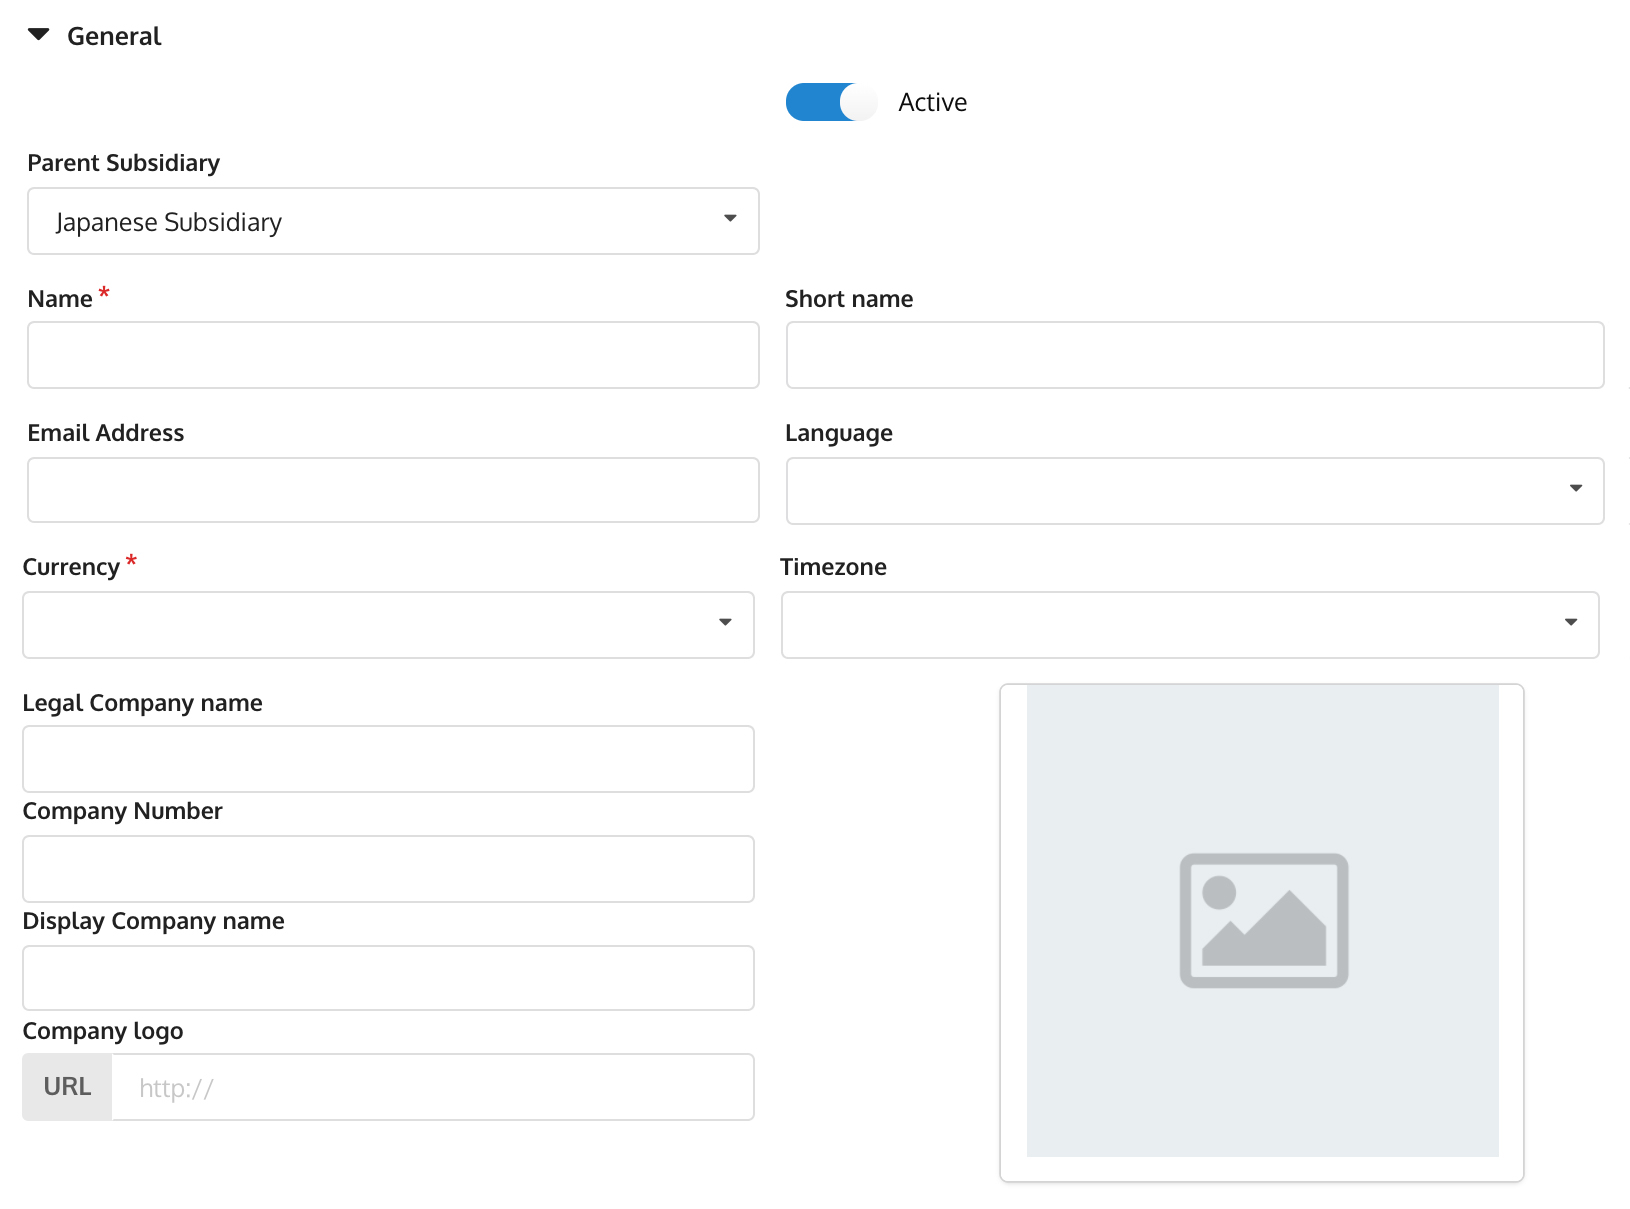
- Parent subsidiary: If the subsidiary being created has a parent subsidiary (meaning you're creating a child subsidiary), choose the parent from this dropdown.
- Name: Enter in name of the company. The value entered here will be used and displayed throughout the application.
- Short name: The short name can be entered to help identify the subsidiary. It is not mandatory.
- Email address: Email used by this subsidiary company.
- Language: Choose the language which you company will be using throughout. English is default.
- Currency: Choose the currency which you will be trading in.
- Timezone: Choose the timezone which you company will be trading in.
- Legal company name: Enter in your legal company name.
- Company number: Enter in you company number.
- Display company name: Enter in the name which you would want to appear on printed documents.
- Company logo: Enter in the URL which links to the logo image.
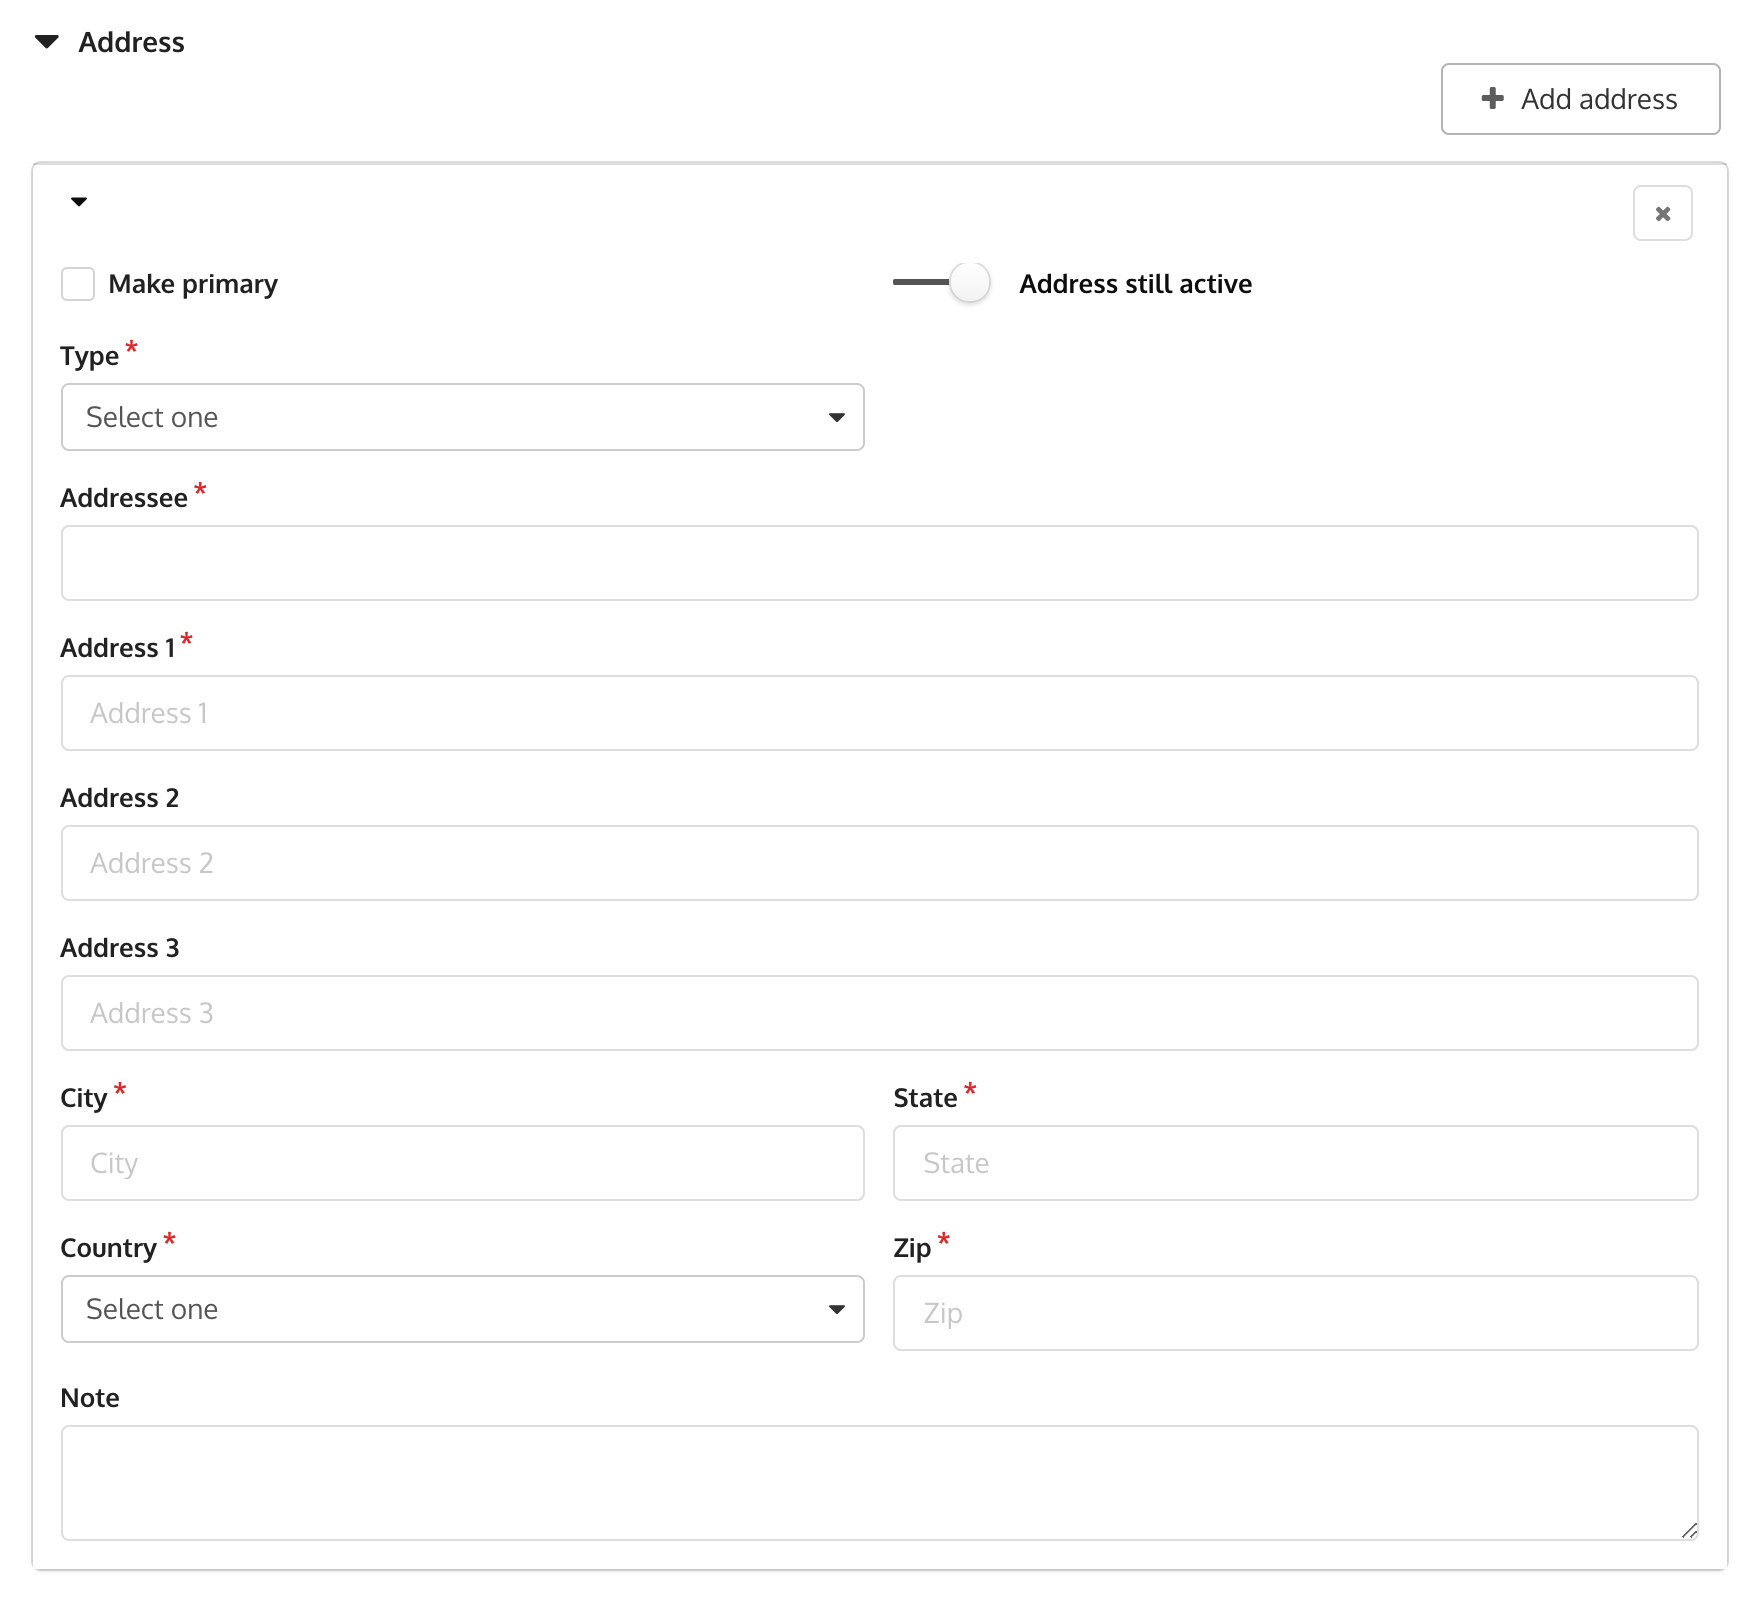
Address:

Click on the Add address button and enter in address details. You can enter in different addresses types for delivery, shipping or others.
Contact:
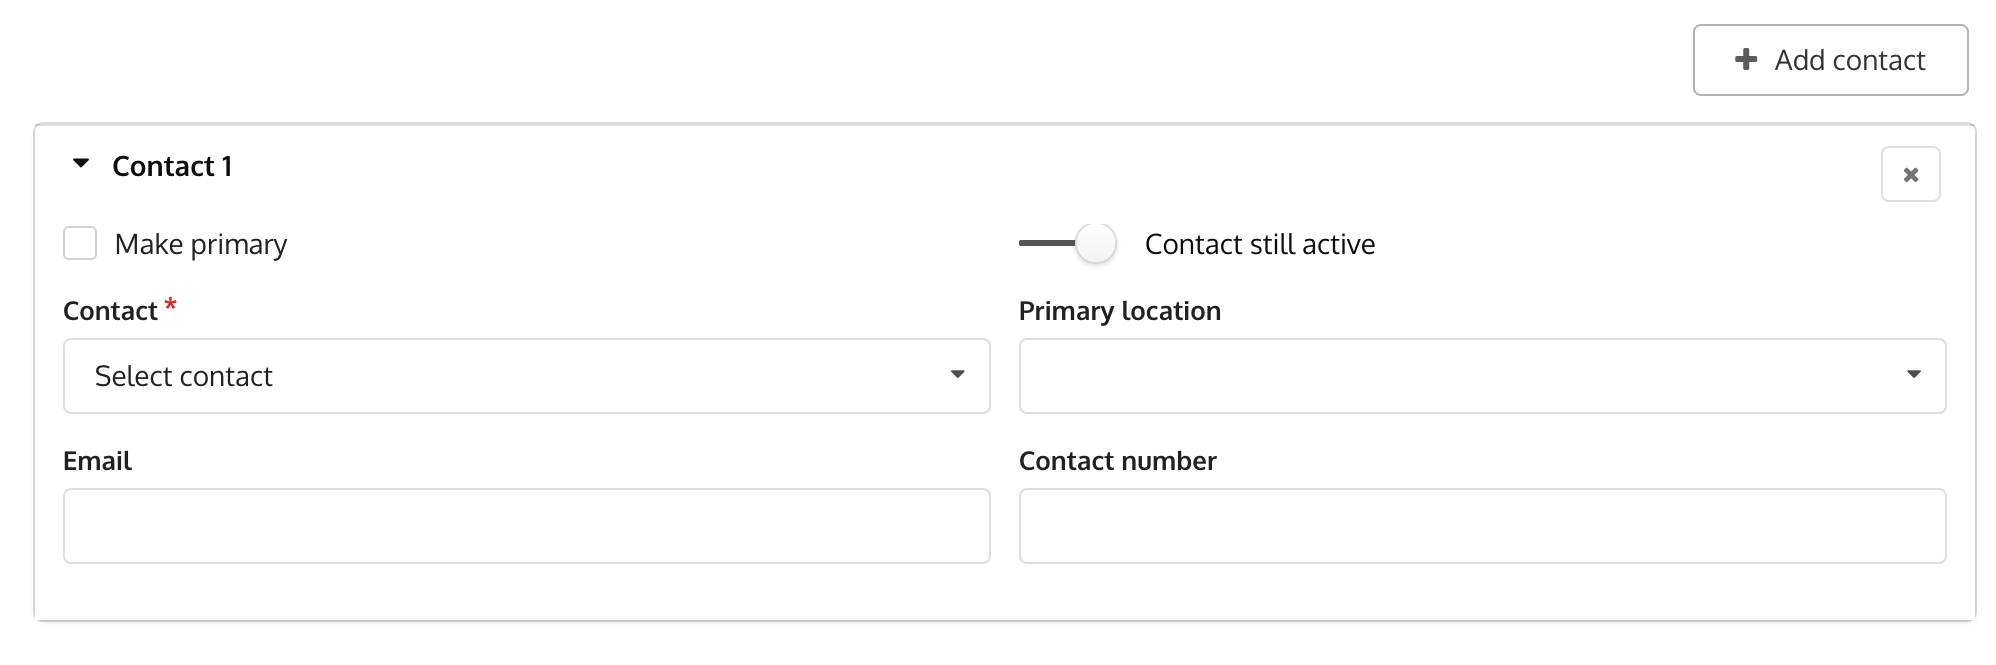
Click on the Add contact button and enter in contact details for you company.
-
Click the Save button.
To edit existing subsidiaries, view Managing subsidiaries.
Creating a new location
KRISP POS defined locations as either a primary location or a sub location.
- Primary location: The primary location will typically define the store from where KRISP POS sale transactions with customers occur.
- Sublocations: Sublocations are used to manage the movement of inventory.
Primary locations:
Each location is unique and will be identified by a name and an address. The primary location is always defined as a physical location.
Creating locations:
- Go to the menu.
- Go to Setup > Company > Locations.
- Click on Add button.
-
This will bring you to a form to create a new location. Complete the form's required fields and sections.
Filling out the form:
You will see a left sidebar so you can navigate through the form.
Sections Description General Details about the location you're adding. Address Address details of the location. Contact Contact details of your company. Sublocation mapping To manage inventory movements and availability. General section:
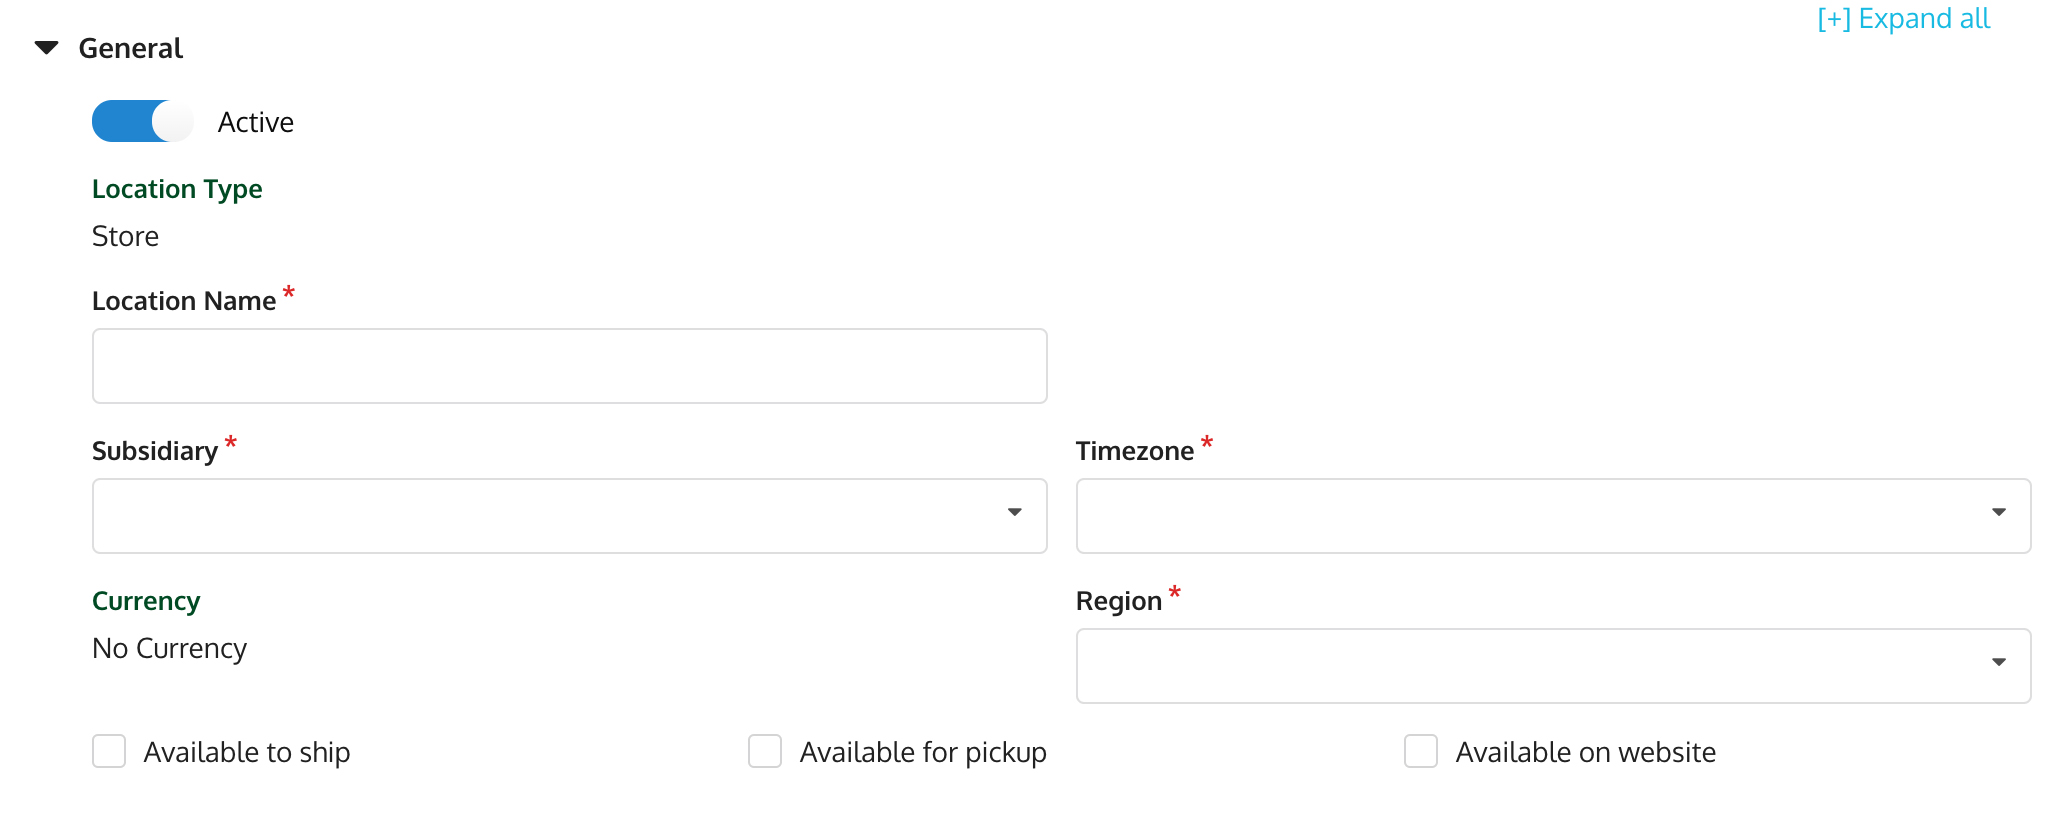
Enter in details of your company:
- Location name: Enter in the name of your store. The name entered will be used and displayed throughout the application.
- Subsidiary: Choose the subsidiary which the location belongs to.
- Timezone: Choose the timezone which you company will be trading in.
- Region: Choose the region which the location will be trading in.
- Checkboxes:
- Available to ship: If you want to enable to shipping from this location, check this box.
- Available for pickup: If you want to enable pickup from this location, check this box.
- Available on website: If you want inventory from the location to be displayed on your website, check this box.
Address section:
Click on the Add address button and enter in the address details.
Contact section:
Click on the Add contact button and enter in the contact details for your company.
Sublocation mapping section:
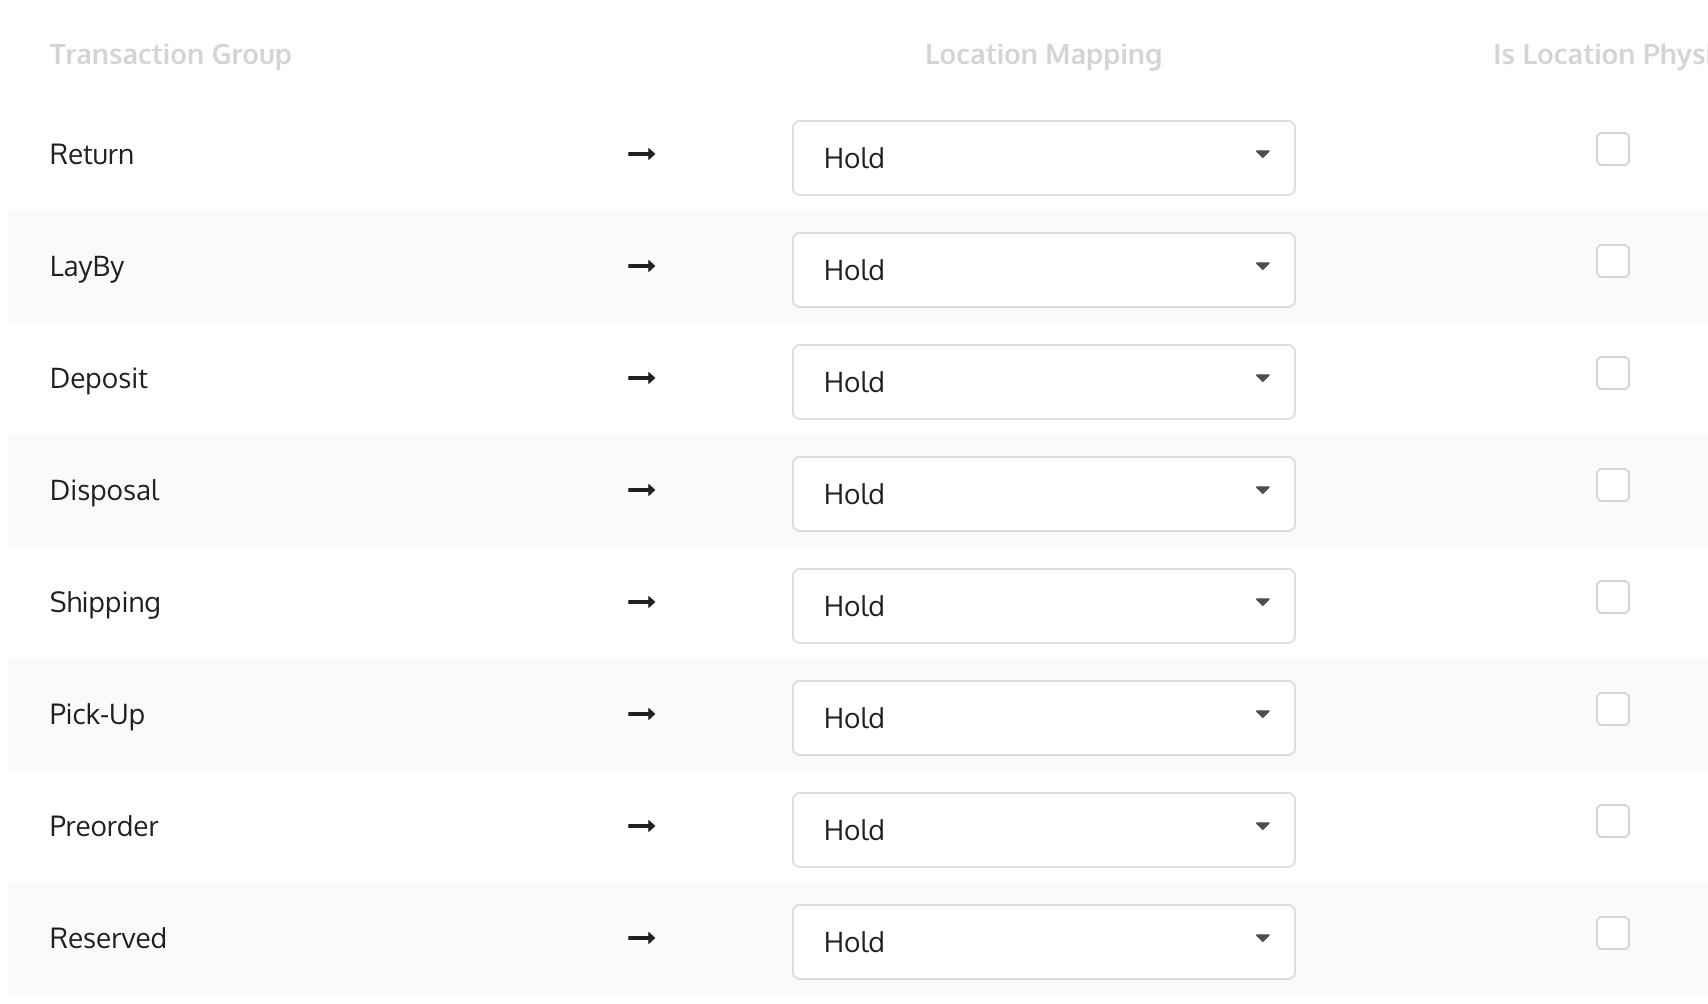
Sublocations are an effective method to manage inventory movements and availability. All primary locations MUST have a minimum of one (1) sublocation. Sublocations can either be a physical or a virtual location:
-
Virtual sublocation: A sublocation is identified as a virtual location if movements with the current location are automatic, i.e. inventory is automatically transferred to and from it, and there is no need for manual intervention.
Note that when moving inventory between different stores or different stores sublocations, transfers will be manually executed. i.e. locations which are in different localities. Sublocations can be grouped into a single location.
Use the dropdown to select a sublocation. If the sublocation is a physical location, check the Is a physical location checkbox.
-
Physical sublocation: A sublocation is identified as a physical location if inventory needs to be manually transferred to and from it.
Example: A transaction group such as layby can be assigned to a layby sublocation. As such, when a layby is created at KRISP POS, the items which are on layby will be located in the layby sublocation.
-
Click the Save button.
To view existing locations, view Managing locations.
Creating relationship types
To create relationship types:
- Go to menu.
- Go to Setup > Lists > Relationship types.
- Click the Add button.
-
Fill out the fields on the form:
- Name: Enter in name of the relationship type. The value entered here will be used and displayed throughout the application.
- Short name: The short name can be entered to help identify the relationship type. It is not mandatory.
- Price level: Assists in determining the price level that should be allocated to the relationship type.
-
Click Save.
Creating a new employee
Employees will need to be setup before they can access the admin and KRISP POS. This is an admin function so make sure you have the right permissions.
Creating employees:
- Go to the menu.
- Go to Relationship > Employee.
- Click the Add button.
-
This will bring you to a form. Complete the form's required fields and sections.
Filling out the form:
You will see a left sidebar so you can navigate through the form. Enter in all the mandatory fields and, if applicable, other optional details.
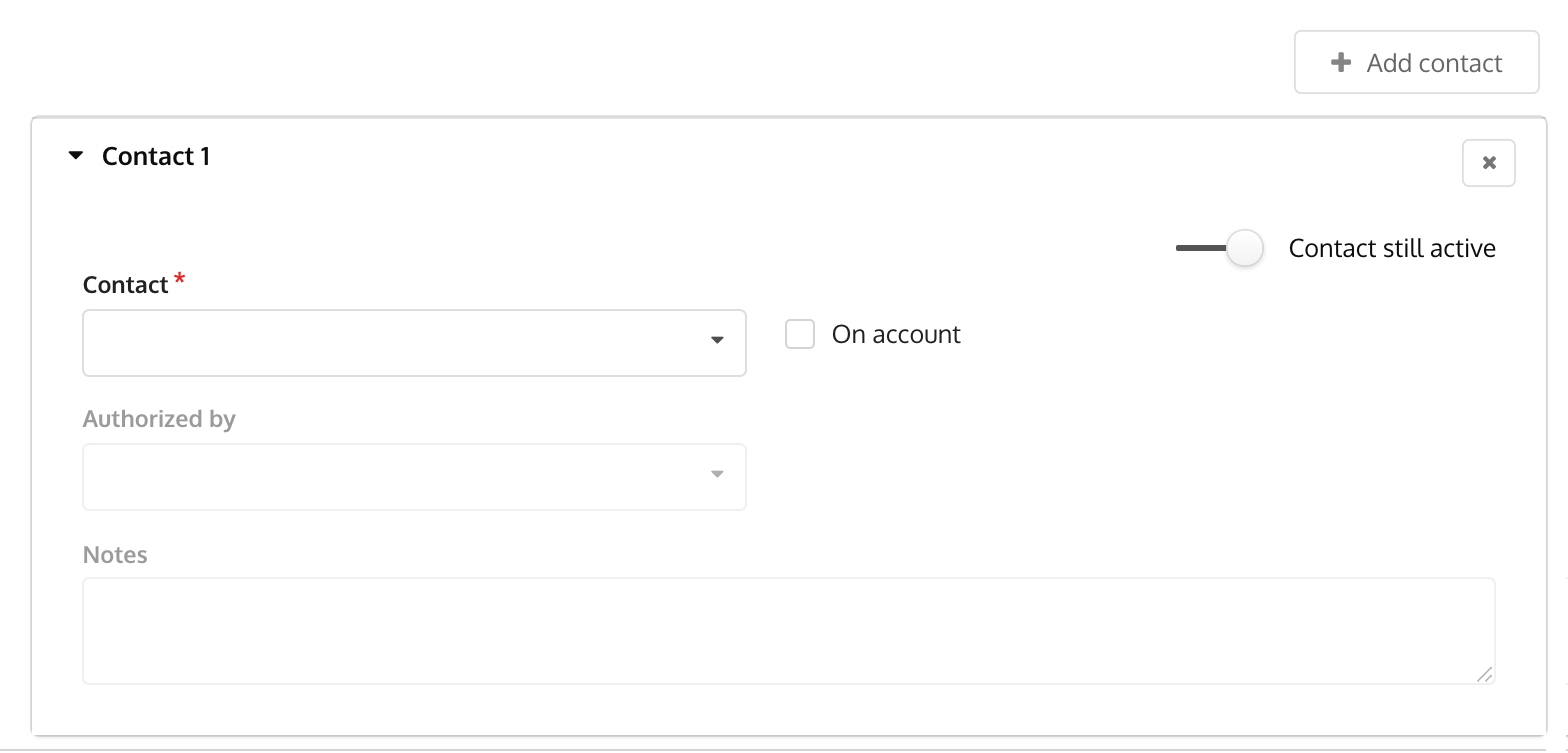
Sections Description General Employee's general details like email, birthday, etc. Address Where you can add their addresses. Contact Alternate persons to call if customer is unavailable. Required for on-account as person noted here will be allowed to pick up the goods on the customers behalf. Loyalty Where you can add or change their price level and loyalty details. Access Details on their access and permissions. General section:

- Entity type: When adding an employee, the Entity type textfield will indicate Employee as default. You can add additional entity types that are applicable to this employee. An employee can also be a contact, customer, and/or supplier.
- Alias: A nickname for the employee.
- Email: The email address entered will also serve as their username when logging in, so an email address cannot be associated with 2 employees. It must be unique.
- Preferred store, currency, and language: Their preferences as a customer.
Address section:
Click on the Add address button to add one. Make sure that all required fields are filled out.
Contacts section:

Click on the Add contact button to add one. Make sure all required fields are filled out.
Loyalty section:
- Price level: Choose a price level which this employee will belong to.
- Loyalty member: If this employee belongs to a loyalty program, turn the loyalty member toggle on.

Access section:
- Access enabled: Using the on/off toggle, this determines whether the employee still has access to the application. It's always enabled by default, but you can turn it off if you want to restrict access at any given time.
- Start date and end date: This is the employee's start of employment. When an employee is no longer employed, you can record an end date.
- Subsidiary access: The subsidiaries which the employee belongs to and/or will have access to.
- POS location access: The locations where the employee has access to the KRISP POS.
- Employee primary location: The primary employee location is the location where they will spend the majority of their time.
- Roles: The system permissions of this employee.
- Username: The username will default to the email entered in General tab.
-
Click the Save button once required details have been entered.
To edit existing employees, read Managing employees.
What your employee receives:
When you're done saving a new employee, the system will automatically send an email to the email address you saved for the employee. They will be asked to set their own password, which will only be known to them.
The employee's 4-digit PIN:
Their 4-digit PIN (for the KRISP POS) is generated automatically after you're done saving the new employee. So you can only view it after doing so. To view it:
- Find the employee name in the list.
- Click the edit icon
 on the right.
 - On the left sidebar, click Access.
-
You will find a Register PIN textfield at the bottom. Hover over the Reset PIN button to see a tooltip with the 4-digit PIN.
Creating contacts
Contacts represent individuals that have a relationship with a customer, but are not directly transacting at KRISP POS. These include:
- On account contacts: Persons assigned to collect items on behalf of the on account customer.
- Next contact: Persons referred by the customer as an alternate reference.
To create a contact:
- Go to the menu.
- Go to Relationships > Contacts.
- Click the Add button.
-
This will bring you to a form. Complete the form's required fields and sections.
Filling out the form:
Enter in all the mandatory and if applicable, other optional details.
General section:

Address section:
To edit existing contacts, view Managing contacts.
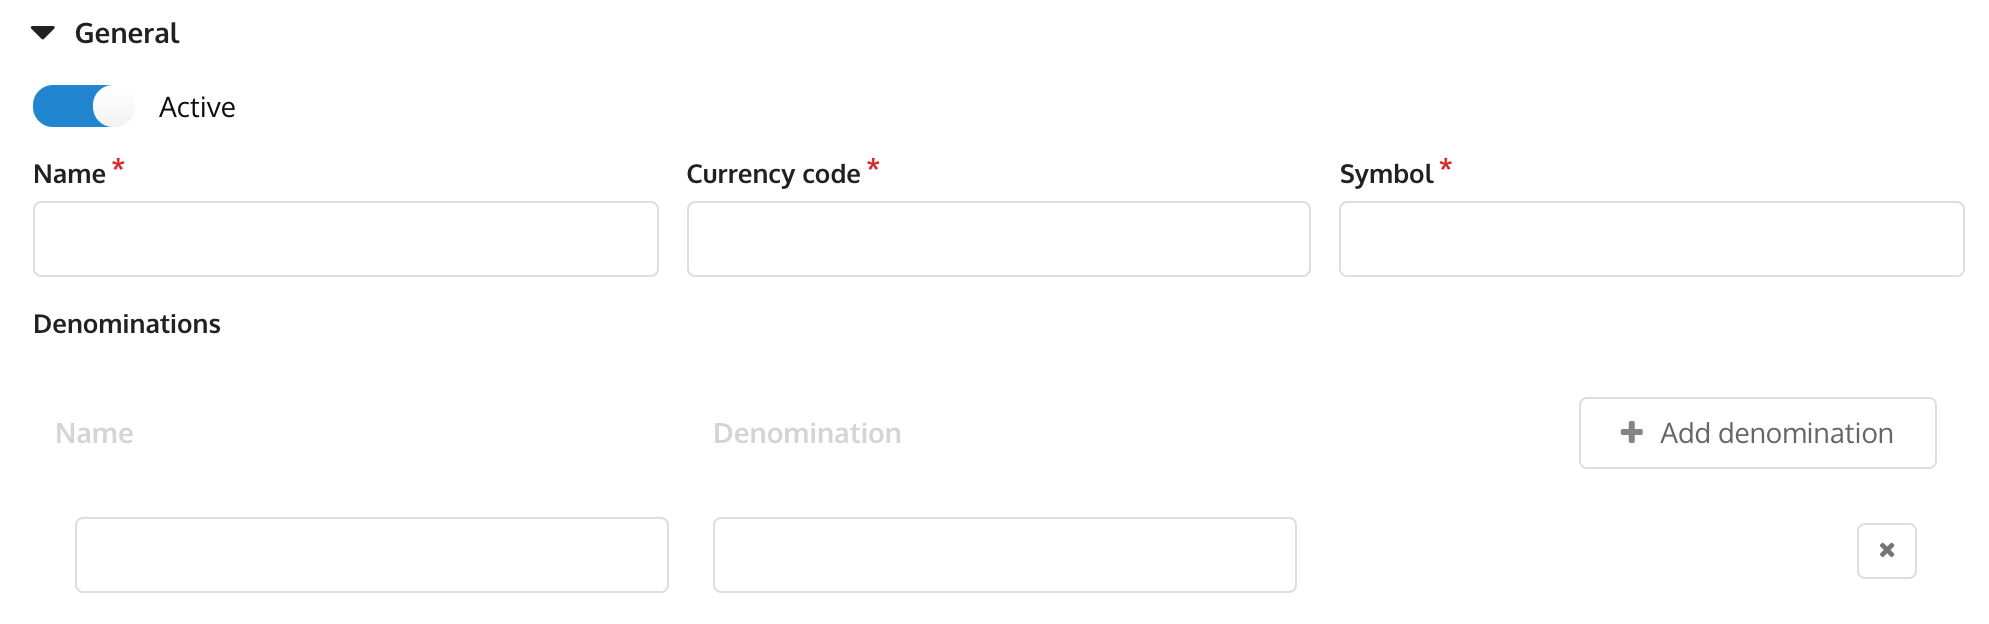
Setting up a new currency or denomination
Even though the application comes preloaded with currency definitions, you can still add new currencies if needed.
To create new currencies and denominations:
- Go to the menu.
- Go to Setup > Finance > Currencies.
- Click the Add button.
-
Fill out the fields in the form:
-
Click the Save button.
If you want to edit an existing currency, click Managing currency and denominations.
Setting up a new country
- Go to the menu.
- Go to Setup > Address > Country.
- Click the Add button.
-
You will see a popup. Enter in the name of the country you want to add. The value entered will be used and displayed throughout the application

-
Enter in the ISO code for the country.
- Lastly, choose the currency used by this country.
- Click Save.
To edit existing countries, view Managing countries.
Creating classification groups
Groups are used as a classification of an item, e.g. gender (male, female).
Creating classification groups:
- Go to menu.
- Go to Setup > Classifications > Groups.
- Click the Add button.
-
Fill out the fields on the form:
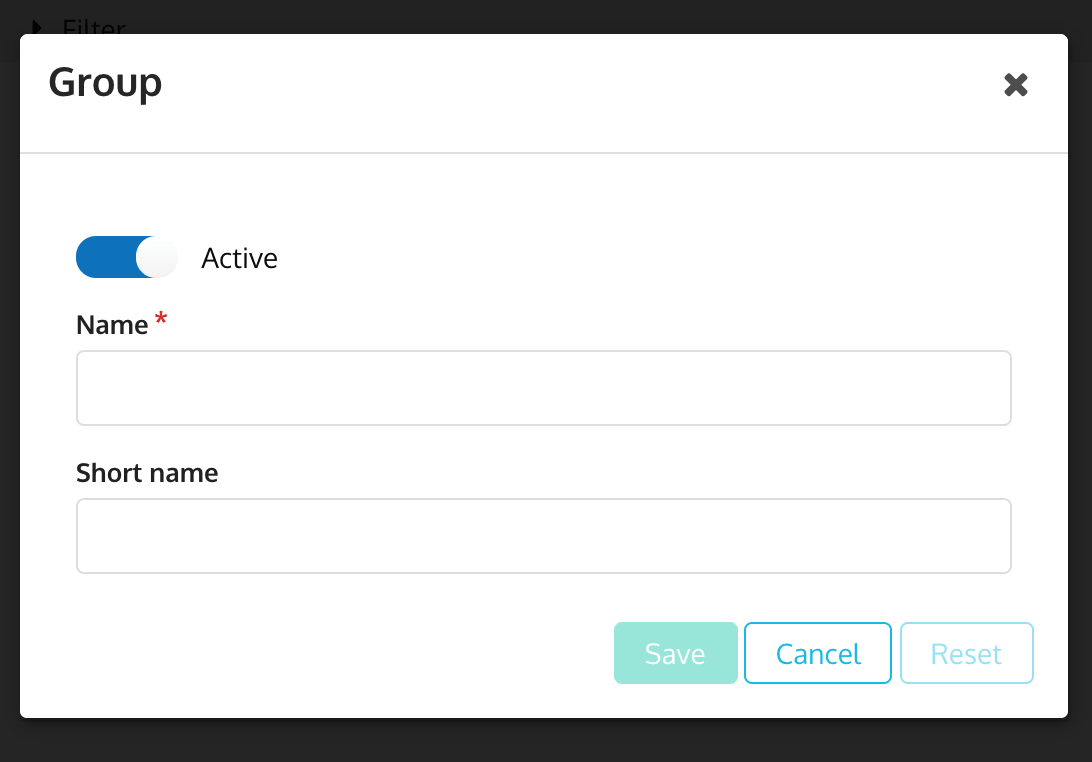
- Name: Enter in name of the group. The value entered here will be used and displayed throughout the application.
- Short name: The short name can be entered to help identify the group. It is not mandatory.
-
Click Save.
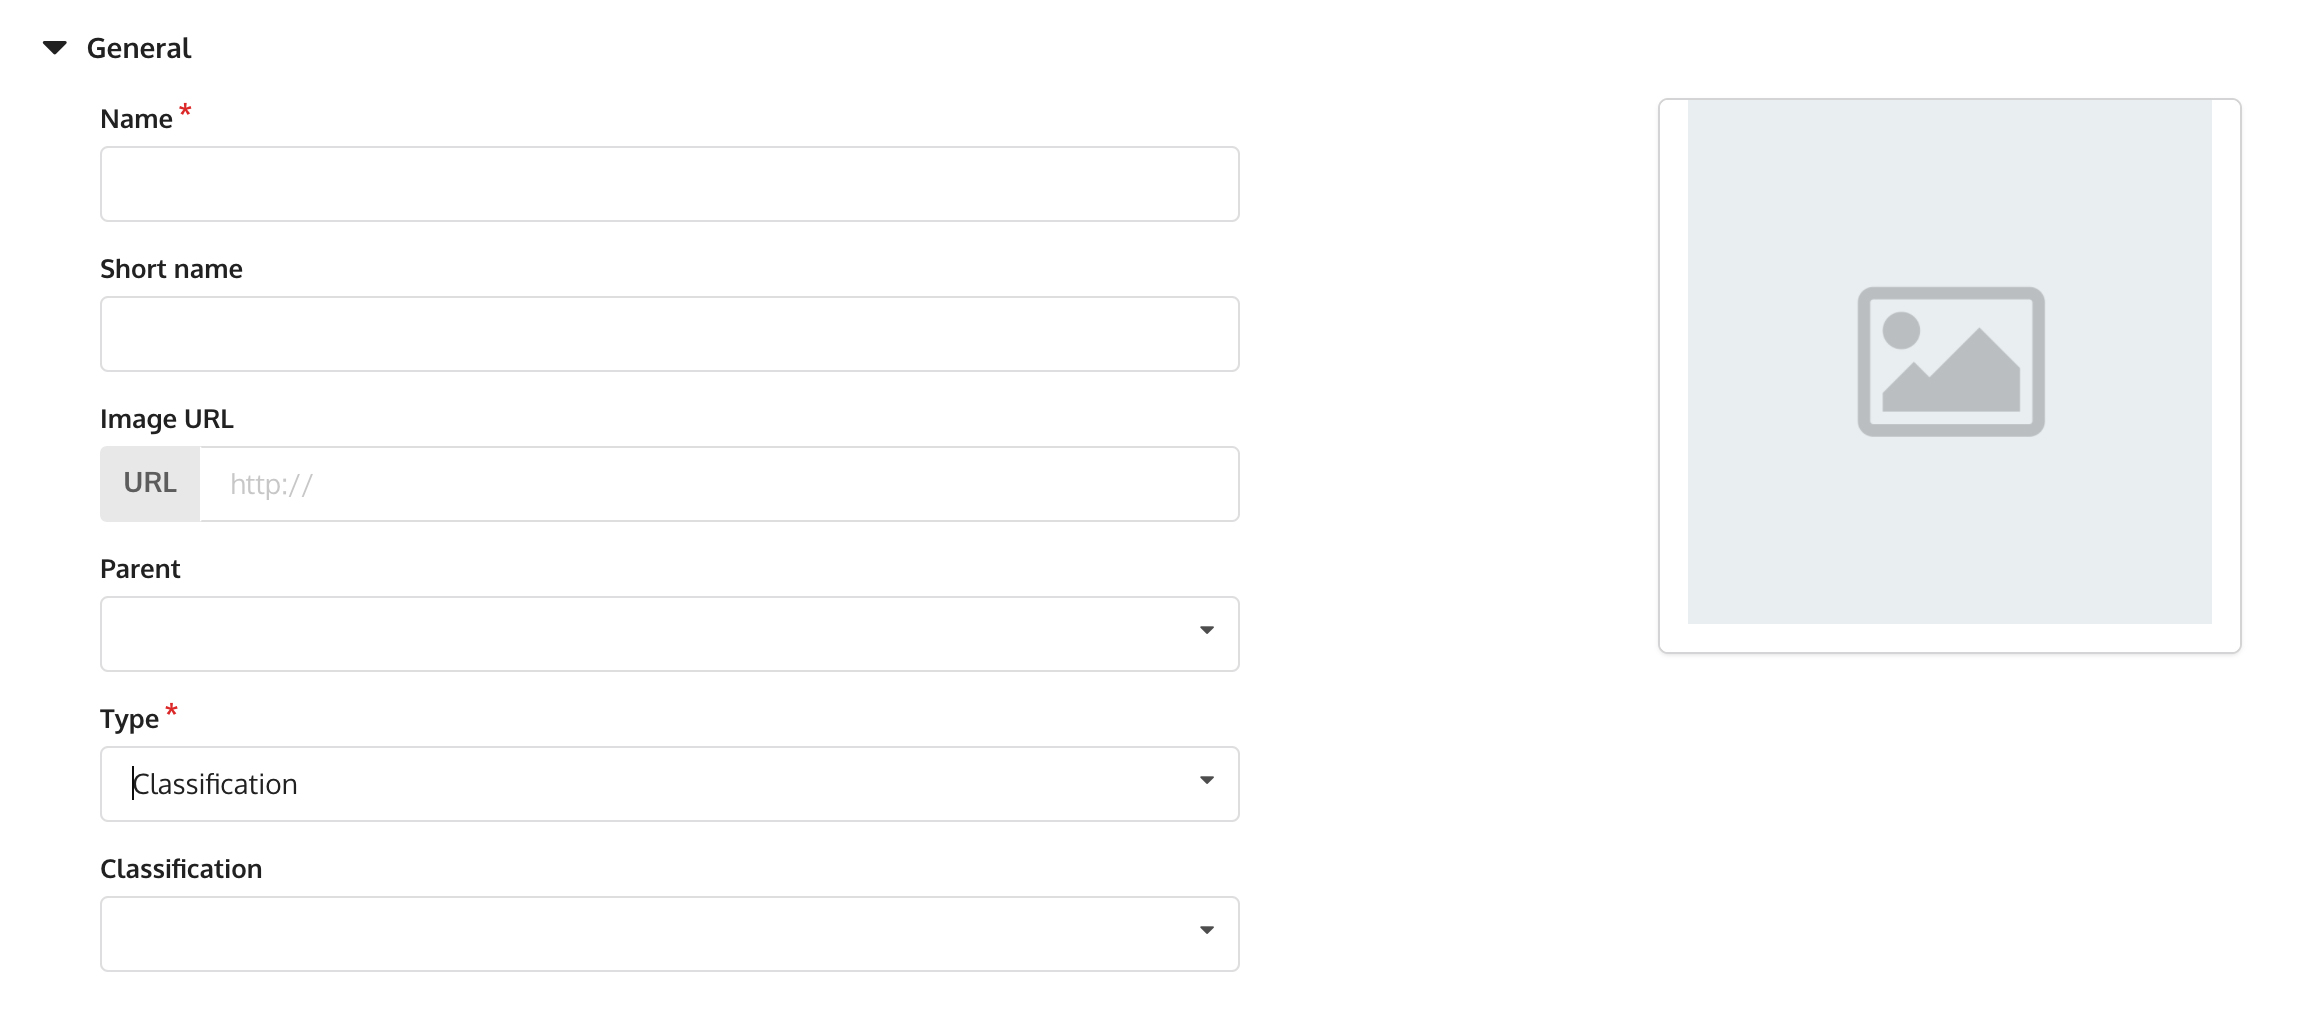
Creating classifications
Classifications (or class) is a structured definition used to determine products groups based on similar characteristics. Classifications are a mandatory for all products.
Adding classifications:
- Go to the menu.
- Go to Setup > Classification > Classes.
- Click on the Add button.
-
This will bring you to a form. Complete the form's required fields and sections.
Filling out the form:
Enter in all the mandatory and if applicable, other optional details.
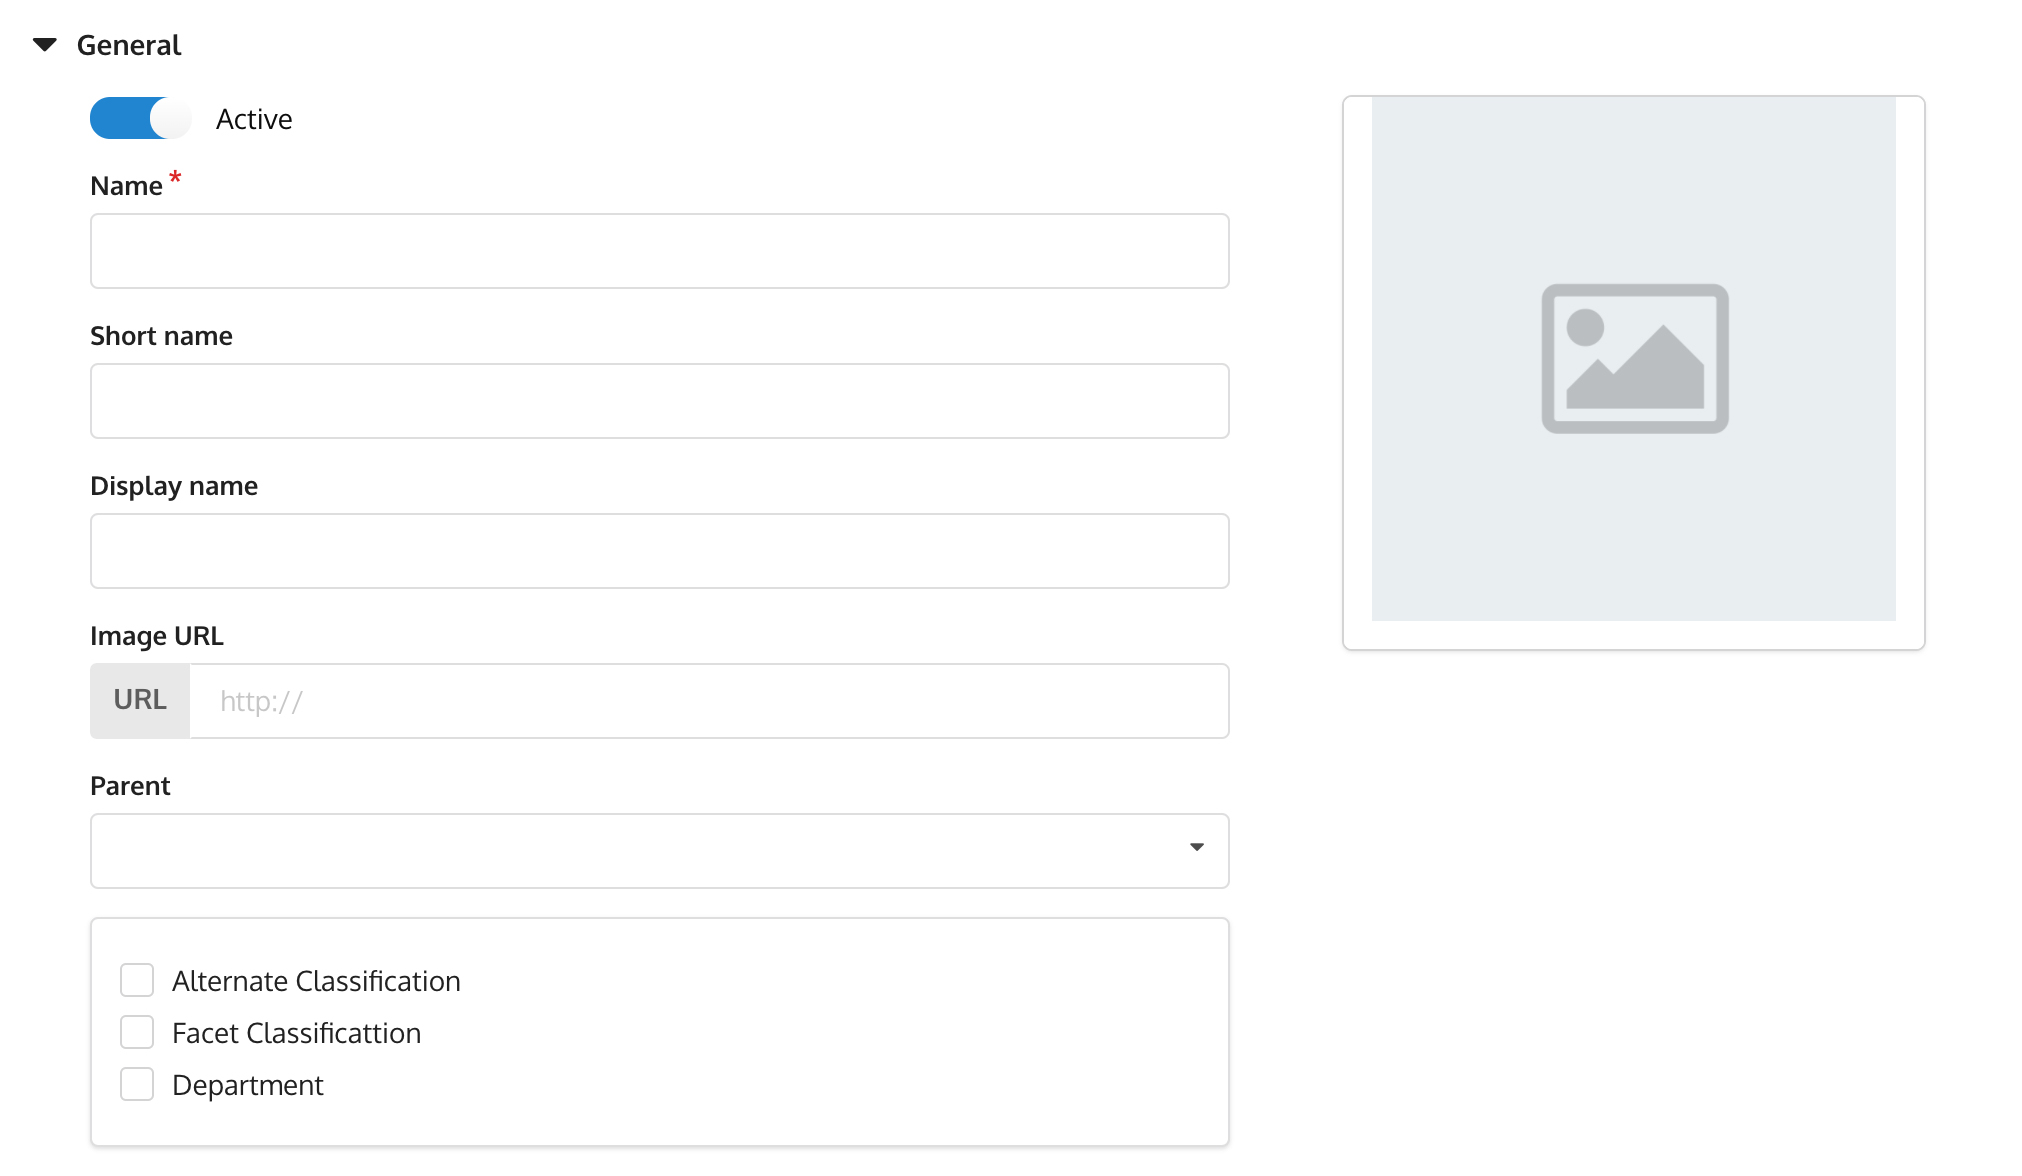
- Name: Enter in the name of the classification. The name entered will be used and displayed in the application.
- Short name: A shorter name that can help identify the classification easier. It is not mandatory.
- Display name: A name typically used for reports.
- Image URL: This image will be associated to the classification. Note that if a class is also defined as a hotkey group, this image will also be displayed on KRISP POS to identify the group.
- Parent: If this classification is a child classification group, choose the parent group which it will belongs to.
- Checkboxes:
- Alternate classification: Check the box if you want to set this classification as an alternate classification. An alternate classification can be assigned to a product.
- Facet classification: For the purposes of website filtering, a classification can be defined as also being a facet. Note that this functionality is currently not in use.
- Department: A classification can also be used to identify a department.
-
Click the Save button.
To edit existing classifications, go to Managing classes.
Creating seasons
Seasons may be used as an item classification.
Creating seasons:
- Go to the menu.
- Go to Setup > Classifications > Seasons.
- Click the Add button.
-
Fill out the fields on the form:
- Name: Enter in name of the group. The value entered here will be used and displayed throughout the application.
- Short name: The short name can be entered to help identify the group. It is not mandatory.
-
Click Save.
Creating product facets
Facets can be used to further classify a product. Products can then be discovered or filtered based on their assigned facet.
Examples of facets include 'morning drink’, ‘red dress’.
Creating facets:
- Go to the menu.
- Go to Setup > Classifications > Facets.
- Click the Add button.
-
Fill out the fields on the form:
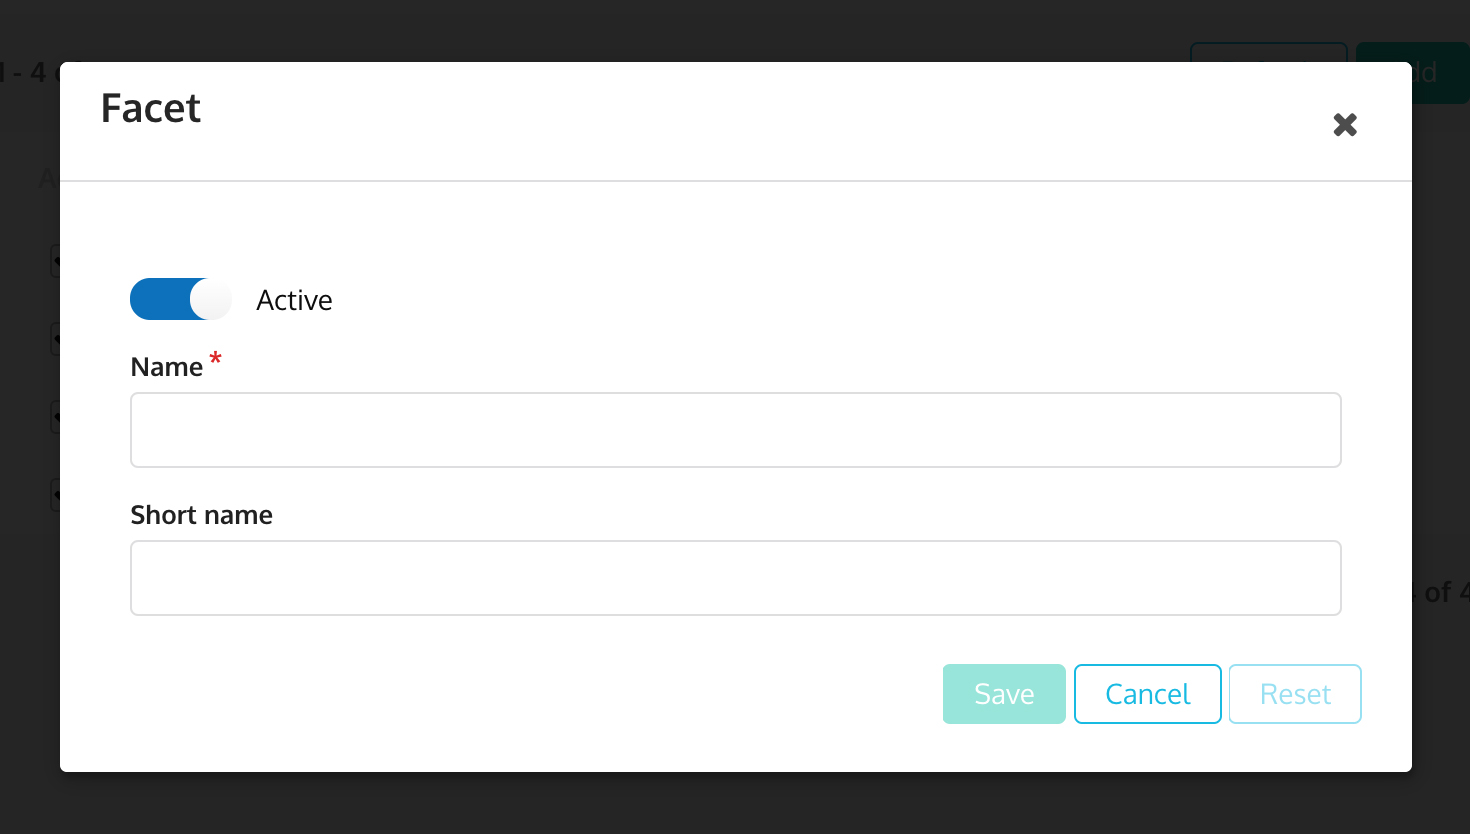
- Name: Enter in name of the facet. The value entered here will be used and displayed throughout the application.
- Short name: The short name can be entered to help identify the facet. It is not mandatory.
-
Click Save.
To edit existing facets, view Managing facets.
Creating product brands
Brands are used to classify items.
Creating brands:
- Go to the menu.
- Go to Setup > Classifications > Brands.
- Click the Add button.
-
Fill out the fields on the form:

- Name: Enter in name of the brand. The value entered here will be used and displayed throughout the application.
- Short name: The short name can be entered to help identify the Brand. It is not mandatory.
-
Click Save.
To edit existing brands, view Managing brands.
Creating location regions
Regions can be used to help find and classify locations.
Creating regions:
- Go to the menu.
- Go to Setup > Classification > Region.
- Click the Add button.
-
Fill out the fields on the form:

- Name: Enter in name of the region. The value entered here will be used and displayed throughout the application.
- Short name: The short name can be entered to help identify the region. It is not mandatory.
-
Click Save.
To edit existing regions, view Managing regions.
Creating address types
Address types enables the categorisation of an address.
Adding address types:
- Go to the menu.
- Go to Setup > Address > Address type.
- Click the Add button.
-
Fill out the fields on the form:
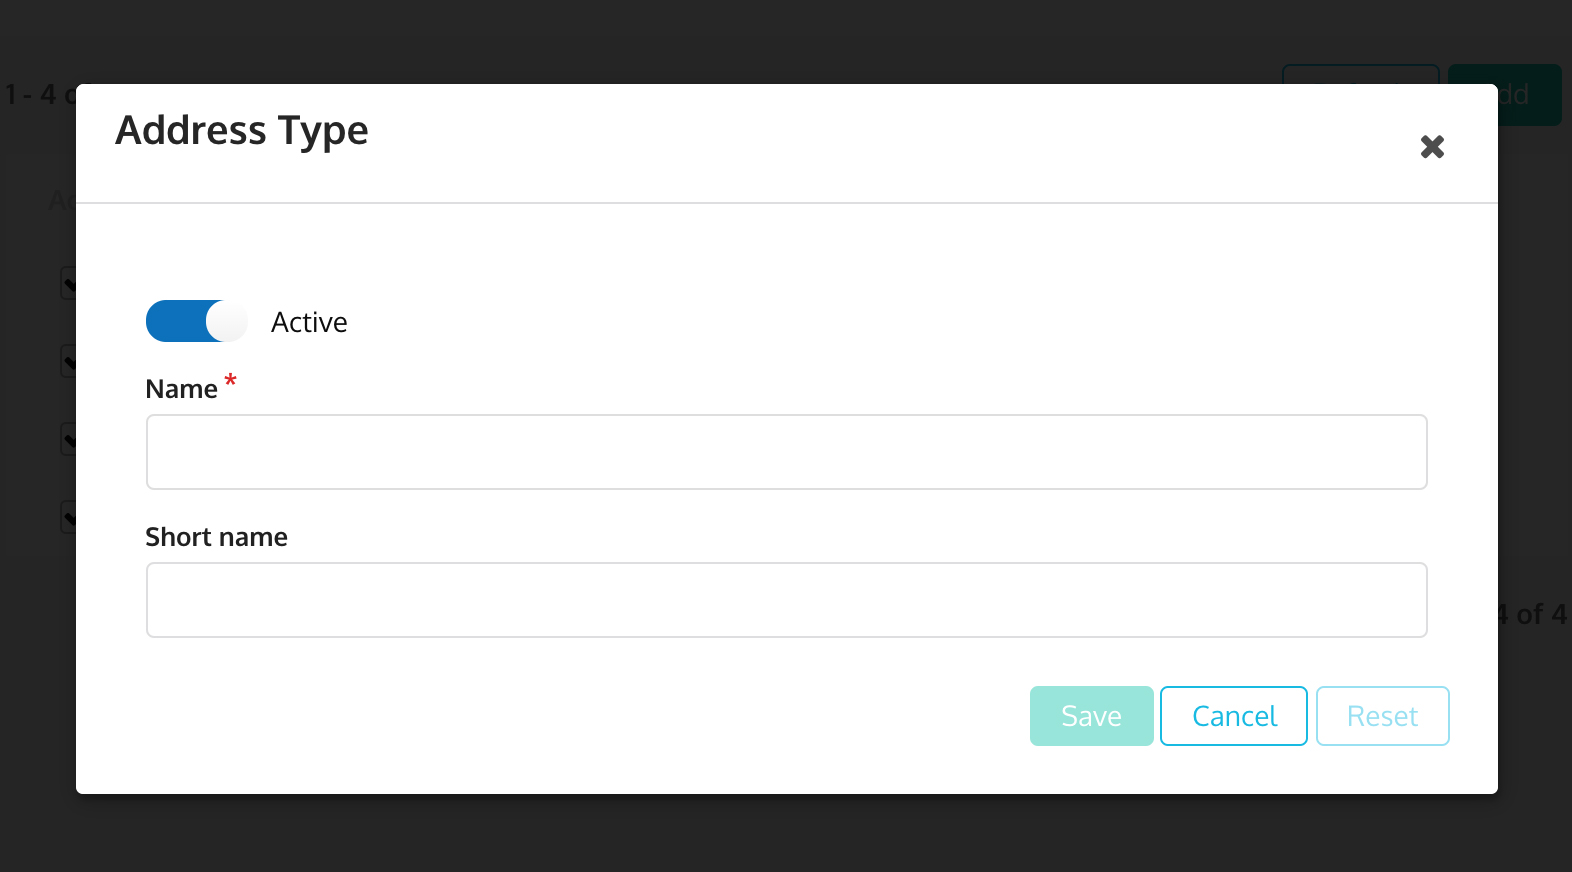
- Name: Enter in an address type name. The value entered here will be used and displayed throughout the application.
- Short name: The short name can be entered to help identify the address type. It is not mandatory.
-
Click Save.
To edit existing address types, view Managing address types.
Setting up taxes
Taxes can be applied on both customer sales and supplier purchases. KRISP POS defines taxes to an item location. Taxes can be applied as each item is selected (tax inclusive) or on checkout (tax exclusive). Dependent on jurisdiction, an item may have one (1) or many taxes applied.
- Tax type. The type of tax being applied, i.e. GST, state tax, etc.
- Tax code. The applicable tax rate associated to a defined location, e.g. country, zipcode, etc.
- Tax group. A grouping of tax codes.
- Tax setup is located on Setup > Finance.
Setting up taxes:
- Go to the menu.
- Go to Setup > Finance > Tax types.
- Click the Add button.
-
There are 3 main steps to setting up taxes. First is creating a tax type.
- Name: Enter in name of the tax type. The value entered here will be used and displayed throughout the application.
- Short name: The short name can be entered to help identify the tax type. It is not mandatory.
-
Click the Save button once you're done.
-
Next, create a tax group.
- Name: Enter in name of the tax group . The value entered here will be used and displayed throughout the application.
- Short name: The short name can be entered to help identify the tax group. It is not mandatory.
-
Click the Save button once you're done.
-
Lastly, create a tax code.
- Tax group: Choose the tax group created from step 5 above.
- Tax type: Choose the tax type created from step 4 above.
- Rate: Enter in the tax rate.
- Amount from: If the tax is applicable only if the item is above a threshold amount, enter the From amount.
- Amount to: If the tax is applicable only if the item is below a threshold amount, enter the To amount.
- Available from: Effective start date of the tax group.
- Available to: Effective end date of the tax group.
- Country: Choose the country which the tax group would be applied to.
- State: Choose the state which the tax group would be applied to. This is only applicable if you have different taxes applied across each states.
- City: Choose the city which the tax group would be applied to. This is only applicable if you have different taxes applied across each cities.
- County: Choose the county which the tax group would be applied to. This is only applicable if you have different taxes applied across each counties.
- Zipcode: Enter in a value here if this tax is applied only for this specific zipcode.
- Apply on sales: Enable this flag when to apply this tax group on sales.
- Apply on purchase: Enable this flag when to apply this tax group on purchases.
-
Click on the Save button.
To edit existing taxes, go to Managing taxes.
Setting up tax exempt items
In many countries, selected items or whole transactions may be exempted from tax if customers are able to show a valid exemption identification. KRISP POS allows tax exemption on items or transactions.
Preferences:
To enable the tax exempt feature:
- Go to menu > Setup > Company > Preferences.
- Click Register on the left sidebar.
- Make sure Enable tax exemption preference is set to True.
Creating and managing tax exempt types:
When enabling an item on POS to be tax exempt, a reason code can be entered to justify removing tax.
- Go to menu.
- Go to Setup > Finance > Tax exemption types.
- Click the Add button.
-
Fill out the form and necessary fields.

Setting up the item to be tax exempt:
- Go to menu > Product > Item.
- Find the item you want to setup to be tax exempt.
- Click Item location on the left sidebar.
- Edit the location you want it applied (or add a new location if needed). Click
- Check the Allow tax exempt checkbox.
- Click Save.
- Go to the POS, and do a server sync by selecting it from the upper right dropdown.
Tax exemption in POS (transactions):
Tax exemption for the whole transaction:
- Add the item available from tax exempt.
-
Click the ellipsis beside Sale.

-
Choose Exempt line from tax.
-
A modal will appear. Choose the right tax exempt type.

Tax exemption in POS (items):
A sale line will remove tax per item line.
-
Click the item line ellipsis.

-
Click Exempt line from tax.
- A modal will appear. Choose the right tax exempt type.
Creating new suppliers
KRISP POS identifies suppliers from whom products and services may be purchased.
Creating new suppliers:
- Go to the menu.
- Go to Relationships > Supplier.
- Click the Add button.
-
This will bring you to a form to create a new supplier. Complete the form's required fields and sections.
Filling out the form:
You will see a left sidebar so you can navigate through the form.
Sections Description General Details about the supplier you're adding. Address Addresses of the supplier. Contact Alternate persons to call if supplier is unavailable. Required for on account as person noted here will be allowed to pick up the goods on the supplier's behalf. Credit Where you add on account details, if applicable. Loyalty Where you can add or change their price level and loyalty details. Friends and Family Details of friends and family. General section:

Fill up all the fields required.
- Entity type: The entity type field will already be prefilled with Supplier. You can enter multiple entity types if applicable to this supplier, i.e. contact, customer, etc.
- Supplier is a company toggle: Turn the Supplier is a company toggle off if you're creating an individual instead of company. The form fields below will change accordingly.

Address section:
-
Address: If an address is required, click on the Add address button and add the address details, making sure that all the applicable and required fields are entered.
Contact section:
-
Contacts: Click on the Add contact button. Enter in the contact details, making sure that all the applicable and required fields are entered.
-
On account: Enable this checkbox and choose an 'authorized by' person if this customer will be an on account customer. Available fields below will change accordingly.
Credit section:

- On account toggle: Turn this toggle on if this supplier is also a customer and will be on account.
Loyalty section:
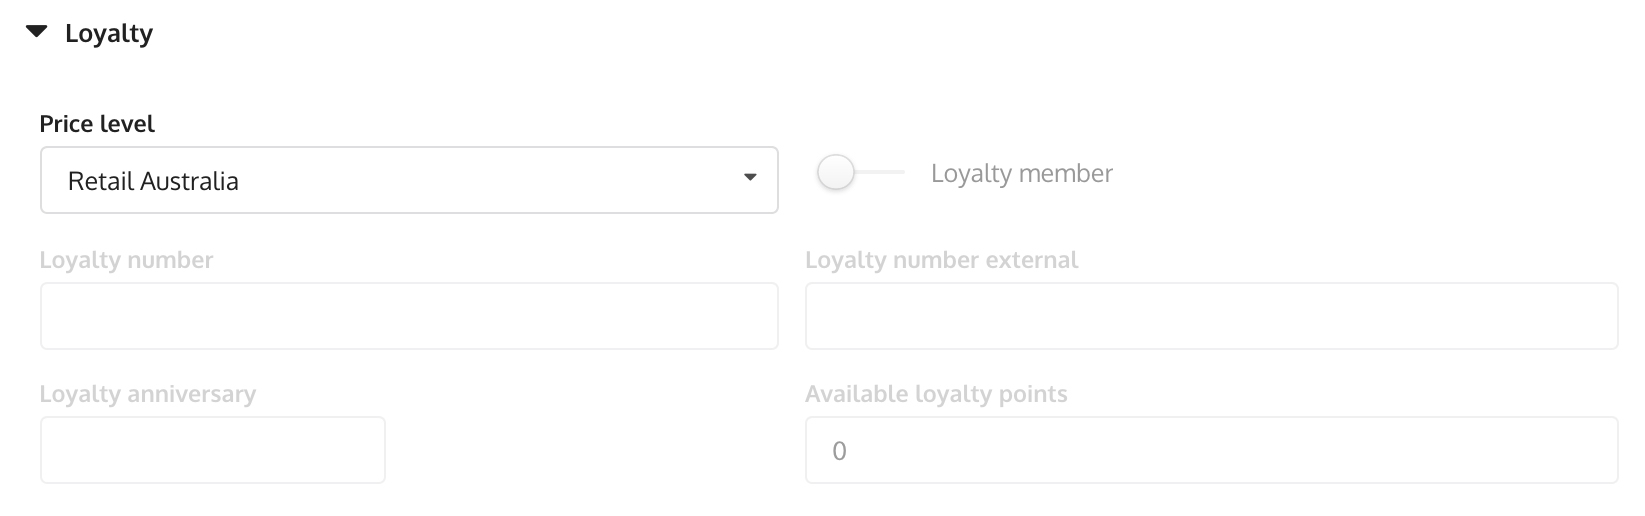
- Price level: Choose a price level which this supplier will belong to.
- Loyalty member toggle: If this supplier will belong to a loyalty program, turn the toggle on. The available fields below will change accordingly.
Friends and family section:

Click on the Add friends & family button.
- Name: Choose the name which is related to this customer.
- Relationship: Click to add the relationship type.
-
Click Save once required details have been entered.
To edit existing suppliers, view Managing suppliers.
Creating hotkey groups
Hotkey groups provide categorised groupings of items (hotkeys) in the KRISP POS workspace. This is so you can quickly access items and add them to the cart.
Hotkeys may be most useful for bulky items or items that are not scannable, e.g. fruits and vegetables, fast sellers, etc.
Hotkeys Groups can be set up:
- As an individual item.
- To show an entire classification of item.
Additionally, hotkey groups can also have multiple levels or hierarchy, to represent a parent-child structure.
Creating hotkey groups:
- Go to the menu.
- Go to Setup > Classification > Hotkeys.
- Click the Add button.
-
This will bring you to a form. Complete the form's required fields and sections.
Filling out the form:
- Name: This is mandatory and the value entered in name will be displayed at KRISP POS.
- Short name: This is mandatory. Short name helps to identify the hotkey group.
- Image URL: Enter in the URL for the hotkey group image.
- Parent: If this group is a child hotkey group, choose the parent hotkey group which it will belong to.
- Type: Choose either classification or item from the dropdown. The dropdown below it will change based on what you choose. When classification is chosen, you can only choose a single classification. If you pick item from the dropdown, you can add multiple items.
-
Click the Save button.
To edit existing hotkey groups, view Managing hotkey groups.
Defining a matrix and creating components
A matrix definition comprises of attributes with defined values.
Creating matrix name and values:
You will first need to enumerate and create names and values before you can start defining a matrix. Examples of these are the colors you have (red, blue, black) or the sizes you have (S, M, L, or size 6, 7, 8 for shoes).
To create matrix names:
- Go to the menu.
- Go to Setup > Matrix > Name.
- Click the Add button.
-
On the popup form, enter in the preferred matrix name. The value entered here will be used and displayed throughout the application. This is what you will call the values you enter later. e.g. size, color, etc.

-
Once you're done, click Save. Enter in as many names as needed.
To create matrix values:
- Go to the menu.
- Go to Setup > Matrix > Values.
- Click the Add button.
-
On the popup form, enter in the perferred matrix value. The value entered here will be used and displayed throughout the application. e.g. small, medium, large, White, blue, red, etc.
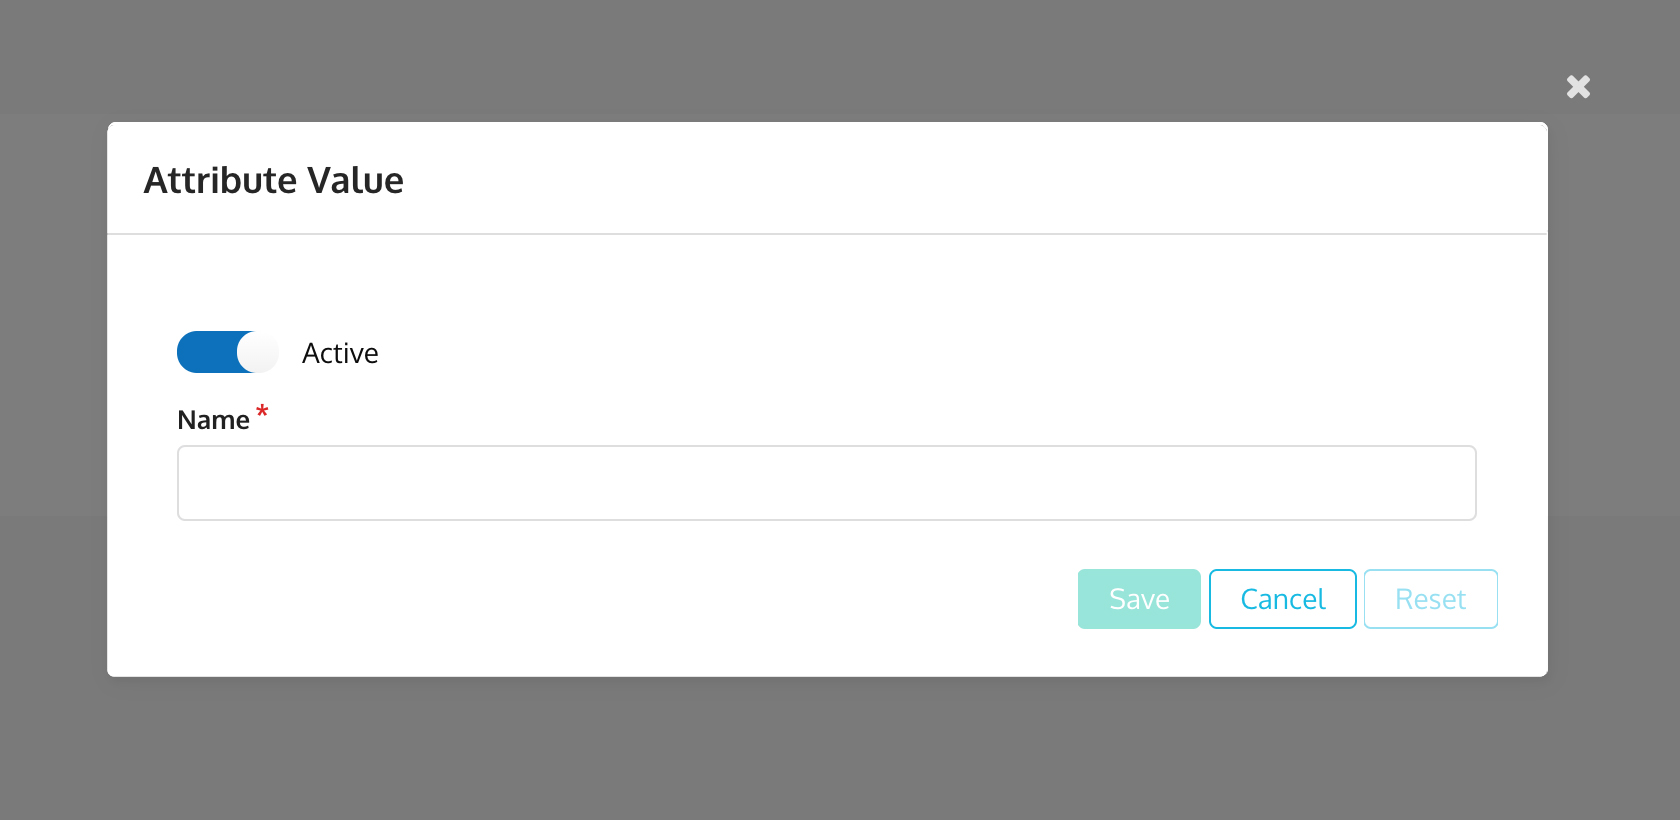
-
Once you're done, click Save. Enter in as many values as needed.
Creating matrix definition:
Once you have created your names and values, you're now able to use those to create a matrix definition.
- Go to the menu.
- Go to Setup > Matrix > Definition.
- Click on the Add button.
-
You will be redirected to a form. Fill out the required fields:

- Enter in the matrix definition name.
- Click on the plus icon
 on top to add an attribute name. You will be selecting from the names you created previously.
 - Click on the other plus icon
 to the right of Value to add a value. You will select from the values you created previously. Just click on the plus icon to keep on adding more values, if needed.
 - Click Save.
Note that currently, KRISP POS only supports up to three (3) matrix components.
-
Click Save.
To edit existing matrix, view Managing matrix and its components.
Creating matrix items
Matrix items allow retailers to quickly define an item which is sold with different options, i.e. an items that comes in different colours, sizes, lengths.
By using matrix (parent) items, the system provides a simplified way of setting up, grouping, and managing the underlying related (child) items. The child item is an inventory item.
Child items inherit the parent matrix item attributes. This ensures standard numbering/naming among items. Certain item values can be altered to assist in distinguishing individual child items, e.g. display names.
Matrix items also have benefits during transaction processing and reporting. Even though the parent item cannot be transacted against, it can appear in reports to group the child matrix items.
Creating matrix items:
The creation of matrix items is similar to creating inventory items, except that you have to assign the matrix definition and generating child matrix items, see Product > Items.
- Go to menu.
- Go to Product > Items.
- Click the Add button.
- You will see a popup with a form you have to fill out.
- When you're done, click the Save button.
-
You will be redirected to a page where you can fill out the details.
Filling out the last form:
Enter in all the mandatory and if applicable, other optional details.
Sections Description General Item's general details like name, item number, etc. Item location Locations where you would like to sell this item with associated pricebook and inventory details. Cross and upsell Substitute and correlated items. Excluded locations Locations where the item will not be accessed from the KRISP POS. UPC QR codes and barcodes for the product. Hotkeys Shows which hotkey groups the product belongs to. System notes A list of recorded activities or changes. General section:
- SKU number: This is automatically assigned but can be overriden if desired.
- Matrix definition field: Choose from the list of matrix combinations. See Defining a matrix and its components.
Item location section:
Add an item location for the matrix item.

-
Click Save.
- Click on Matrix child details button, which will bring you to the matrix detail page.
-
On this screen you will see all the possible combinations of the matrix. Select the combinations you need to generate. Note that if you don't select a combination right away, you can generate the matrix items at a later stage.

- Currency: Choose the desired currency. 2 more fields will appear after selecting one.
- Apply to locations: Choose the locations which this item will be sold at.
- Excluded locations: Choose the locations which this item will be excluded from. Leave this blank if there are no locations to exclude.
-
Click on the Generate matrix items button.
There will be a message to indicate that the matrix children have been successfully created. From there, you can click on the links to the child matrix items.
Creating price books
Price books are used to define product pricing.
Price books:
- Are effective dated to allow proactive price changes.
- Can belong to one or many products.
- Can be configured to manage price levels as well as quantity breaks.
- Will allow you to proactively plan a price change for a future date.
Price books capture the retail price, tax-exclusive.
Creating price books:
- Go to the menu.
- Go to Product > Price book.
- Click the Add button.
-
Fill out the form to create a new price book.
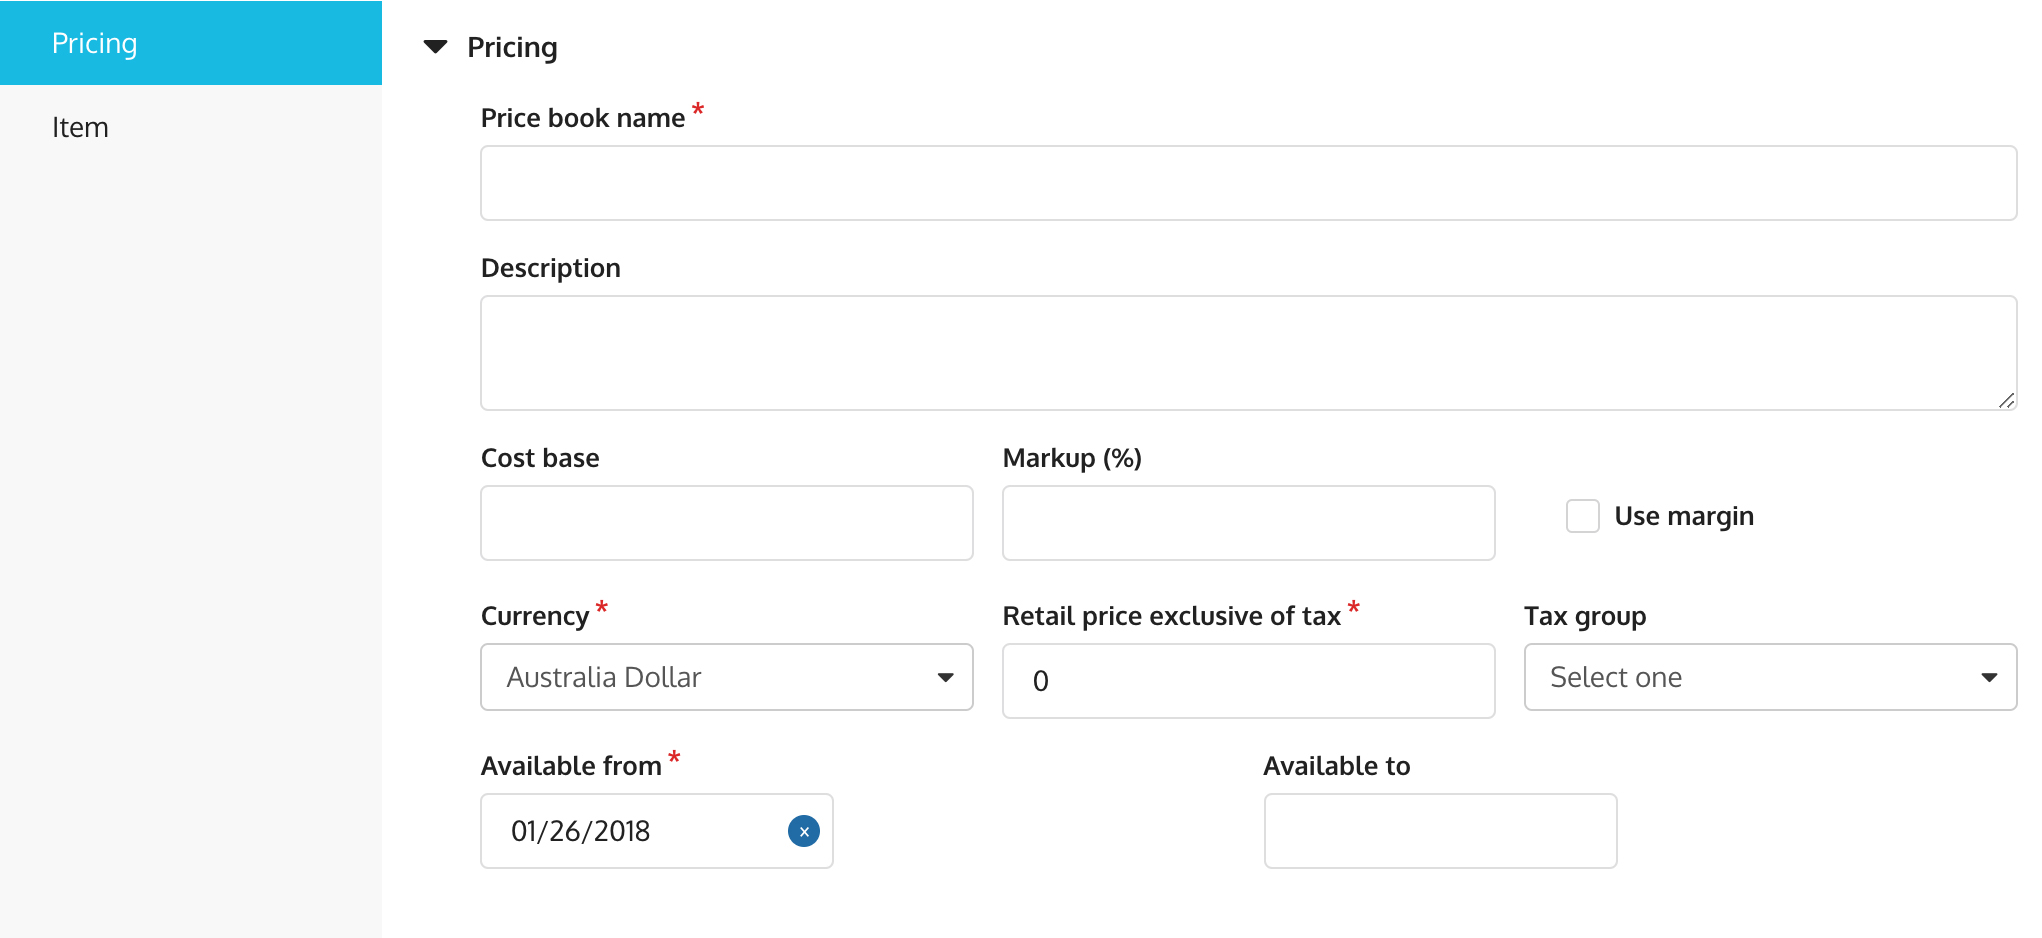
- Price book name: Enter in name of the price book. The value entered here will be used and displayed throughout the application.
- Description: Enter in a description of the price book.
- Cost base: Enter in the tax-exclusive cost price.
- Markup: By default, you can enter in the markup % of this price book. If margin is a preference, enable the Use margin checkbox, then enter in the margin % value.
- Retail price exclusive of tax: The value here is displayed based on the calculation from cost base and markup/margin values.
- Tax group: Choose the tax group applicable to this price book.
- Available from: Choose the date when prices will start becoming effective.
-
Available to: Choose the date when prices will stop becoming effective.
The from and to dates are the effective dates for this price book.
-
Click on Add price level button to add price level and quantity price breaks.
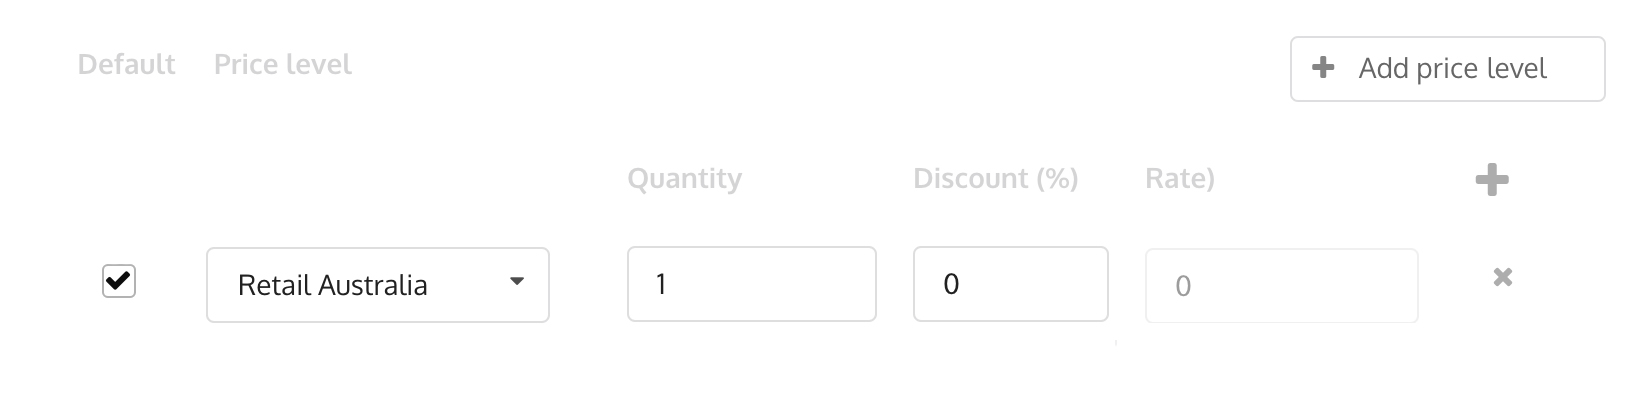
- Default checkbox: Defines the price level to be used where a) the customer is not defined at the time of sale, b) their price level is not defined in the price book, c) they do not have an allocated price level.
- Price level: Choose price level for this price book.
- Quantity: Enter in quantity.
- Discount: Enter in the discount % value if applicable.
- Rate: The rate will be displayed based on the calculation of retail price and discount. Note that the rate is for display purposes ONLY. The discount will be used when calculating the price level sales price.
-
Click the Save button when you're done. If you need to add additional quantity price breaks, proceed below.
Adding additional quantity price breaks:
You might want to sell your products at a different rate when they are bought in preset quantities. At KRISP POS, the prices will automatically be reflected without the need for manual intervention.
For example, if a customer buys 10 units of an item and you want to offer them a 10% discount automatically at KRISP POS, then enter in 10 as quantity and 10% as the discount.
-
Click on the plus icon
.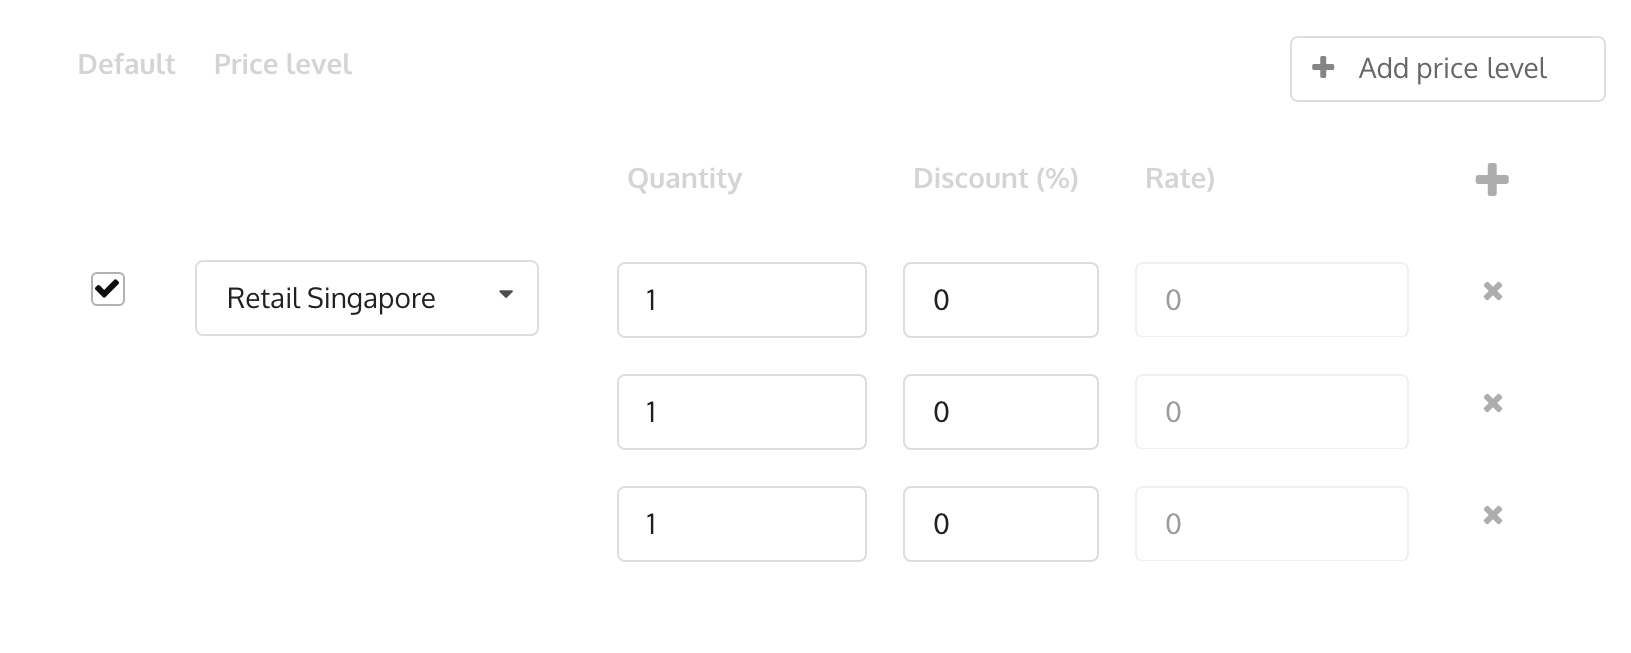
-
Enter in the quantity and discount values applicable to this price break.
- Repeat steps above to add more prices levels and quantity breaks.
- Click the Save button.
Reference number:
On save, a price book is allocated a systems reference. This reference is used to tie together effective dated rates for a price book.
Making copies of price books:
To set a new price for a future dated effective price book, you can make a copy of the original price book. From this copy you will then define the new cost and prices.

-
Find the original price book and click on the make copy icon
 .
. -
Enter in the new values and dates pertaining to this copy.
-
Click the Save button.
To edit existing price books, go to Managing price books.
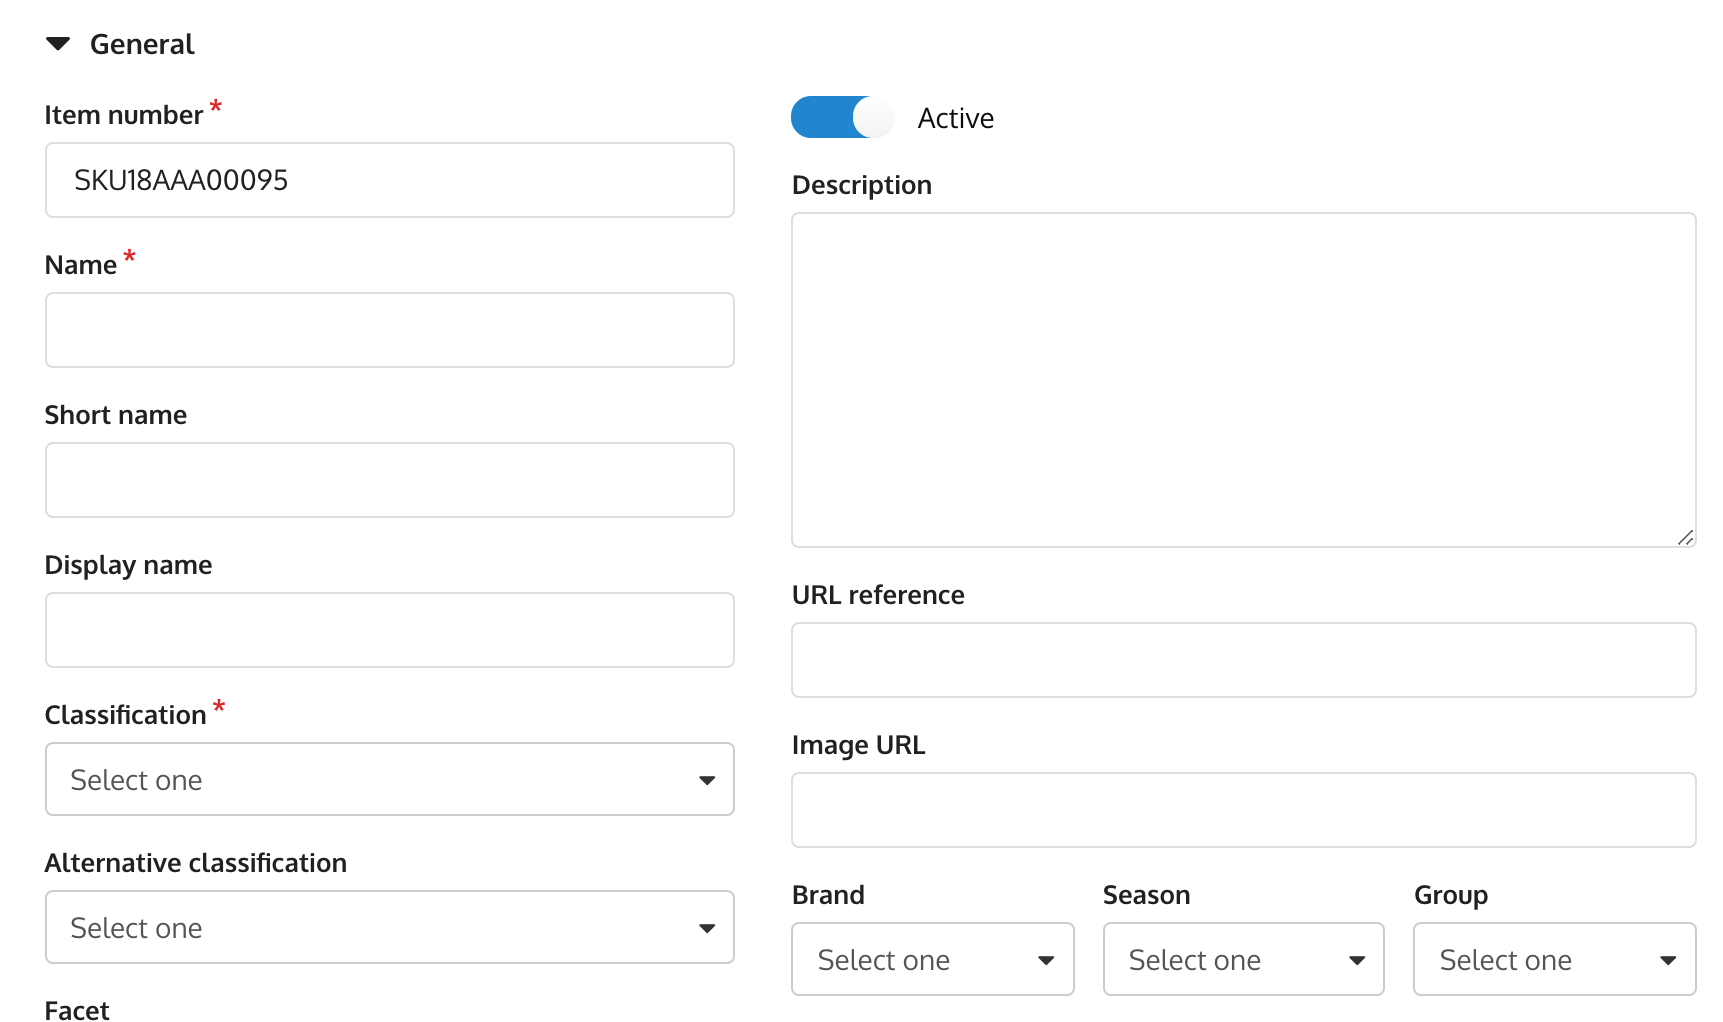
Creating new products
KRISP POS enables the categorising of goods and services. Merchandise sold at POS will need to created in admin.
To create new products:
- Go to the menu.
- Go to Product > Items.
- Click the Add button.
-
This will bring you to a form. Complete the form's required fields and sections.
Filling out the forms:

- Item name: Enter in name of the item. The name entered here will be used and displayed throughout the application.
- Type: Choose what type of product it is, e.g. promotion item, inventory item, matrix item, etc.
- Description: Enter in additional information for this item. This information will be shown on the item details popup at KRISP POS.
-
Click the Save button.
-
You will be re-directed to a page created for the item you just created. Fill out the second and last form:
Filling out the last form:
Enter in all the mandatory and if applicable, other optional details.
Sections Description General Item's general details like name, item number, etc. Item location Locations where you would like to sell this item with associated pricebook and inventory details. Cross and upsell Substitute and correlated items. Excluded locations Locations where the item will not be accessed from the KRISP POS. UPC QR codes and barcodes for the product. Hotkeys Shows which hotkey groups the product belongs to. System notes A list of recorded activities or changes. General section:
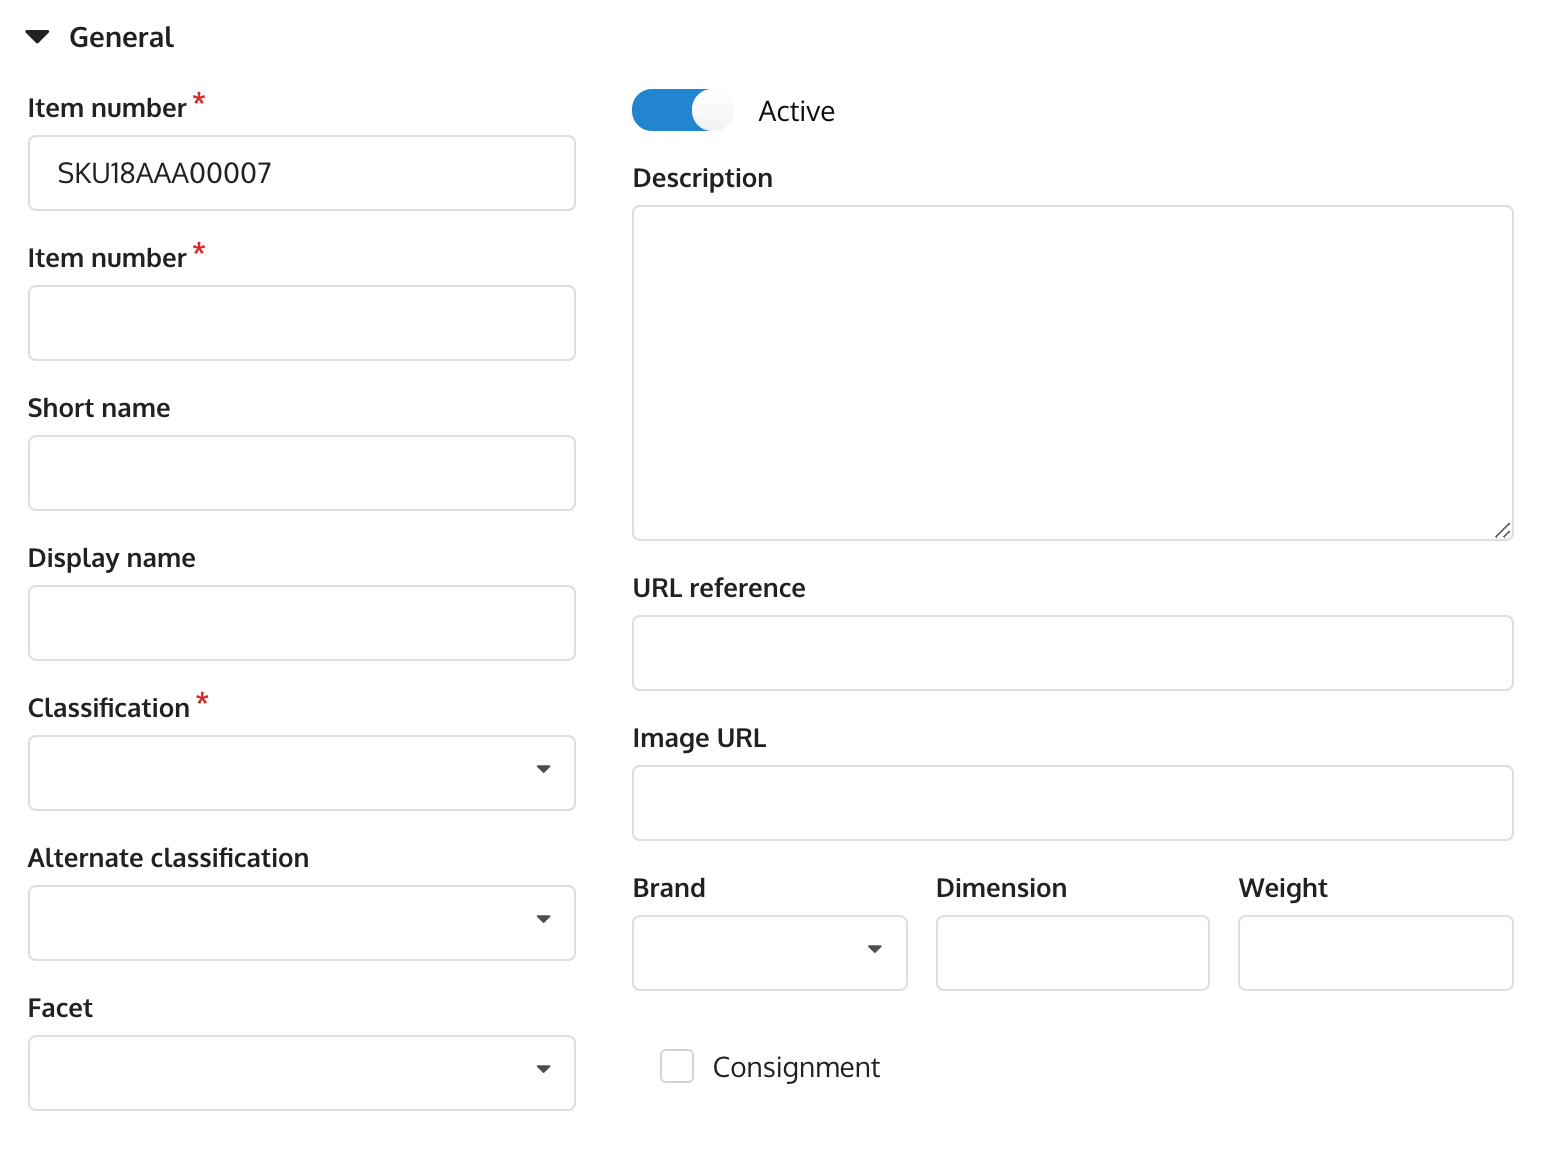
Enter in all the details pertaining to this item. The SKU number is automatically assigned but can be overwritten if desired.
Item location section:
The fields available on the item location page is dependent on the item type, e.g. service item will not require inventory details.
- Location: Choose the location where this item will be sold.
- Currency: This is a view-only field and shows the currency for the location chosen from above step.
- Price book: Choose the price book for this item.
- Retail price: This is a view-only field which shows the retail price from the price book chosen from above step.
Click on the open popup icon
 and enter in these additional values pertaining to the item:
- MSRP: Enter in the manufacturer supplied retail price. This is optional.
- Floor price: Enter in the floor price. This is optional.
- Tax group: Choose the tax group for this item.
- Cost price: Enter in an initial cost price.
- Landed Cost: Enter in the landed cost for this item.
- Shipping cost: Enter in the shipping cost for this item.
- Handling cost: Enter in the handling cost for this item.
- Min: Enter in the minimum quantity which is used in the calculations for re-ordering.
- Max: Enter in the maximum quantity which is used in the calculations for re-ordering.
- Safety stock: Enter in the safety stock quantity which is used in the calculations for re-ordering.
- Back order: This is a view-only field which will show the quantities on back order.
- Back order ETA: This is a view-only field which will show the estimated time of arrival for a back order.
- Supplier: Choose the suppliers for this item.
- Checkboxes:
- Available for pickup: Check the box if you will allow this item to be picked up from this location.
- Available to ship: Check the box if you will allow this item to be shipped from this location.
- Available for transfer: Check the box if you will allow this item to be transferred from this location.
- Re-order: Check the box if you will allow this item to be re-ordered at this location.
- Allow manual discount: Check the box if this item can be manually discounted at KRISP POS.
Repeat these steps above to add more locations, pricebook, and inventory details.
Cross and upsell section:

- Substitute items: Choose the substitute items for this item.
- Correlated items: Choose the items which will be correlated.
At KRISP POS, these substitute and correlated items will appear in the product detail popup.
Excluded locations section:

- Excluded locations: Choose the locations where the item will be excluded from being available at KRISP POS.
UPC section:

- QR code and/or barcode: Click on Generate button to obtain a system generated code. Alternatively, enter in your own code then click on the Add button.
You can add multiple unique codes for an item.
Hotkeys section:
This is a view-only section, and it will show the hotkey groups which this item has been assigned to.
-
Click the Save button when you're done.
Item types:
Item types are used to identify the attributes associated to a good or service.
- Inventory: A tracked inventory item.
- Non-inventory: A non-tracked inventory item.
- Matrix: Defines a linking parent item to child items. Child items are categorised generated by varied attributes identified on the parent item.
- Shipping: Shipping costs.
- Serialized: Uniquely itemized inventory item.
- Batch: Uniquely itemized inventory items.
- Service: Service costs.
- Discount: Transaction discount item.
- Bundle: An item generated by merging or grouping other items.
- Gift certificate: Credit note purchased or gifted to a customer.
- Loyalty: An item associated to the purchase of loyalty.
- Promotion: An item uniquely identifying a promotion.
- Coupon: An item identifying either a voucher or coupon.
- Payment surcharge: A payment generated surcharge.
- Payment charge: Payment charge.
- Gratuity: Item identifying a gratuity provided by the customer at the time of payment.
To edit existing products, view Managing products.
Creating product bundles
Individual products can be grouped and sold together at KRISP POS as a single unit.
- A bundle has its own selling price which may vary from the sum of the bundled items.
- It can be made up of inventory, non-inventory, and service items. This allows the single bundle item to be selected on a sale. Note that the underlying items are not tracked.
- A bundle's quantity is increased by an adjustment. See inventory adjustment.
An example of a bundle would be a gym bundle made up of a gym towel, bag and, shirt.
When a single unit of that gym bundle is sold at KRISP POS, the inventory decreases for the bundle.
Creating bundles:
The creation a bundle item is similar to creating an inventory item. However, there is an additional step where the underlying items and quantity, which make up the bundle, are selected. i.e. bundle items subtab.
In this subtab, add the items and quantity which will make up the bundle.
- Go to the menu.
- Go to Product > Items.
- Click the Add button.
- Fill out the form and make sure that bundle is selected under the Type dropdown.
-
This will bring you to a form. Complete the form's required fields and sections.
Filling out the forms:

- Item name: Enter in name of the item. The name entered here will be used and displayed throughout the application.
- Type: Choose bundle for this purpose.
- Description: Enter in additional information for this item. This information will be shown on the item details popup at KRISP POS.
-
Click the Save button.
-
You will be redirected to a page created for the item you just created. Fill out the second and last form:
Filling out the last form:
Enter in all the mandatory and if applicable, other optional details.
Sections Description General Item's general details like name, item number, etc. Item location Locations where you would like to sell this item with associated pricebook and inventory details. Cross and upsell Substitute and correlated items. Excluded locations Locations where the item will not be accessed from the KRISP POS. UPC QR codes and barcodes for the product. Hotkeys Shows which hotkey groups the product belongs to. System notes A list of recorded activities or changes. All the other sections are exactly similar to how you create new products, which you can refer to by going to Creating new products. For creating bundle items, there will be an additional section on the left called Bundle items.
Bundle items section:
Click the plus icon
to add the items you want to include in this bundle. You can change the quantity depending on what you need.
-
Press the Save button once you're done with all the other sections (General, item location, cross and upsell, etc).
Setting up cash rounding rules
Cash rounding rules determine any currency rounding that needs to occur when calculating or dispensing a total.
They can be setup for each country which has imposed a regulation for retailers, or to apply specific payment type rounding rules. When rounding rules are setup and associated to a payment type (on checkout), the KRISP POS will apply these rules automatically without the need to prompt the cashier.
Creating cash rounding rules:
- Go to the menu.
- Go to Setup > Finance > Cash rounding.
- Click the Add button.
-
Fill out the required fields on the form:

- Name: Enter in a name for this rule.
- Currency: Choose the currency which will be used.
- Round to (denomination in cents): Enter in the denomination (in cents) you want to apply the rounding rule to.
- Method: Choose a rounding method. There are 3 rounding methods available:
- Standard: The total will be rounded to the nearest multiple of the round to denomination, which may be higher or lower than the unrounded total e.g. 9 cents will be rounded to 10 cents, and 6 cents to 5 cents.
- Up: Will always round up.
- Down: Will always round down.
- Middle rounding method: If the cash total hits a middle value in the 'round to' denomination, the rounding can be set to round up or down.
Example: In Australia, cash rounding is to nearest 5 cents.
If a transaction is being paid in cash, and the number of cents to be paid does not end in zero or five, requiring the customer to use 1 and 2 cent coins in payment or the retailer to use such coins in giving change, the amount of change paid will be rounded to the nearest 5 or 10 cent: 1 and 2 would be rounded down to zero, 3 and 4 would be rounded up to 5, 6 and 7 would be rounded down to 5, 8 and 9 would be rounded up to 10.
-
Click the Save button.
To edit existing cash rounding rules, view Managing cash rounding rules.
Creating certificates
KRISP Systems enables viewing of all certificates in the admin. Certificates include:
- Gift certificates
- Credit notes
Creating certificates:
To create certificates:
- Go to menu.
- Go to Concession > Certificates.
- Click the Add button.
-
You will be redirected to a page with forms you have to fill out. You will see different sections via the left sidebar.
- General: Contains the basic information about the certificate, i.e. certificate type, location, certificate availability and available amount.
- Created: Enable the user to view the transaction from which the certificate was issued. Click the transaction reference ID to redirected to the transaction.
- Used: Allows the users to view all transactions where the certificate has been used. Sale and payment are also linked into it.
Creating promotions
Promotions can be triggered by the system or manually by the cashier, i.e. a manually applied promotion/coupon.
Different types of promotions:
-
$% off: Either a % or $ discount is applied as the reward. e.g. a Buy 1 Get 50% off Promotion.
-
Dollar spend (Product - amount): When the trigger value of the items is met, a discount amount is applied. Multiple trigger values can be set. e.g. the customer gets a $10 off, only when the total of their promotion-valid items reaches the minimum trigger of $500.
-
Dollar spend (Product - percent): When the trigger value of the items is met, a discount percent is applied. Multiple trigger values can be set. e.g. the customer gets a 20% off, only when the total of their promotion-valid items reaches the minimum trigger of $500.
-
Dollar spend (Transaction - amount): When the trigger value of the transaction is met, a discount amount is applied. e.g. the customer gets a $10 off, only when the total of their entire transaction in the cart reaches the minimum trigger of $500.
-
Dollar spend (Transaction - percent): When the trigger value of the transaction is met, a discount amount is applied. e.g. the customer gets a 20% off, only when the total of their entire transaction in the cart reaches the minimum trigger of $500.
-
Set the sell price: a) Items on promotion can be given a promotional price (each), b) the total can be given a promotional price (all), and c) additional items after the trigger is initiated can be purchased for a set price.
Some promotion examples:
- Example 1: Get 10% off Entire Sale above $500.
- Example 2: Get 5% entire range.
- Example 3: 15% Off for Members.
- Example 4: Buy 2 Get the Next item FREE.
Creating promotions:
Most promotions will have a start and end date, a target customer (no target audience implies that the promotion applies to everyone), triggers (can be a single or combination of items, class, brand and facets), and rewards (can be a discount or a set price to the triggers itself or other specific items, class, brand or facets).
-
Go to the menu.
-
Go to Concessions > Promotions.
- Click the Add buttion.
-
This will bring you to a form to create a promotion. Complete the form's required fields and sections.
Filling out the create a promotion form:
You will see a left sidebar so you can navigate through the form.
Sections Description General Details about the promotion. Schedule Promotion's duration of availability. Trigger & rewards What conditions will trigger the promotion, and the corresponding rewards. General section:

- Name: Enter in name of the promotion. The value entered here will be used and displayed throughout the application.
- Short name: The short name can be entered to help identify the promotion. It is not mandatory.
- Promotion item: Choose the promotion item which was explained above.
- Excluded locations: Choose the locations which will be excluded from this promotion.
- Is manual checkbox: Check this box if this promotion is set off manually at KRISP POS.
- Can apply more than once checkbox: Check this box if this promotion can be applied more than once in a single transaction.
- Apply to lowest cost item: On a promotion where multiple rewards are possible off an activated promotion, apply the reward to the lowest priced items.
Schedule section:
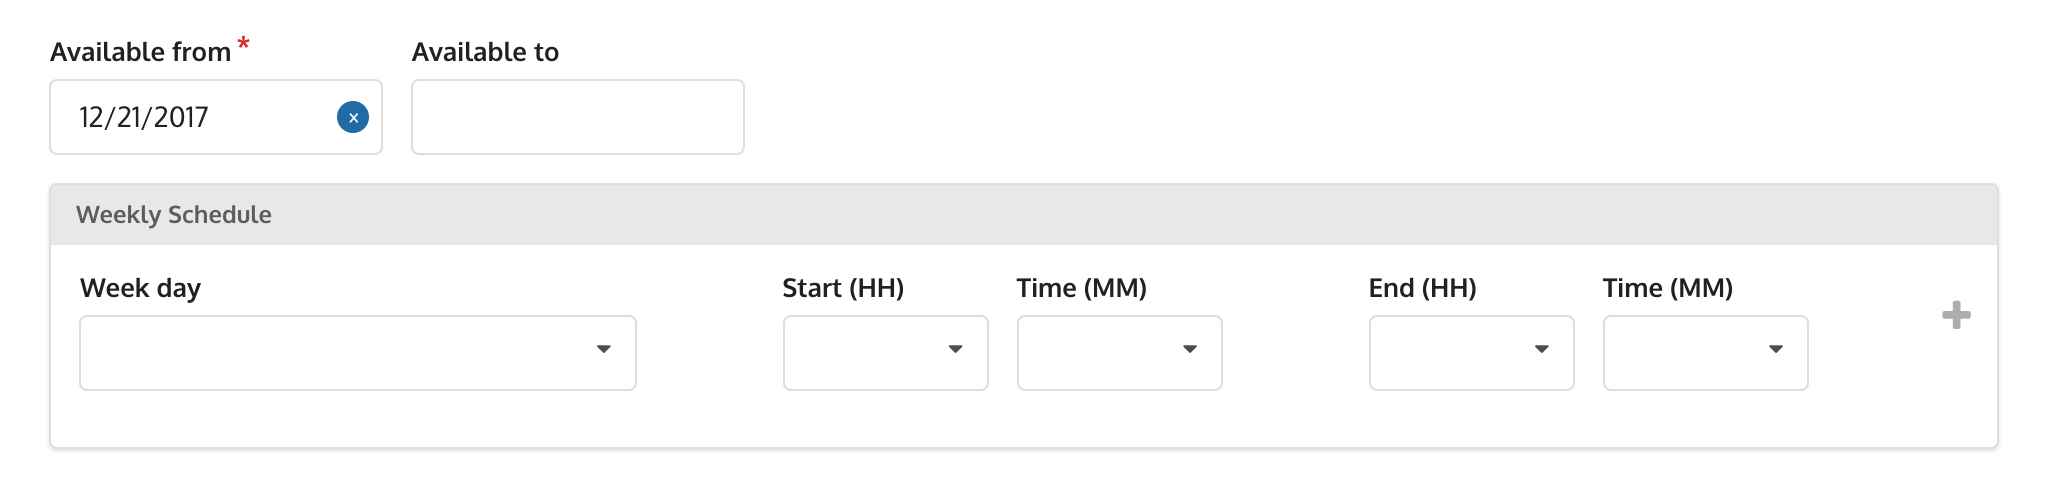
- Available from: Choose the date which this promotion will start to be active at KRISP POS.
- Available to: Choose the date which this promotion will cease to be active at KRISP POS.
Trigger & rewards section:
The fields available will depend on the promotion type.
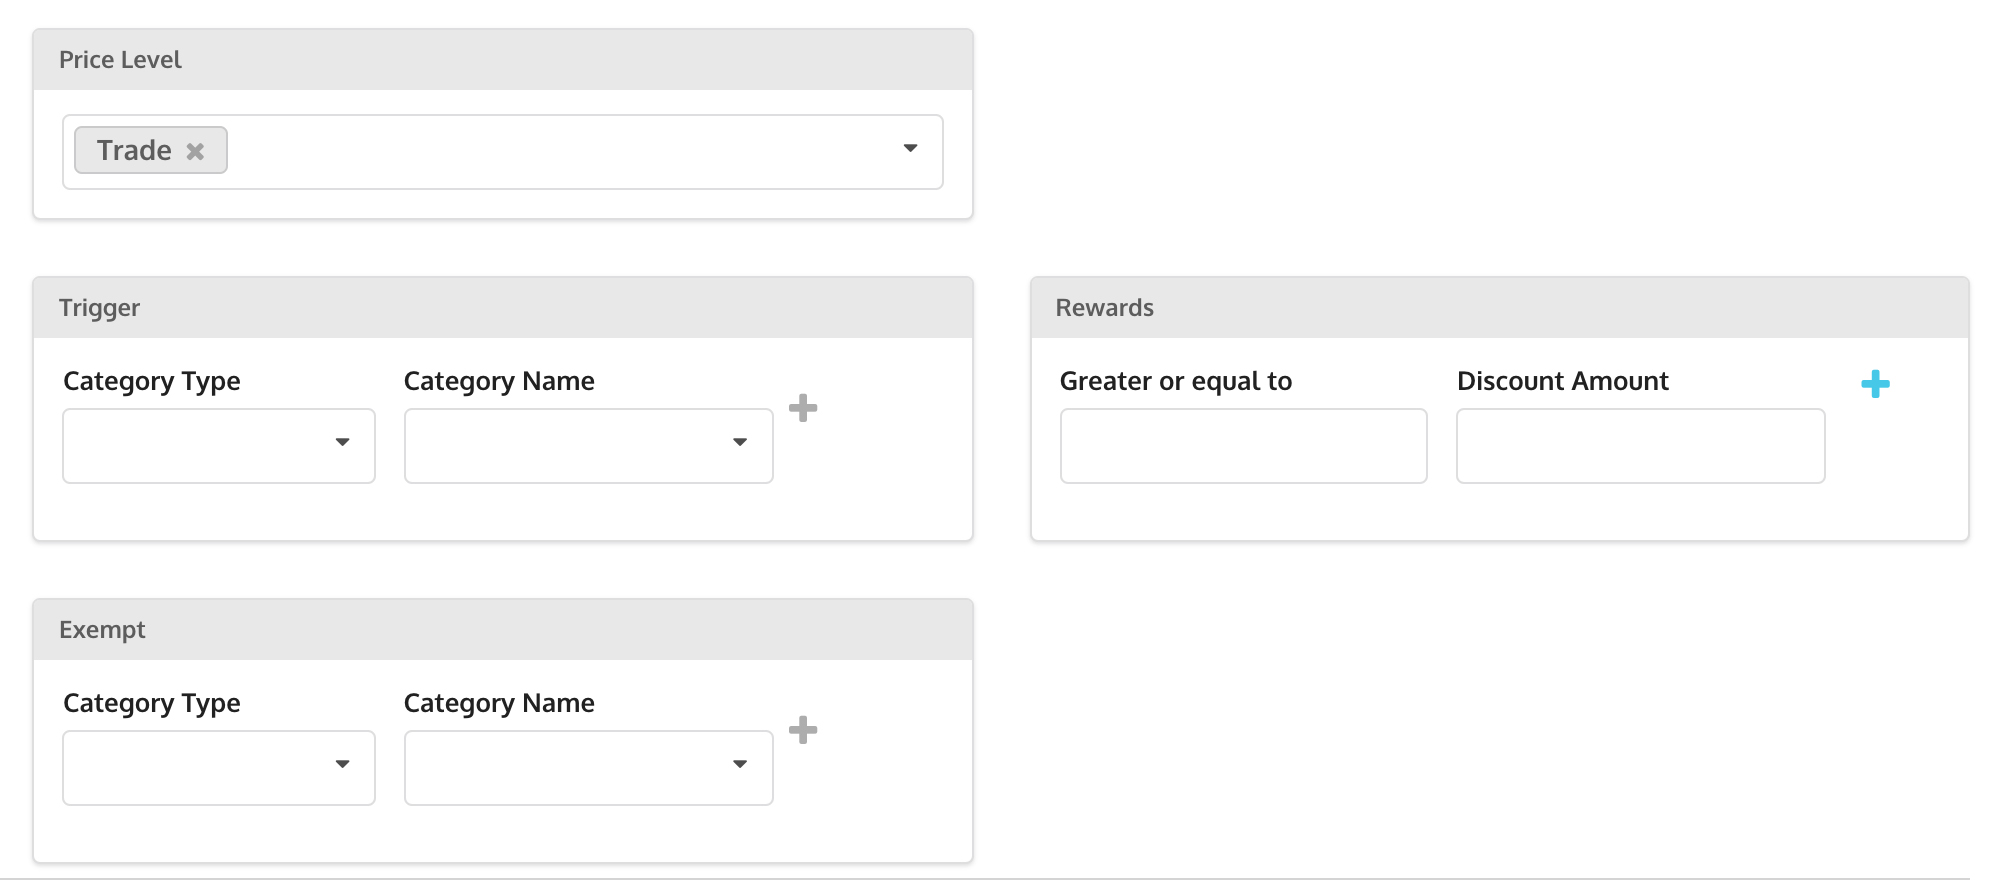
Trigger:
- Price level: Choose the price level/s which applies to this promotion. If no price level is chosen, the promotion applies to all price levels.
- Trigger: In this section, you will define the triggers for this promotion. You can add several triggers for a single promotion. The combination of these triggers would set off the promotion at KRISP POS.
- Category type: Choose the category type which will trigger this promotion. This can be either item, classification, brand or facet.
- Category name: Choose the category name related to the type chosen above.
- Qty: Enter in the quantity which would trigger this promotion.
Click on the plus icon
if you want to add more.Rewards:
- Category type: Choose the category type which will be the reward for this promotion. This can be either item, classification, brand or facet.
- Category name: Choose the category name related to the type chosen above.
- Qty: Enter in the quantity which would be the reward for this promotion.
- Apply reward to trigger checkbox: Check this box if the triggers would be the reward.
- Discount: Enter in the % or $ value of the discount applicable to this promotion.
- Exempt: Exempt defines categories that are not to be included in the promotion.
- Category type: Choose the category type which will excluded from this promotion. This can be either item, classification, brand or facet.
- Category name: Choose the category name related to the type chosen above.
-
Click Save.
Promotion rules and guidelines:
- A promotion that falls within a current start and end date cannot be edited and can only be inactivated.
- A promotion that has not started can be edited and deleted.
- A promotion which has expired cannot be modified to have a new start and end date.
- A promotion with no end date will continue to be current at KRISP POS indefinitely.
Creating credit types
Credit types define the types of credit enabled in the application. Typically, a credit type is associated to a payment type, e.g. credit note, gift certificate.
Creating credit types:
- Go to menu.
- Go to Setup > Lists > Credit types.
- Click Add.
-
Fill out the fields on the form:
- Name: Enter in name of the credit type. The value entered here will be used and displayed throughout the application.
- Short name: The short name can be entered to help identify the credit type. It is not mandatory.
-
Click Save.
Setting up KRISP POS devices
Devices denote peripherals such as registers, cash drawers and printers. Devices need to be configured before use.
Through a device, other devices may be attached. Examples include a register will be attached to a cash drawer where cash payments are accepted. Note that the cash drawer - till, is managed through till management.
Note that devices will be allocated and referenced by a unique 4-digit read-only code.
Setting up non-register devices:
- Go to the menu.
- Go to Setup > Device > Devices.
- Click the Add button.
-
Fill out the fields on the form:
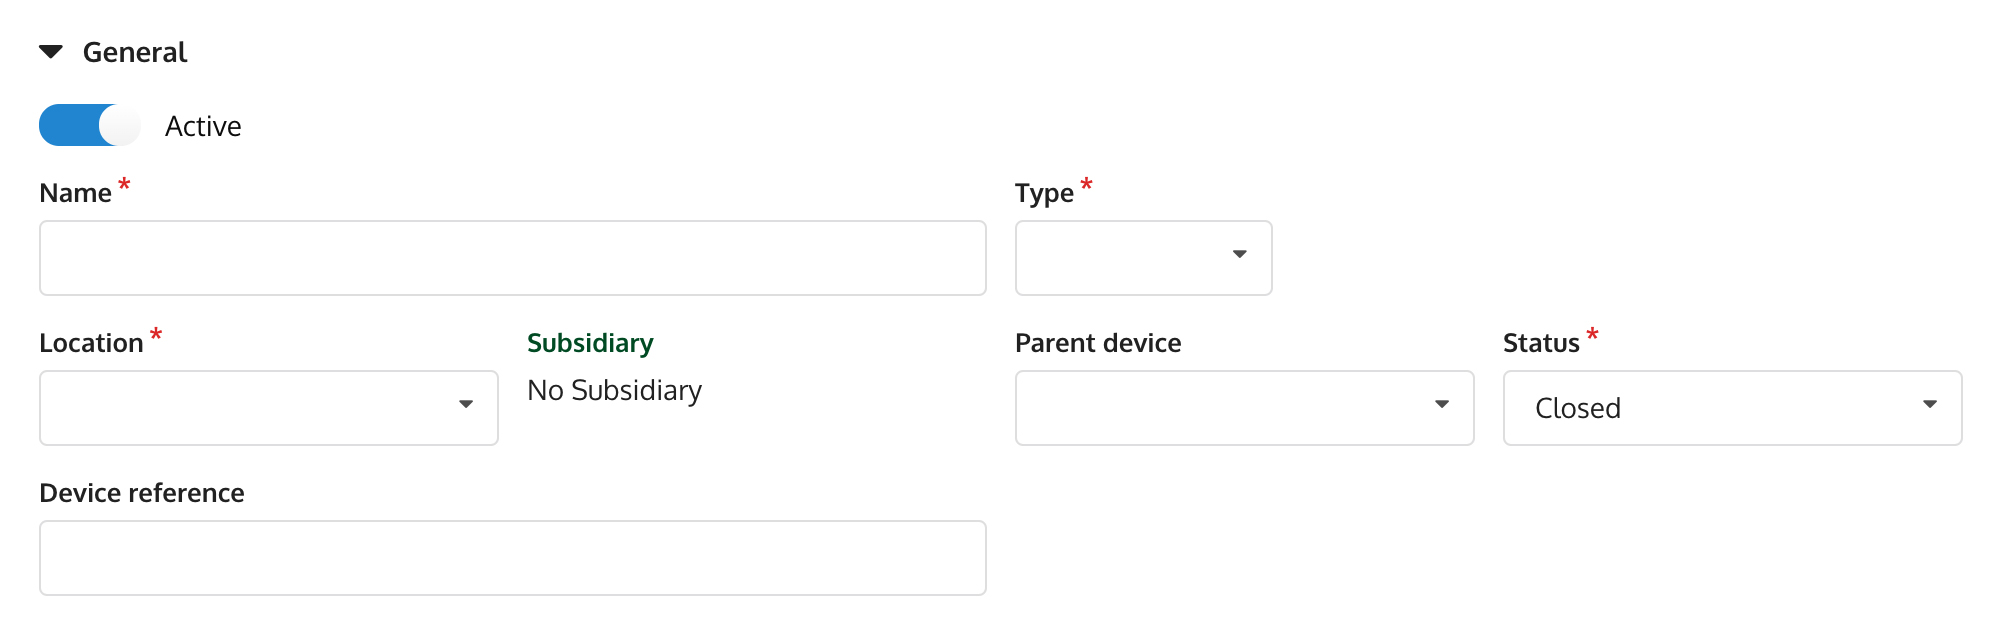
- Name: Enter in the name of the device. The value entered here will be used and displayed throughout the application.
- Type: Choose a device type from the dropdown.
- Location: Choose the location where this device will be used at.
- Parent device: If this device is dependent on another device, i.e. receipt printer, enter the parent device here.
- Status: Note for a cash drawer, the status should be set to CLOSED. For all other devices, choose the OPEN status.
- Device reference: Refers to the device code/serial number.
-
Click Save.
Repeat these steps for all other devices.
Setting up registers:
- Go to the menu.
- Go to Setup > Device > Devices.
- Click the Add button.
-
Fill out the fields on the form:
- Name: Enter in name of the device. The value entered here will be used and displayed throughout the application.
- Type: Choose register as device type. You will notice that the parent device field will disappear.
- Location: Choose the location where this device will be used at.
- Status: Choose the OPEN status.
- Device reference: N/A
-
Attached devices: Choose the devices which are attached to the register. Use the plus icon
to add more devices. Typically, a register would have a receipt printer and a scale scanner.
-
Employee access: Choose the employees who will have access to this register. Note that only employees that have access to the defined location can be selected.
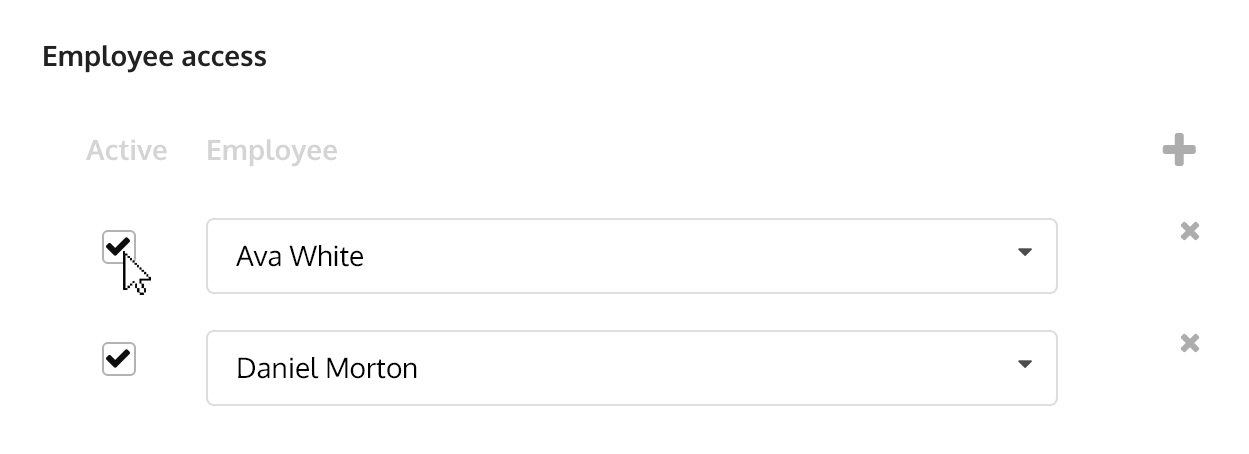
-
Click Save.
Repeat these steps to setup other registers.
To edit existing KRISP POS devices, view Managing KRISP POS devices.
Creating device types
Device types define peripherals that can be attached either directly or indirectly to KRISP POS.
Creating device types:
- Go to menu.
- Go to Setup > Device > Device types.
- Click Add.
-
Fill out the fields on the form:

- Name: Enter in name of the device type. The value entered here will be used and displayed throughout the application.
- Short name The short name can be entered to help identify the device type. It is not mandatory.
- Lockout period (seconds): Input time allotted for the device to lockout.
- Output device: Check if the device type is an output device.
-
Click Save.
Creating task types
Task types are used to categorise tasks. Examples of task types include stock count or sale items.
Creating task type:
- Go to the menu.
- Go to Setup > Lists > Task types.
- Click the Add button.
-
Fill out the fields on the form:
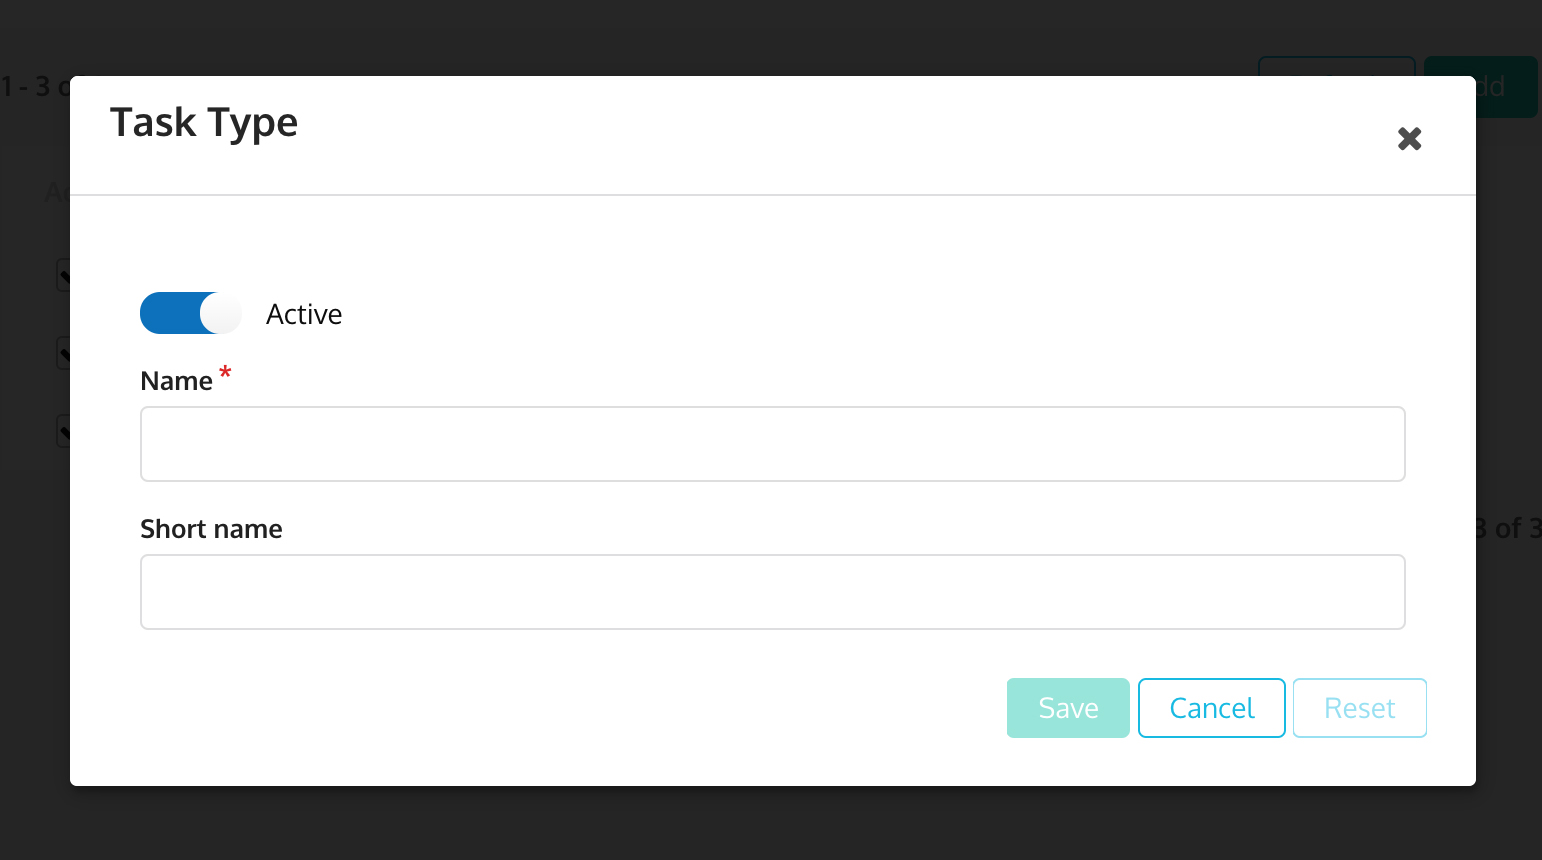
- Name: Enter in name of the task type. The value entered here will be used and displayed throughout the application.
- Short name: The short name can be entered to help identify the task type. It is not mandatory.
-
Click Save.
To edit existing task types, view Managing task types.
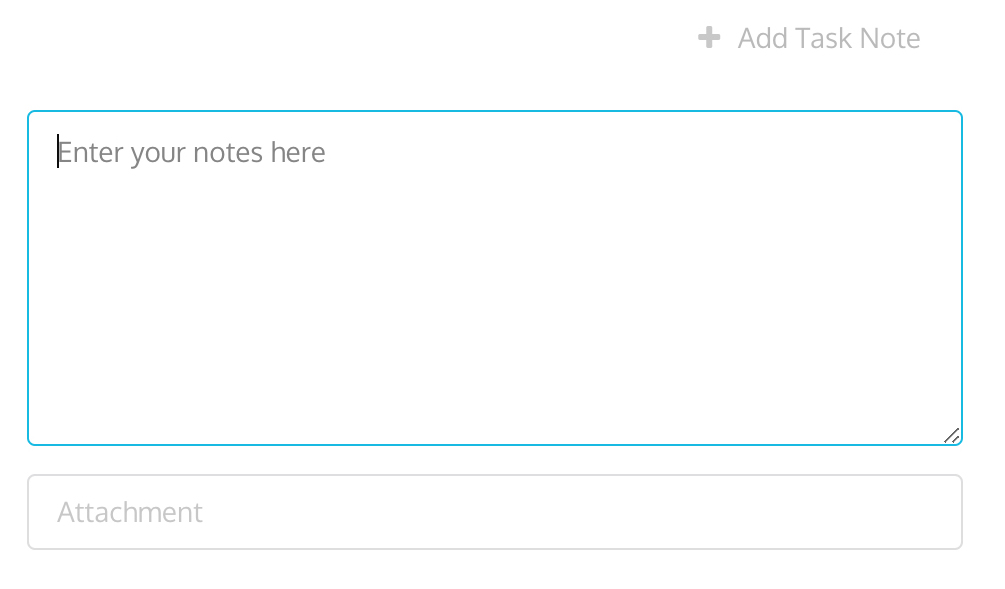
Creating tasks
Tasks can be created and assigned to a specific employee. While in KRISP POS or admin, the employee will be notified of their tasks via the notification icon displayed on the top bar.
Screenshot.
An employee can view, edit, or save tasks.
Creating tasks:
- Go to the menu.
- Go to Tasks.
- Click the Add button.
-
This will bring you to a form. Complete the form's required fields and sections
Filling out the form:
You will see a left sidebar so you can navigate through the form.
Sections Description General Details of the task. Task notes Notes to document the task activities. General section:
Fill out the required fields.

Task notes section:
Notes can be added to tasks to chronologically document the task activities.
To edit tasks, go to Managing tasks in the admin.
Templates: Printed receipts, emails, and chits
Templates provide the base structure on which reports, receipts, chits, and emails are constructed.
KRISP POS enables templates to be created or modified as required. The template can be assigned to the output type via system preferences. Templates can be assigned to the following:
- Receipts for printing
- Receipts for emailing
- Email templates
- Gift receipts
- Till movement chits
- Till movement summary report
- Purchase order
KRISP comes with predefined templates which cover most retailers' requirements. These can be modified or copied for use.
Print template:
To view, edit, or add a template:
- Go to menu.
- Go to Setup > Print templates.
- Click the Add buttion.
-
You will be redirected to a form that you have to fill out.
Sections Description General Contains the name for the template, where the template will be applied, transaction type, template type, and output type. Layout Contains the orientation, page size, and the margins. Template Contains text template and predefined template and tags. -
Once completed, click the Save button.
System preferencs:
System preferences are where templates are assigned to output types. To assign a print template:
- Go to menu.
- Go to Setup > Company > Preferences.
-
Go to the preference settings you need to edit:
- Email attachment templates for receipts for emailing.
- Email templates for email templates.
- Print templates for receipts for printing.
- Till management for chit templates and the till summary template.
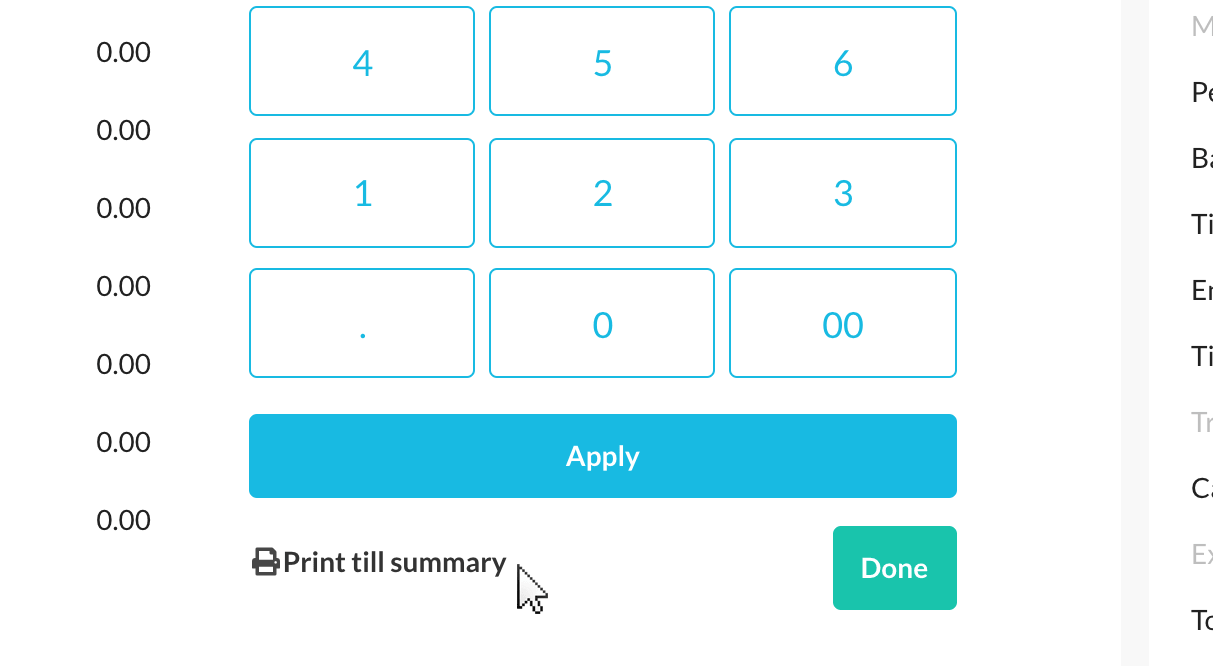
Example: Printing a chit and till summary:
To print a chit:
- Go to menu.
- Go to Till.
-
There are 2 ways to print a chit:
- A chit will automatically be printed on every till movement when a receipt printer is attached to the register.
- Print till summary button is available to print the till summary.
Connecting a thermal printer to the KRISP POS
To connect a thermal printer to KRISP POS:
- Make sure that the thermal printer and the KRISP POS device are connected to the same network.
- Get the IP address of the thermal printer.
- Turn the printer off.
- Turn on the printer by holding down feed button.
- Release the feed button. The resulting printout will include the IP address.
Connecting an iPad or Android tablet to the thermal printer:
Register setup:
- Go to the menu.
- Go Setup > Device > Devices.
- Choose the receipt printer.
- Click the edit icon on the right.
-
In the Device reference field, input the IP address of the thermal printer. Make sure to enter the format as TCP: [IP ADDRESS].
Example: TCP:192.168.0.0
-
Save the update.
Preferences:
To update the preferences:
- Go to menu.
- Go to Setup > Company > Preferences.
- Click Register on the left side.
- Click Edit.
- Edit the preference by setting the Print method to thermal print.
- Click Save.
Setting up foreign currencies
KRISP POS has a foreign currency feature, which allows the cashier to:
- Count and create a till movement using different currencies, while also being able to monitor the cash flow of these currencies.
- Accept foreign currency as a payment in the checkout.
Enabling foreign currency in preference settings:
For the till:
- Go to menu.
- Go to Setup > Company > Preferences.
- Select Till management tab on the left.
- On this page, find an option called Multi-currency.
- Set this preference to True.
For the checkout:
- Go to menu.
- Go to Setup > Company > Preferences.
- Select Register tab on the left.
- On this page, find an option called Enable multi-currency.
- Set this preference to True.
Adding foreign currencies:
- Go to menu.
- Go to Setup > Finance > Payment types.
- Look for the payment type you want to edit, i.e. the payment type where you want foreign currencies applied.
- Click the edit icon .
- In the checkboxes below, check the the Allow foreign currency.
- After doing this, a new textfield will appear. Input currencies you want the store to accept.
- After the currencies are set up, you can now add the exchange rates for each of them. To do that, checkout the link Exchange rates.
- Once you are done with the setup, go back to the POS.
- Click the dropdown on your account on the upper right.
- Click Server sync.
When you're done with this, you will see it reflected both on your till and checkout page:
- On the till, you will see a new dropdown with the foreign currencies you added.
- On the checkout, you will notice a new dropdown for foreign currencies when you make a transaction. The exchange rate will also be visible.
Setting up quick service chit
Service printing is similar to receipt printers – the goal is to set how items are sent to service-oriented printers. This is usually utilized in a cafe or restaurant.
To enable this feature:
- Go to the menu.
- Go to Setup > Company > Preferences.
- Select Receipt printing tab on the left.
- On this page, find an option called Enable service print.
- Set this preference to True.
After updating your preferences, add a device:
- Go to the menu.
- Go to Setup > Device > Devices.
- Click the Add button.
- Select Service printer from the dropdown, and assign a name and location.
- Set Status to Open.
- Click Save.
After creating a device, make sure it's attached to your register:
- Go to menu.
- Go to Setup > Device > Devices.
- Find your register.
- Click the edit icon .
- Go to Attached devices tab.
- Add an attached device by clicking the plus icon.
- Add the device you created.
To assign an item to a service printer:
- Go to menu.
- Go to Products > Items.
- Find an item you want to edit.
- Click the edit icon .
- Go to Item location tab.
- Pick a location you want to edit, and then click the edit icon .
- In the Output device type tab, add the service printer you added.
- Click Save.
- Once you are done with the setup, go back to the POS.
- Click the dropdown on your account on the upper right.
- Click Server sync.
When you're done setting this up, you will see a new service printer icon in the checkout screen when you make a transaction including an item with an assigned service printer.
- Click the service printer icon and a popup will appear.
- Click the checkboxes of the items that you want printed to the service printer.
- Click Print. A chit should be printed out in the selected service printer.
Customer online-only mode
This feature allows the register to search directly from the server, without downloading customer data to the register.
A combination of customer volume, register hardware, and available disk space (as well as internet availability) will determine whether customers can be available locally or from the server for lookup.
Enabling customer online-only mode:
- Go to the menu.
- Go to Setup > Device > Devices.
- Look for your register.
- Click the edit icon .
-
On the General tab, you will see a toggle for Customer search (online).

-
When enabled: the register will search for customers from the server directly. The POS should be online to do this.
-
When disabled: the register will download all customer data in your device. This will add register setup time depending on the customer database size. The customer will be searchable even if the POS is offline.
-
-
Click the Save button.