Getting started
Logging in and out of the KRISP POS
You can login to POS using either pin or email and password. To access POS, use your company’s allocated URL, typically in the format of https://yourcompany.krispsystems.net/pos.
Note that for a new register, initial access will prompt the register to setup. Setup can only be achieved via a username and password access. You can then use your PIN for all subsequent logins to POS.
Logging into the POS:
Logging in to POS using email and password:
- Go to your store URL.
-
Enter in email and password to login.

If you have forgotten your username and password, click on the Don't remember your password? link and follow the prompts.
PIN login:
-
Enter in PIN to login. Alternatively, from this screen you can still use your email and password to login by using the link provided.

Logging out of POS:
- On the POS, click the dropdown beside your name.
-
Click on logout to exit POS.

Emails, passwords, and PINs
Email and password:
Passwords can be:
- Created and reset by an administrator via the employees record.
- Reset by an employee when accessing either KRISP POS or KRISP admin.
A few notes:
- When setting up a store register for the very first time, an email & password is required.
- Either a PIN or email & password can be used to access a register.
- ONLY an email & password can be used to log into admin.
Setting an employees email and password:
Upon setup of your account, your administrator would have prompted a system email to be sent to your email address. This email contains simple steps to set your password. The password you set is protected and only known to you.
Resetting your email and password:
Note that an administrator can reset the employees password by going to the employees record and clicking reset password.
KRISP also allows every users to reset their own password.
To reset your password:
-
Click Don’t remember your password link on the login screen.
-
You will be re-directed to a new screen to enter your email address.
- You will then receive an email from KRISP Systems giving you a link to reset your password.
- You will be re-directed to a page where you can then set your new password.
Getting and resetting the PIN:
A PIN number can be used to log into KRISP POS.
Getting a PIN:
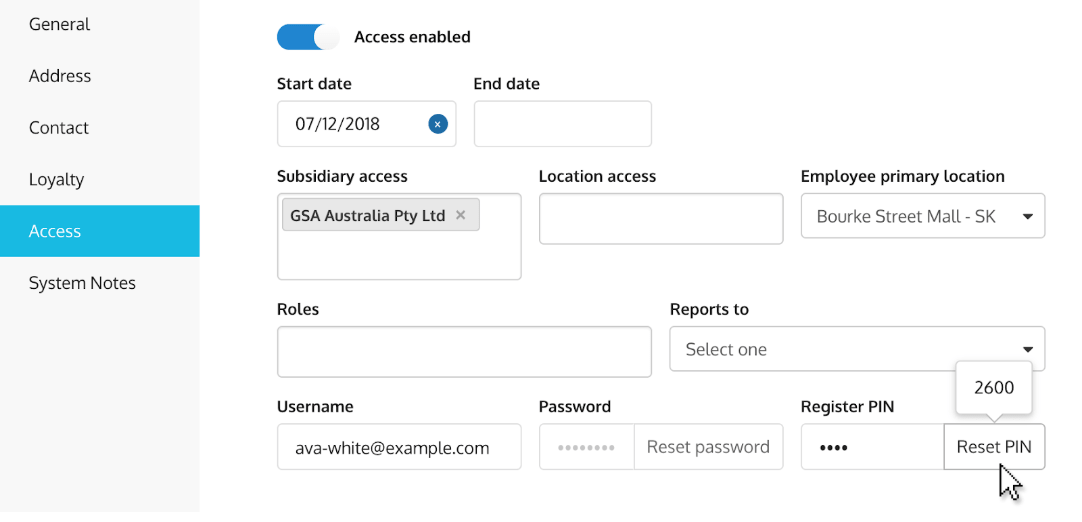
PINs are created and reset by an administrator by going to the employee’s record.
Resetting a PIN:
To reset the PIN:
- Go to menu.
- Go to Relationships > Employees.
- Find the employee.
- Click edit icon
 on the right.
 - Click Access from the sidebar.
- Click the Reset PIN button.
-
Hover over the field to see the new PIN. The new PIN for the employee will appear.
Logging into KRISP through the KRISP POS app
KRISP POS is delivered via a browser. An application management layer (wrapper) may be required if your register needs to manage an external device, e.g. thermal printer.
Make sure you have the KRISP POS app downloaded from the App Store or Google Play.
To log into the KRISP POS app:
- Open the KRISP POS app. The domain setup page will appear.
-
Enter you KRISP POS supplied address. e.g. FORMAT: [env-id]-[tenant-id].krispsystems.net.
-
Click the Next button.
- On initial setup, enter in a valid email and password to login.
- When prompted for a device, enter the register ID assigned to the current register in use.
- Click Activate.
- Then click Continue.
- Enter your PIN to login.
Till management shift types
Shift types is an optional setup used to identify a shift for till management, e.g. you might have a single shift daily, or split the day into different shifts.
Adding a shift type:
- Go to the menu.
- Go to Setup > Lists > Shift types.
- Click the Add button.
-
Fill out the form:

- Name: Enter in name of the shift. The value entered here will be used and displayed throughout the application.
- Short name: The short name can be entered to help identify the shift. It is not mandatory.
Viewing or editing a shift type
- Go to the menu.
- Go to Setup > Lists > Shift types.
- You will see a list of shift types. Select the shift type you want to view or edit.
- Click the edit icon to edit or update shift type details.
- Press Save to update any changes.
Opening and managing your till
Till management is an integral function of cash management for cash drawers.
- The till is managed via till management.
- The start and end of day may encompass the period in which the till is opened for use through to being closed.
- The opening and closing of a till is grouped to a unique reference ID.
- A day is made up of one or many referece IDs.
- A reference ID can be associated to a shift. e.g. morning shift.
- A reference ID can be uniquely allocated to an employee or many employees.
Note that though till management can be reported on within admin, all movements are performed from a KRISP POS register. All movements are performed from a KRISP POS register.
Till management components:
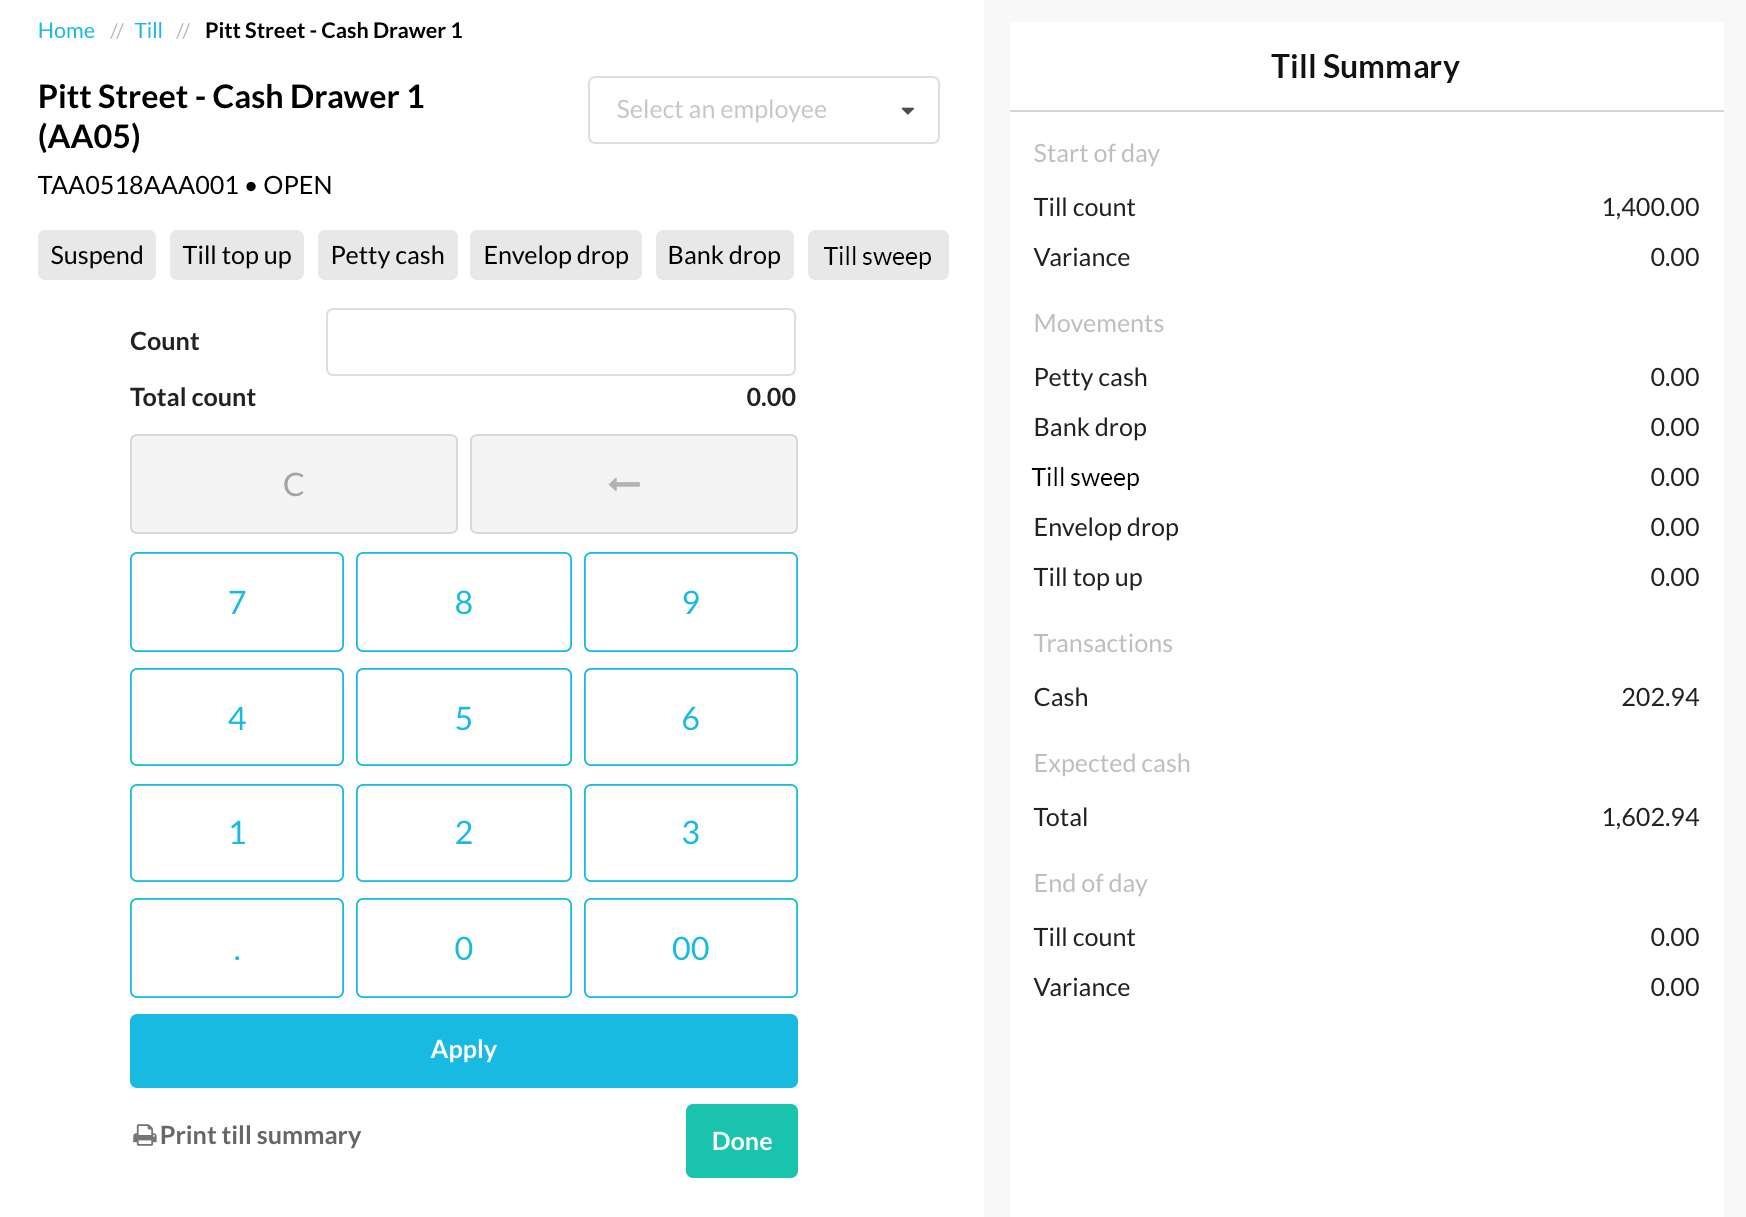
- Reference ID: This is a unique system-generated ID for each till shift. After a start of day is performed, there would be a reference ID assigned to the till.
-
Shift name: If this is enabled in the preferences, you can then assign a shift to each till. Typically, a shift name is allocated to a till to correspond to:
- A time of day.
- An employee.
- A float allocation.
-
Restrict to an employee: If this system preference is enabled, the person that logs into KRISP POS will be the till owner. Hence, the employee that starts the day will be one who will also need to end the day.
- Float: A cash drawer can be assigned a pre-defined float by the administrator.
- Denominations: If this system preference is enabled, you are able to perform a count with a breakdown of each denomination. Read more about currencies. Without this entered, a single count amount is entered.
-
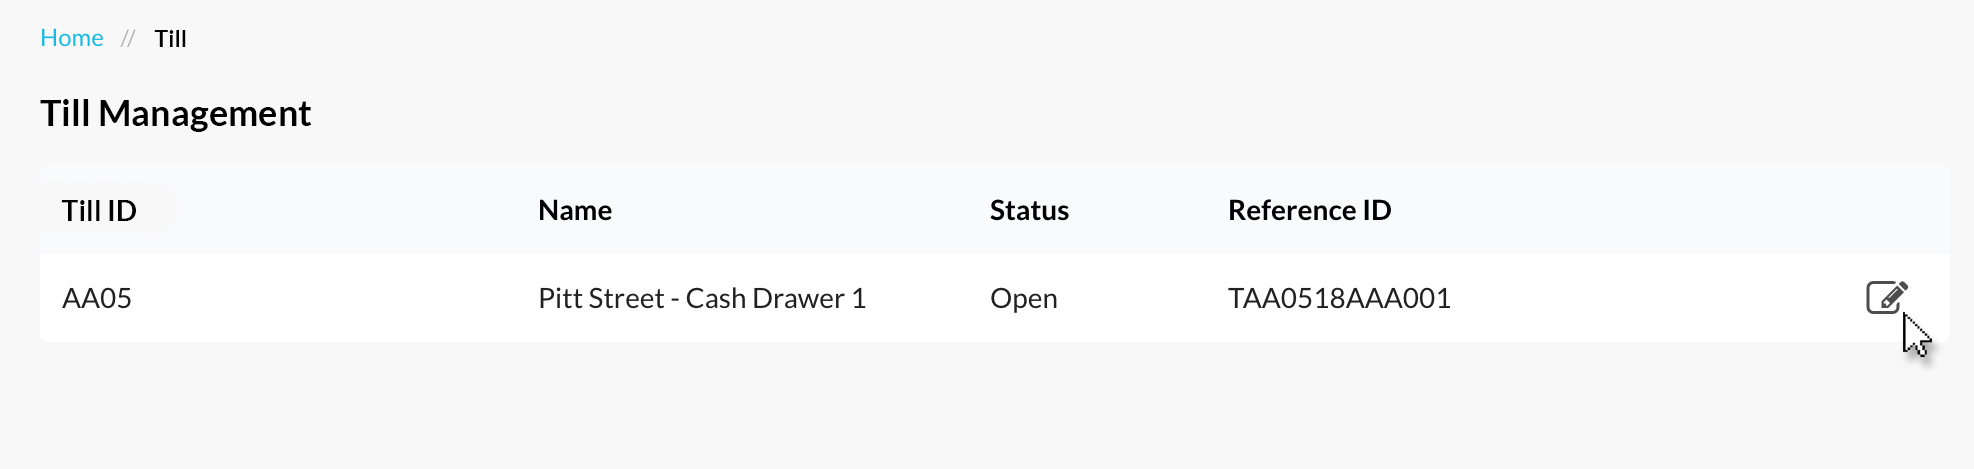
Till statuses: There are 3 statuses for each till: Open, Suspended, and Closed.
- Open: You can perform cash sales, petty cash, till top up, bank drop, envelop drop, and till sweep.
- Suspended: When you do either a start of day count/re-count, end of day count/re-count, the till will be suspended.
- Closed: When till is closed, you can initiate a start of day or edit the till to do an end of day re-count.
-
Till re-count: If this system preference is enabled, you are able to perform a re-count of start of day and end of day. The variance from each of the recounts will be recorded.
For example, if the float defined is for $500 and by accident, the employee mistakenly enters in $400, a till recount can be performed.
-
Till movements: When the tills have an open status, you can record a till movement to track cash moved in and out of the till.
Till movements are till top up, petty cash, envelop drop, bank drop, and till sweep.
- Till top up: Top up your till with cash when till is below your float amount.
- Petty cash: If you allow the use of a small amount of discretionary funds in the form of cash for expenditures from your till.
- Envelop drop: If you have too much cash in the till and need to move it to a safe.
- Bank drop: If you need to bank cash from the till.
- Till sweep: If cash in the till is regularly kept to a maximum threshold, any cash which exceeds this threshold is removed.
Performing start of day:
The start of day process represents to first step to enabling the till to be open for use. It is used to define the open balance/float of the till.
- Go to the menu.
- Click on Till.
-
Click on Start of Day button.
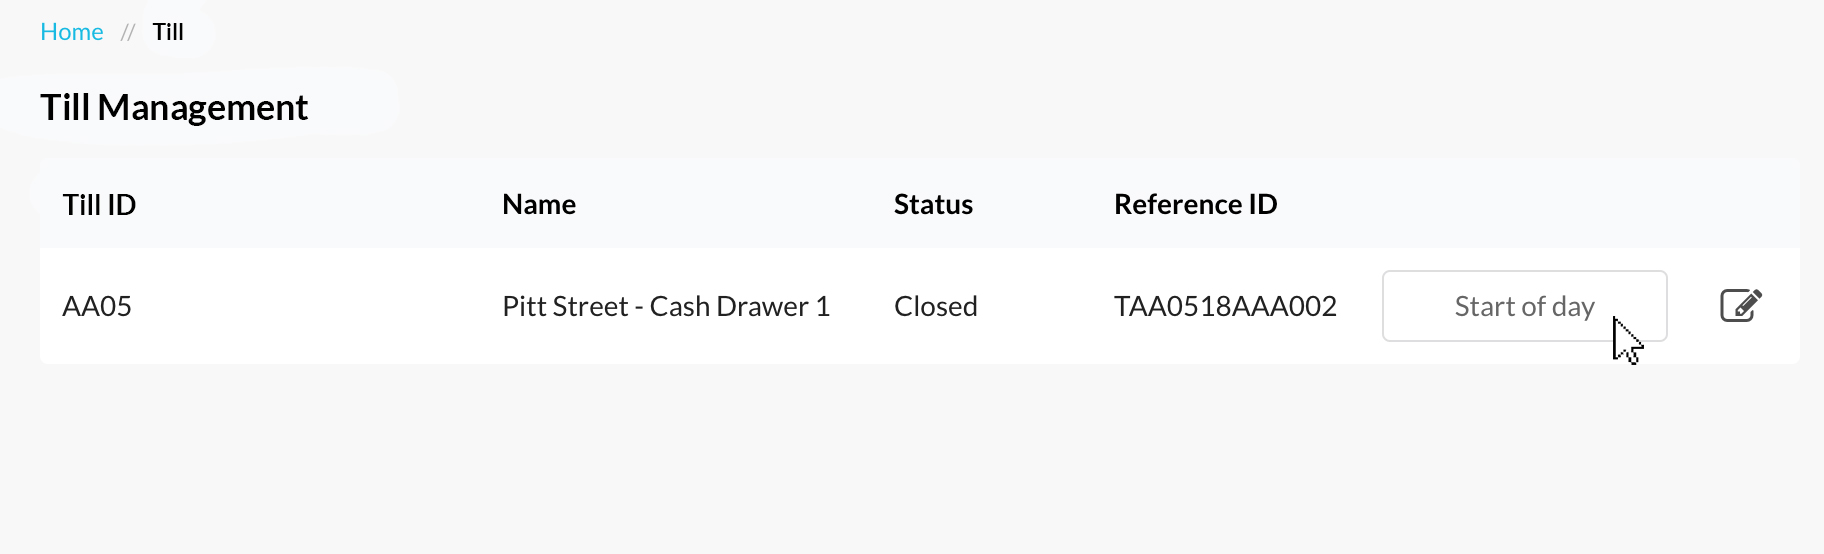
-
The status will change to Suspended.
-
Click on the edit icon.
-
You will be redirected to a page with the till summary / details on the right, and a keypad on the left.
-
Choose the shift type and employee name if these preferences are enabled.
- Click on Till count start of day button.
- Enter in the float count. If the denominations preference is enabled, type the quantity of each denomination. Note: Your administrator would have defined a float amount for this cash drawer.
- Click the Apply button.
- A popup will appear, asking you to select a till movement reason and notes. Note: any variances is recorded and displayed on the till summary.
- Click the Submit button on the popup.
- The till status is now changed to Open.
- Click the Done button.
- Click on the Home link to bring you back to the cart so you can proceed with transactions.
Performing start of day till re-count:
On occasion it may be found that the till has not been correctly counted. A recount is required to determine the 'variance'. The Variance is captured as a movement.
Note that the cash drawer has a status of Open.
- Go to the menu.
- Click on Till.
-
Click on the edit icon.
-
You will be redirected to a page with the till summary / details on the right, and a keypad on the left.
-
Click on Suspend, then click on Apply.
- The status is changed to Suspended.
- Click on Till recount start of day button.
- Enter in the variance amount and click on Apply. The variance is displayed in the adjustment column. If the denominations preference is enabled, type the quantity of each denomination.
- A popup will appear, asking you to select a till movement reason and notes. Note: any variances is recorded and displayed on the till summary.
- Click the Submit button on the popup.
- The status is changed to Open.
- Click the Done button.
Performing till movements:
You would be able to see a cash drawer with a status of Open.
- Go to the menu.
- Click on Till.
-
Click on the edit icon.
-
You will be redirected to a page with the till summary / details on the right, and a keypad on the left.
-
Choose to do either a till top up, petty cash, envelop drop, bank drop, or till sweep.
- Enter in cash count for this till and tap on Apply. If the denominations preference is enabled, type the quantity of each denomination.
- A popup will appear, asking you to select a till movement reason and notes. Note: any variances is recorded and displayed on the till summary.
- Click the Submit button on the popup.
- Click the Done button.
- Click on the Home link to bring you back to the cart so you can proceed with transactions.
Performing end of day:
You would be able to see a cash drawer with a status of Open.
- Go to the menu.
- Click on Till.
-
Click on the edit icon.
-
You will be redirected to a page with the till summary / details on the right, and a keypad on the left.
-
Click on Suspend then click on Apply.
- The status is changed to Suspended.
- Click on Till count end of day button and click on Apply.
- Enter in cash count for this till and click on Apply. If the denominations preference is enabled, type the quantity of each denomination.
- A popup will appear, asking you to select a till movement reason and notes. Note: any variances is recorded and displayed on the till summary.
- Click the Submit button on the popup.
- Click Apply.
- The status is changed to Closed.
- Click the Done button.
Performing end of day till re-count:
On occasion it may be found that the Till has not been correctly counted. A recount is required to determine the 'variance'. The Variance is captured as a movement.
You would be able to see a cash drawer with a status of Closed.
- Go to the menu.
- Click on Till.
-
Click on the edit icon.
-
You will be redirected to a page with the till summary / details on the right, and a keypad on the left.
-
Click on Suspend then click on Apply.
- The status is changed to Suspended.
- Click on till re-count end of day.
- Enter in the variance and click on Apply. If the denominations preference is enabled, type the quantity of each denomination.
- Choose a till movement reason and optional notes Note: any variances is recorded and displayed on the Till Summary.
- Click Close and click Apply.
- The status is changed to Closed.
- Click Done.
Till summary:
KRISP POS shows a real time till summary illustrating both sale and manual movements.
Printing:
Print format are defined within system preferences.
Till summary:
A till summary represents all movements, including cash sales, that have been transacted at the till. The report will be printed to a receipt printer attached to the register.
Chit printing:
A system preference can be set such that a chit is automatically printed with each till movement. The chit will be printed to a receipt printer attached to the register.