Inventory management
Manual inventory adjustment
An inventory adjustment is used to reduce or increase the amount of inventory you have without making a sale or refund. This may be for:
- Damaged: Inventory that is damaged or broken and is not in a sellable condition.
- Wastage: Inventory that has expired, or needs to be disposed of.
- Write-offs: Inventory loss due to theft or a bad batch of goods.
- Consumption of own inventory: Inventory that is consumed in the course of business that is not directly sold to a customer, but that you need to account for in your inventory.
To start an inventory adjustment:
- Go to menu.
- Go to Inventory > Adjustment.
- Click the Add button.
-
This will bring you to a form. Complete the form's required fields:

- Location: Use the drop down to pick the adjustment location.
- Sale transaction reference: This is an optional field linking the adjustment to a sale. Typically this reference number is left blank when performing a manual adjustment.
- Brand, classification and alternate classification: Use the dropdowns to filter the item which will be allowed in the adjustment sheet. If they are left empty, then all item in this location will be allowed in the adjustment sheet.
- Reason code: Choose a reason code which is applicable to the adjustment.
- Comment: Enter in comments.
- Enter unit cost: By ticking this, you are then able to make an adjustment to the unit cost in the adjustment sheet.
-
Add a line to the adjustment sheet by clicking the plus icon
 :
:
- Item: Choose the item for adjustment.
- On hand: This is a view-only field which shows the on hand quantity for this item.
- Average cost: This is a view-only field which shows the average cost for this item.
- Total cost: This is a view-only field which shows the average cost x on hand quantity for this item.
-
Adjustment: Enter in the quantity to be adjusted. This can be a positive or negative number.
-
Unit cost: Enter in the cost of this item.
- New qty: This is a view-only field which shows the new on hand quantity after the adjustment is processed.
- Status: This is a view-only field which shows if the adjustment has been processed or in a state of pending.
- Reason code: Choose a reason code which is applicable to the item.
- Comment: Enter in optional comments.
-
If you need to add more lines, click the plus icon.
- Click the Save button to save the adjustment worksheet, or click Save and process to save the worksheet and process it immediately.
After saving the worksheet, its status will stay as OPEN and you will be able to edit the worksheet.
After the worksheet is saved, the worksheet can also be abandoned or deleted. When abandoned, the worksheet is still listed and will show a status of Closed - Abandoned. If deleted, the worksheet will not be listed.
Purchase order
A purchase order (PO) is a commercial document and first official offer issued by a buyer to a seller, indicating types, quantities, and agreed prices for products or services. It is used to control the purchasing of products and services from external suppliers.
The typical flow for ordering would be to create a PO, and then PO receipts.
To create a purchase order:
- Go to menu.
- Go to Purchase > Orders.
- Click the Add button.
-
You will be redirected to a page where you can fill out the details.
Filling out the last form:
Enter in all the mandatory and if applicable, other optional details.
Sections Description General The details of the purchase order. 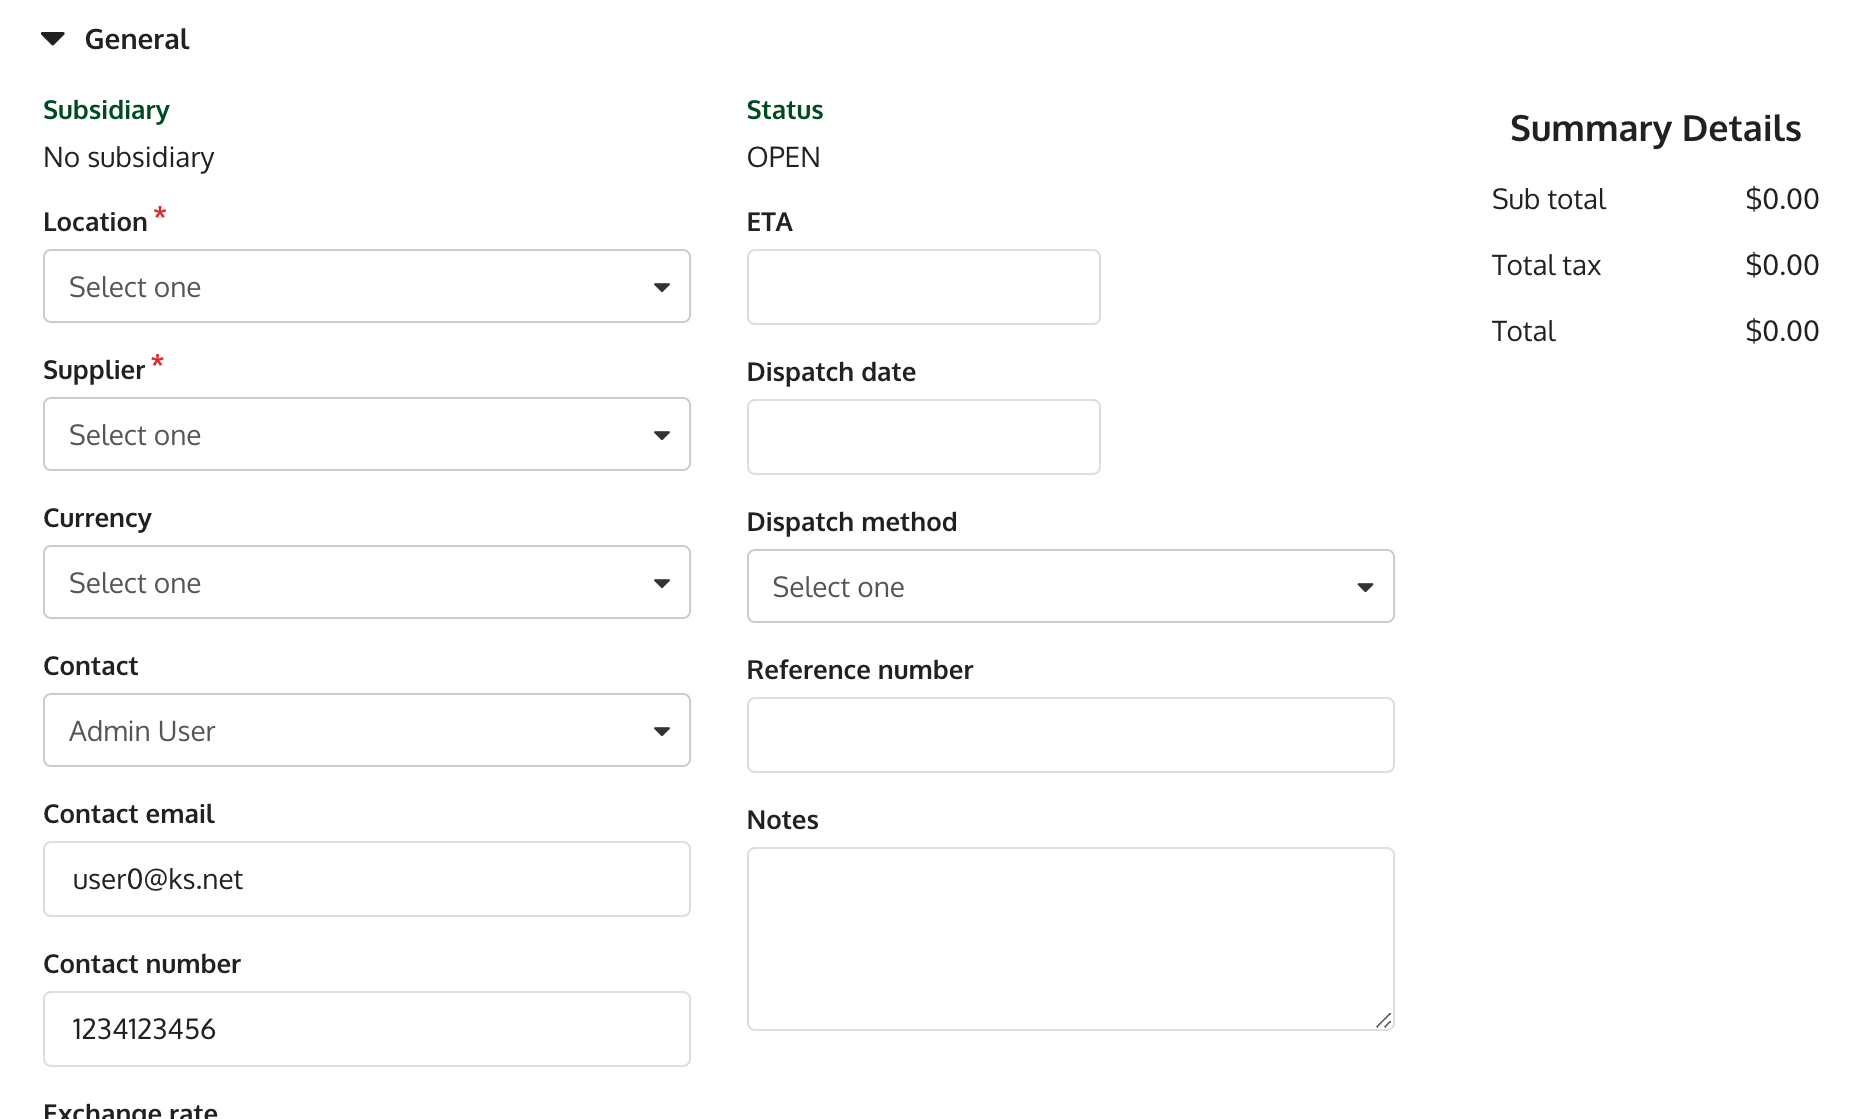
- Location: Use the drop down to select the purchasing location.
- Supplier: Use the drop down to select the supplier.
- Currency: This will default to the subsidiary's currency. You are able to choose a different currency if the supplier supplies goods in another currency and you need to create the PO in the supplier's currency. The supplier should have a currency defined on the supplier's record.
- Exchange rate: The exchange rate would be based on what has been defined in the exchange rates (admin). You are able to overwrite this value if required. The cost will be converted and recorded in the currency defined in the subsidiary.
- Brand, classification, and alternate classification: Use the dropdowns to filter the item, which will be allowed in the adjustment sheet. If they are left empty, then all item in this location will be allowed in the adjustment sheet.
- ETA: Choose the estimated date of arrival of goods to store.
- Dispatch date: Choose the estimated date of dispatch for goods from supplier.
- Dispatch method: Choose the dispatch method.
- Reference number: Enter in a reference number from the supplier if required.
- Notes: Enter in notes pertaining to his order
- Summary details: This is a view-only section which shows the subtotal, total tax, and total of the order.
To add a line to the transfer sheet, just use the plus icon
 .
.
- Item: Choose the item to purchase.
- Available: Shows the available quantities for this item.
-
Reorder qty: Suggested reorder amount based on current system parameters.
- The formula is: max reorder point - min reorder point - back order qty.
-
Quantity: Enter in the quantity to order.
- Unit price: Enter in the unit price if required. This will default to the current average cost of the item.
- Tax group: Choose the tax group for the item. This will default to the tax group defined for this item.
- Tax rate: This shows the tax rate as per the tax group chosen.
- Tax: The total taxes for the item.
- Total: The total for the line including taxes.
- Reason code: Enter in the reason code if required.
- Comment: Enter in the reason code if required.
-
You can Save or Save and approve the purchase order at this stage.
If you Save, the status of the purchase order is 'open'. You can edit this purchase order while it is still 'open'. While open, the purchase order can either be deleted or abandoned.
If you Save and approve, the PO is processed immediately and will have a status of 'pending receipt'. It is still possible to edit or abandon this PO whilst in this status.
The next step after a purchase order is closed, would be to receive the purchase order.
When your fully receive a PO, the status changes to ‘fully received’. If a PO is partially received, the PO status is set to ‘partially received’.
Purchase receipt
A purchase receipt is a document to acknowledge the receipt of the items listed in it. When goods are received into a location, the ‘available’ and ‘on hand’ values will be increased according to the quantities received.
A purchase receipt can be generated from a purchase order, or you can create a stand-alone receipt.
Generating a receipt from a purchase order:
To perform a receipt from a purchase order:
- Go to menu.
- Go to Purchase > Order.
-
View on a purchase order by clicking on the PO with a status of ‘pending receipt'. The list of the items on the purchase order will be displayed on the worksheet.

-
Click on the Generate receipt button, which will then bring you to the purchase receipt form.

Subsidiary, location, supplier, currency, exchange rate fields will be derived from the purchase order.
Note: The exchange rate can be overwritten or derived from the exchange rates table.
- Purchase order: This is the view-only PO number for this receipt.
- Receipt date: Choose the receipt date.
- Reference number: If there is a reference number entered on the PO, it will be carried over to the receipt and displayed here. It can be overwritten if desired.
- Notes: Enter in any notes pertaining to this receipt.
- Item: The item which will be received. Note: If you are receiving in Serial or Batch items, there will be a pop-up to allow you to record the serial numbers or Batch Numbers.
- Available: Shows the current available quantity of the item in this location.
- PO qty: Shows the view-only quantity derived from the quantity entered on the purchase order.
- Received qty: When multiple receipts are performed on the purchase order, this will show the items already received.
- Remaining qty: Displays the quantity to be received based on what has been requested on the purchase order.
- Quantity: Enter the exact quantity to be received. This can be different quantity than what has been entered on the purchase order. The quantity received can be the same as the purchase order, Lesser (short-shipped), more (over-shipped), or even 0.
- Unit price: Displays the price from the purchase order.
- Tax group: This defaults to the tax group for this item on the purchase order. This can be overriden is necessary.
- Tax rate: Displays the rate derived from the tax group chosen.
- Tax total: Shows the tax included with this purchase.
- Status: Shows the processing status of this line item. This is a system controlled status. Typically, when this receipt is processed, that status will change to 'processed'.
- Reason code: Enter in a reason code if required.
- Comment: Enter in a comment if required.
-
Once you have gone through and entered in the desired quantities and costs of item, you have the the option to click Save or Save and process.
If you Save, the purchase receipt stays open and you can work on this worksheet at a later time.
If you Save and process, the received quantities and costs will be recorded and the receipt is closed.
Multiple receipts:
You can perform multiple receipts on a purchase order which has a status of ‘partially received’. For example, a single PO might arrive in different shipments. To perform another receipt from a purchase order, follow the steps below:
- Go to menu.
- Go to Purchase > Receipts.
- View on a purchase order by clicking on the PO with a status of 'partially received'. Enter in the items and quantities received following the steps listed above.
Stand-alone receipts:
On the occasions where a receipt is done without a corresponding purchase order, you can go to:
- Go to menu.
- Go to Purchase > Receipts.
- Click on Add button.
- Enter in the items and quantities to be returned following the steps listed above.
Over or short receiving:
KRISP provides the option for over or short receiving a purchase order.
- Short shipped: Where the quantity received is less than the ordered amount.
- Over shipped: Where the quantity received is more than the ordered amount.
Simply close the purchase order once all items expected to be received have been processed.
Purchase return
A return can be generated from a purchase receipt or you can create a standalone return.
To perform a return from a purchase receipt:
- Go to menu.
- Go to Purchase > Receipts.
- View a purchase receipt by choosing one from the list with a status of ‘closed’. The list of the items on the purchase receipt will be displayed on the worksheet.
-
Click on the Generate return button, which will then bring you to the purchase return form.
- Subsidiary, location, supplier, currency, exchange rate: Will be view only fields which are derived from the purchase order. Note: The exchange rate can be overwritten or derived from the exchange rates table.
- Purchase order: This is the view-only PO number for this receipt.
- Receipt date: Choose the receipt date.
- Reference number: If there is a reference number entered on the PO, it will be carried over to the receipt and displayed here. It can be overwritten if desired.
- Notes: Enter in any notes pertaining to this receipt.
-
Item: The item which will be received.
-
Available: Shows the current available quantity of the item in this location.
- PO qty: Shows the view-only quantity derived from the quantity entered on the purchase order.
- Received qty: When multiple receipts are performed on the purchase order, this will show the items already received.
- Remaining qty: Displays the quantity to be received based on what has been requested on the purchase order.
- Quantity: Enter the exact quantity to be received. This can be different quantity than what has been entered on the purchase order.
- Unit price: Displays the price from the purchase order.
- Tax group: This defaults to the tax group for this item on the purchase order. This can be overriden if necessary.
- Tax rate: Displays the rate derived from the tax group chosen.
- Tax total: Shows the tax included with this purchase.
- Status: Shows the processing status of this line item. This is a system controlled status. Typically, when this receipt is processed, that status will change to 'processed'.
- Reason code: Enter in a reason code if required.
- Comment: Enter in a comment if required.
-
Once you have gone through and entered in the desired quantities and costs of item, you have the the option to Save or Save and process.
If you Save, the purchase receipt stays open and you can work on this worksheet at at later time
If you Save and process, the received quantities and costs will be recorded and the receipt is 'closed'.
Multiple returns:
You can perform multiple returns on a purchase order which has a status of ‘closed’. To perform another return from a purchase receipt:
- Go to menu.
- Go to Purchase > Orders.
- Pick one purchase order from the list with status of 'closed'.
- Click on the purchase receipt ID/number. You will be redirected to the purchase receipt page that is tied to the purchase order.
- From this page click Generate return button.
- Edit the items in the transfer sheet and input the correct items and quantities to be returned.
- Once you have gone through and entered in the desired quantities and costs of item, you have the the option to Save or Save and process.
Standalone return:
On the occasions where a return is done without a corresponding purchase receipt:
- Go to menu.
- Go to Purchase > Returns.
- Click on Add button.
- Enter in the items and quantities to be returned following the steps listed above.
Inventory transfers
An inventory transfer is used to track the movement of items from one location (or sub location) to another within your organisation. Transfers are used for:
- Managing the availability of stock at a location.
- Managing supply and demand issues, i.e. stock can be moved between stores where they are most needed.
Inventory transfers are automatically created when performing a sale at the POS, or manually created via the KRISP admin.
POS transfers:
POS transfers are system generated created at POS when a sale transactions initiates a transfer of inventory between locations, e.g. laybys, reserved, deposit, preorders. KRISP will automatically create an inventory transfer to move the quantities between locations (inclusive of sublocations). System generated transfers will have a unique sale reference number, which corresponds to the sale transaction number created at the POS. The reference number can be used to search for the transfer in the admin.
Take note that:
- All POS transfers are accessible in admin.
- POS transfers between logical locations will automatically be applied if stock is available to be transferred. Otherwise, the transfer MUST be completed in the admin.
- A transfer between physical locations will NOT be automatically applied. The transfer MUST be completed in the admin.
Admin transfers:
Manual transfers are used to transfer inventory between locations and sub-locations.
Inventory flows:
When items have been shipped from the sending store, they will show as being in transit and will have the in transit status at the sending store. The available quantity will be reduced to reflect the items in transit.
Upon receipt at the receiving store, the available and on hand quantities will be increased.
System preferences can be used to determine transfer flows:
- Auto receipt: When true, the receiving store will not have to perform a receive.
- Use status pick: When true, the sending store will have to perform a pick.
- Use status pack: When true, the sending store will have to perform a pack.
- Use status ship: When true, the sending store will have to perform a ship.
Complete cycle of a transfer:
Follow the following steps to complete a transfer:
- Step 1. Create the transfer
- Step 2. Pick the stock
- Step 3. Pack the stock
- Step 4. Ship the stock
- Step 5. Receive the stock (at the new location)
Step 1: Creating a transfer:
To create an inventory transfer:
- Go to menu.
- Go to Inventory > Transfers.
-
You will be redirected to a form. Fill out the fields:
- From location: Choose the location of the sending store.
- Sales transaction reference: Typically, a manual transfer will not require a reference and should be left blank.
- Reason code: Enter in an applicable reason code for this transfer.
- Comment: Enter in optional notes.
- Status: When a transfer is created, it will have a status of 'open'.
- Processed date: Date of when the transfer is processed.
- Created: Date of when the transfer is created and the user who created the transfer.
Adding a line to the transfer sheet:
Use the plus icon
to add new lines:- Item: Choose the item to transfer.
- Available quantity: Shows the quantity available on the sheet.
-
Transfer quantity: Enter in the quantity to transfer.
-
To: Choose the receiving location.
- Status: Shows the current processing status of this line.
- Reason code: Choose an optional reason code
- Comment: Enter in comments if required.
-
Click Save or Save and process.
Click on Save if you will not process the transfer immediately. Upon saving, the transfer will still be in a status of 'open'. You are able to make edits to the transfer. You can also abandon the transfer while it is still 'open'.
Click on Save and process to process the transfer immediately. The status should then show 'processed'.
Step 2: Pick the stock:
Once the transfer worksheet is processed, you can proceed with picking the items.
- Go to menu.
- Go to Inventory > Transfer.
- Select the transfer you want to edit. Click the edit icon
 .
. - Edit all the desired information on the transfer worksheet.
- Click on Select all pending button to choose all items in the worksheet which you are ready to pick. Alternatively, you can select the item individually by clicking the checkbox for each line item.
- Click on the Apply status and choose cancelled or pick.
- When picking the item, you can change the receive quantity if needed.
- Click on Apply status.
Step 3: Packing the items:
Once the Transfer worksheet is Picked, you can proceed with Packing the items.
- Click on Select all pick to choose all items in the worksheet which you are ready to pack. Alternatively, you can select the item individually by ticking each line item.
- Click down on the Apply status and choose pending, pack, or cancelled.
- Click on Apply status and save.
Step 4: Shipping the items:
Once the transfer worksheet is packed, you can proceed with shipping the items.
- Click on Select all pack to choose all items in the worksheet which you are ready to ship. Alternatively, you can select the item individually by ticking each line item.
- Click down on the Apply status and choose pick, ship, or cancelled.
Step 5: Receiving the items:
Once the Transfer worksheet is in Shipped status, you can proceed with Receiving the items.
- Click on Select all shipped to choose all items in the worksheet which you are ready to receive. Alternatively, you can select the item individually by ticking each line item.
- Click down on the Apply status and choose pack, received, or cancelled.
- Click on Apply status and save.
Mass transfer:
Transfer ALL items from a location using the mass transfer function.
- Complete the details noted above in Step 1: Create a transfer.
- Click on the Mass transfer button. The worksheet will be populated with all the items which has available quantity at the sending store. Additionally, you can edit the items on the worksheet.
- Click Select all pending button.
- Select the ‘apply to’ location.
- Proceed with Steps 2, 3, 4, if needed, to complete the transfer process.
Inventory stock count
Stock counts will help you keep track of your inventory.
You have to make sure that you count and record each item in your store. When the inventory count is processed, your store's inventory records are also updated.
Inventory counts help you to keep on top of your inventory movements and identify any discrepancies faster.
There are 2 main types of counts:
- Full: This is usually performed once a year. Typically, the store is prepared for a count and not trading. Ensure that all inventory is received and all, if any, supplier returns are made prior to commencing counts.
- Partial: Typically, the count is performed in a small section of your inventory, usually a particular brand, type, or supplier's items. Many retailers complete these during trading hours.
To do a count:
- Go to menu.
- Go to Inventory > Counts.
- Click the Add button.
-
You will be redirected to a form that you have to fill out:
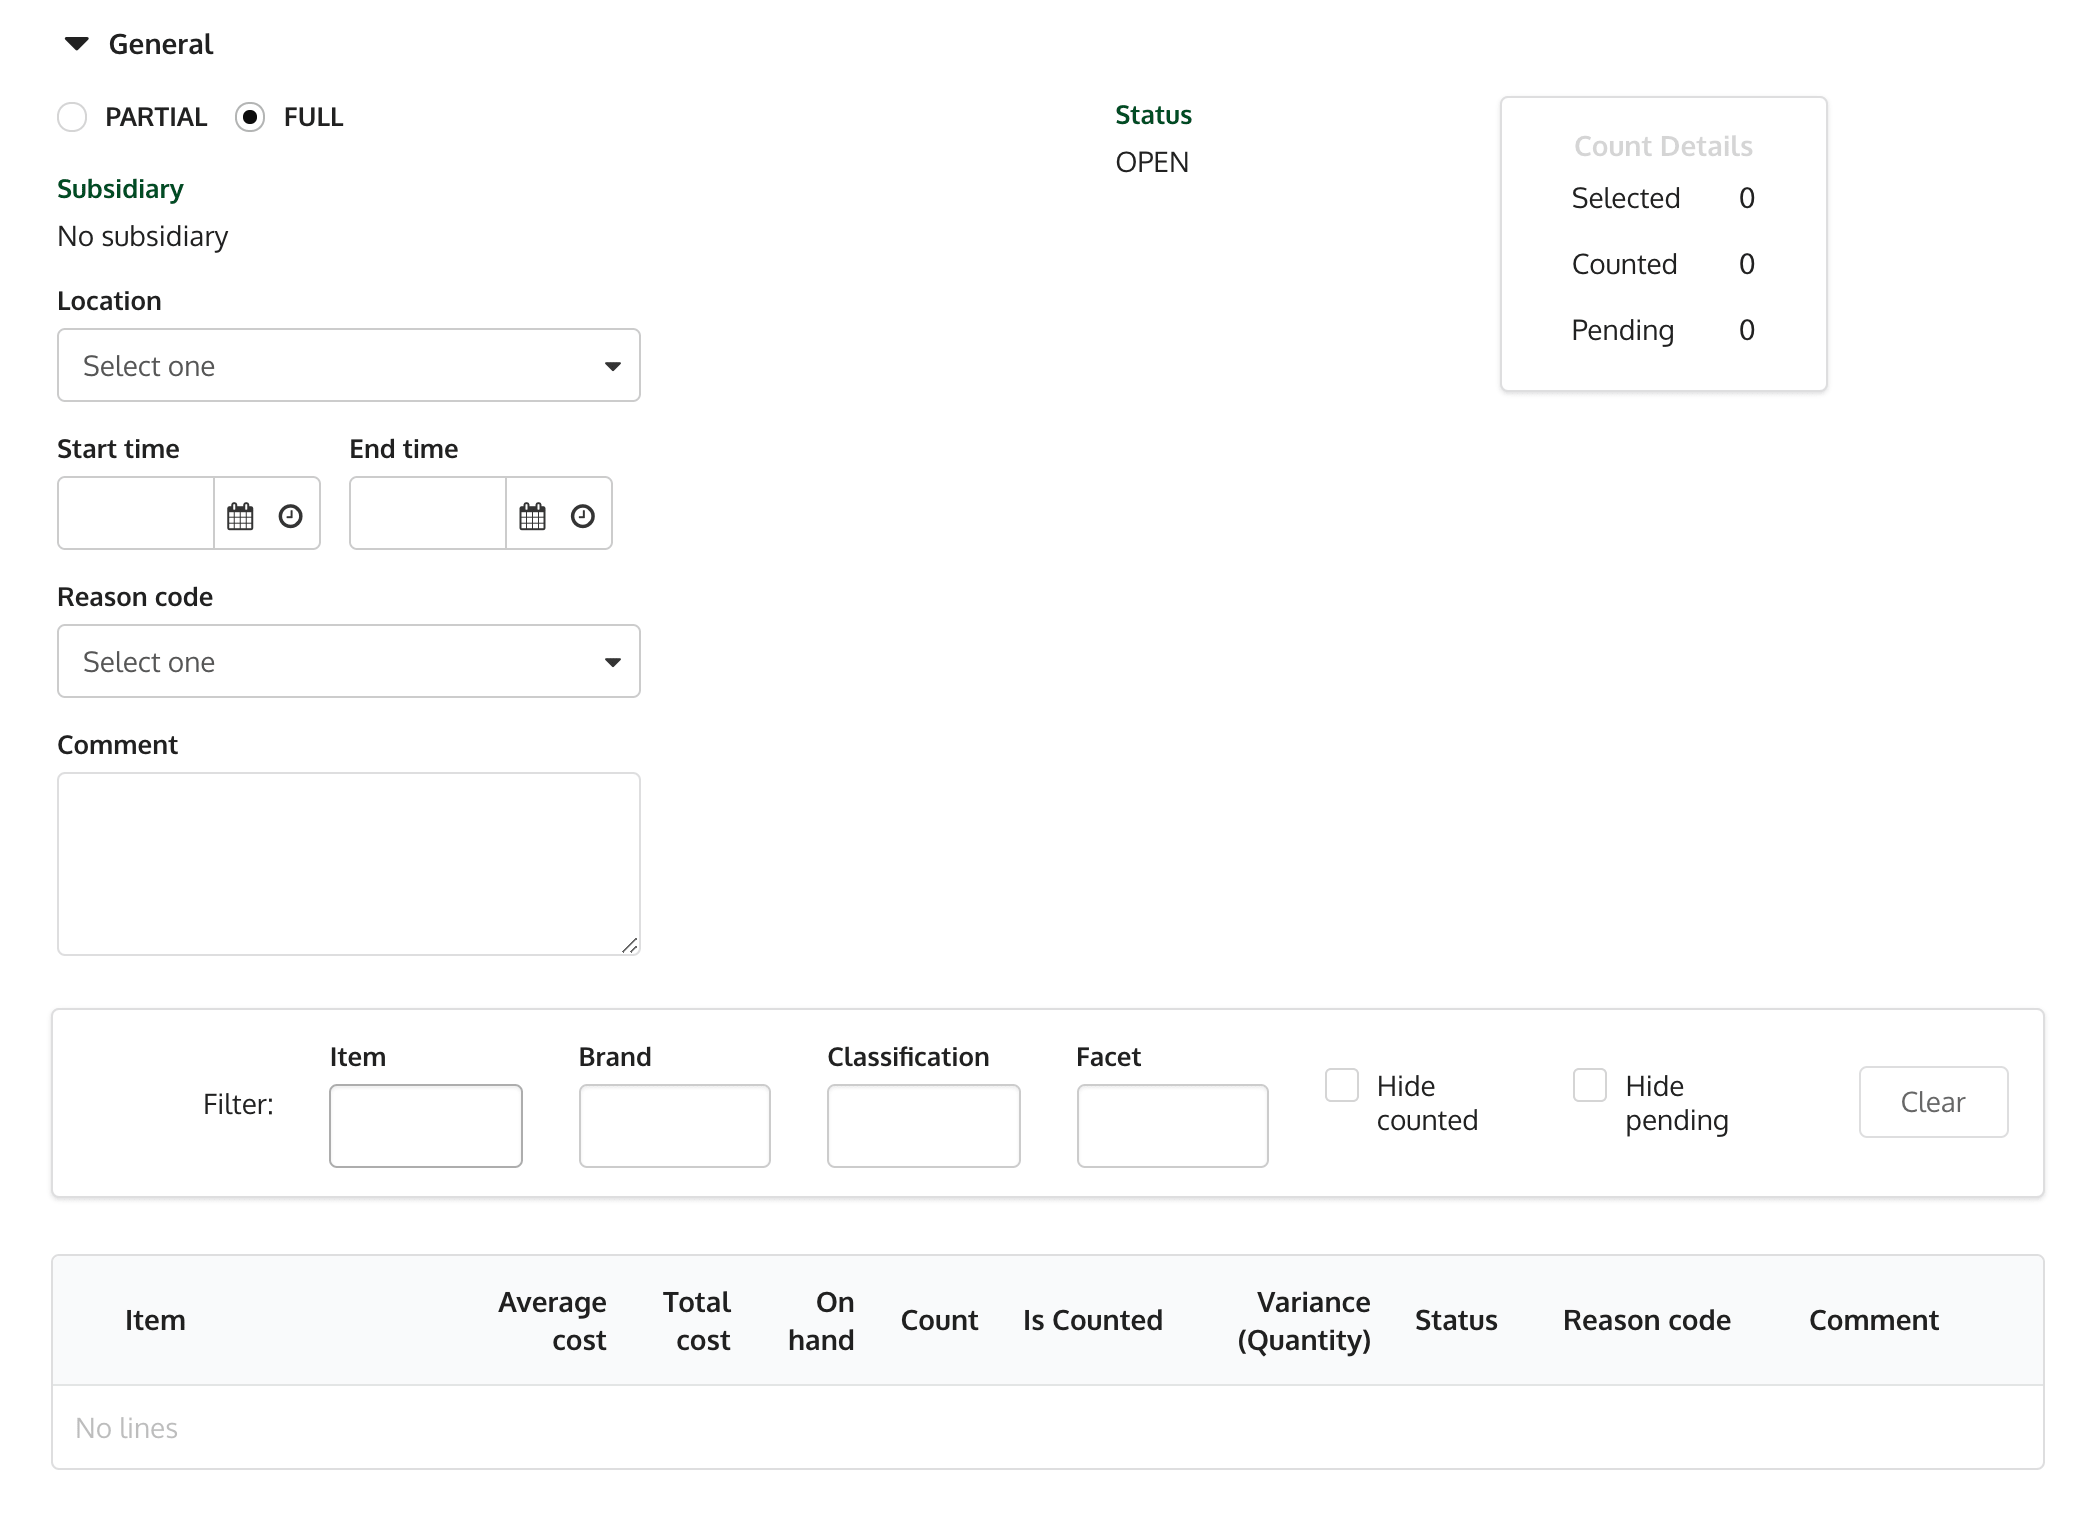
- Location: Choose the location which you will be performing the count. When you choose a location, note that the worksheet is filled of the item which you sell at this specific location.
- Start time: Choose the start date and time.
- End time: Choose the end date and time.
- Reason code: Choose the reason codes which are applicable.
- Comment: Enter in any comments if necesary
- Status: This shows the current status of the count. When you first start the count, the status would show open'. After the count is processed the status shows 'closed'.
- Count details: Shows the tally of your current count.
- Enter unit cost: Check this if you need to also make adjustments to your cost as you are performing your count.
- Filter: Use the item, brand, classification, and facet filters to constraint the items that are presented on the worksheet.
- Hide counted: Check this if you want to hide the items which you have counted.
- Hide pending: Check this if you want to hide the items which you have not counted.
- Clear button: Click on the button to remove all the filters and checkboxes.
While on the worksheet, enter in the count on the Count textfield. The variance quantity will show the difference between on hand and counted quantity.
-
Once all items are counted, you can save the count to be processed at a later stage. The count will still be in ‘open’ status and you can edit the count, delete, or abandon it.
But if you want to process the count instantly, click on the Save & process button. This will change the status to ‘closed’.