Payments
Doing a split payment
KRISP POS allows the balance amount on the checkout to paid by one or many payments. e.g. on checkout, the balance is $1,000 and customer wants to pay $500 using their card, and the rest as cash.
For the scenario above, here's what you do on the checkout:
For payment 1 (card):
- Using the keypad supplied, enter $500 in amount tendered.
-
Choose Credit card.

-
Click Apply payment button. The balance will then show $500 amount.
For payment 2 (cash):
-
Ensure that the Cash option is selected.

-
Click Add payment button. The balance should then be zero.
- Print or email the customer's receipt before exiting the checkout.
- Click Done.
Tyro payment gateway
Tyro Payments offers Australia-based retailers the opportunity to process credit and debit card payments in their stores.
To set up a Tyro payment device in KRISP POS, please follow these steps:
Creating a Tyro payment type:
- Go to the menu.
- Go to Setup > Finance > Payment types.
- Click the Add button.
-
Fill out the form required for the setup:
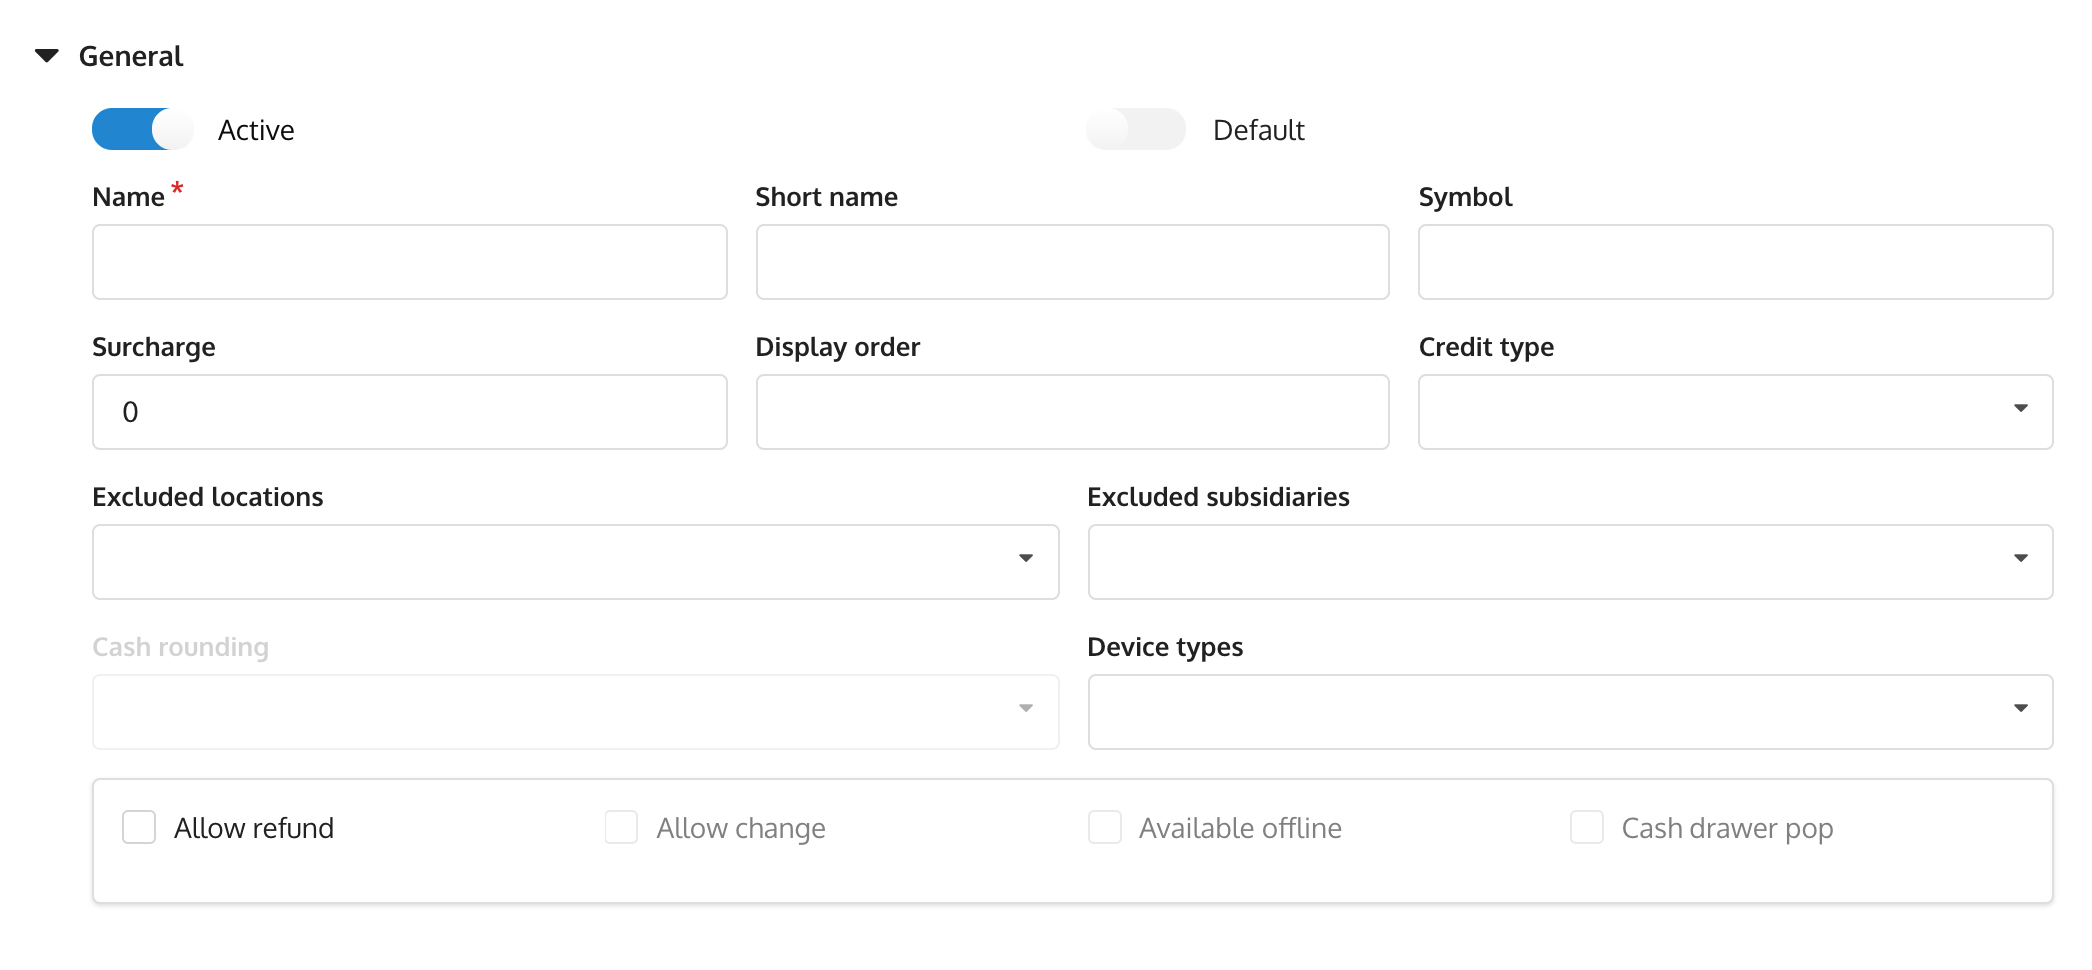
- Name: Enter in Tyro or any other name which will identify this payment type at checkout.
- Device types: Choose Tyro terminal.
- Checkbox:
- Allow refund: Check this box.
- Allow change: Disable this checkbox as this feature is not yet available.
-
Click Save.
Creating a Tyro device:
- Go to the menu.
- Go to Setup > Device > Devices.
- Click the Add button.
-
Fill out the form required:

- Active toggle: Make sure toggle is on.
- Name: Enter in a name which follows this convention: Tyro Terminal (M:1238 T:3).
- Merchant ID: This is the ID which will be provided by Tyro.
- Terminal ID: This is the ID which will be provided by Tyro.
- Location: Choose the location where this device will be used.
- Subsidiary: Choose the subsidiary where this device will be used.
- Status: Choose OPEN.
-
Click on Save.
- Click on Pair terminal button. If successful, the button should say Unpair to terminal after clicking.
- Click on Save.
Tyro KRISP POS checkout:
KRISP POS can be configured to accept various payment methods like Tyro. At the checkout, the cashier will be able to choose Tyro as the payment method.
Example 1:
- On checkout, the balance is $100 and the customer chooses to pay all using a credit/debit card.
- Choose Tyro.
- Click the Add payment button. The customer will then be prompted to give their card to complete the transaction. After this, the balance will show $500.
Example 2:
- On checkout, the balance is $1000 and customer wants to pay $500 with card and the rest with cash.
-
For payment 1:
- Using the keypad, enter in $500 in amount tendered.
- Choose Tyro.
- Click Add payment button. The customer will then be prompted to produce their card to complete the transaction. After this, the balance will show $500.
-
For payment 2:
- Make sure Cash option is selected.
- Enter in the amount tendered.
- Click Add payment button. The balance is now zero.
-
Print or email the customer receipt before exiting the checkout.
- When you're finished, click Done.
Payment reversal
Payment reversal allows the cashier to make a transaction with a reverse payment.
To enable this feature:
- Go to menu.
- Go to Setup > Company > Preferences.
- Select Register tab on the left.
- On this page, find an option called Allow payment reversal.
- Set this preference to True.
After configuring the preferences:
- Go to menu.
- Go to Setup > Finance > Payment types.
- Look for the payment type you want to edit.
- Click the edit icon
 .
. - In the checkboxes below, check the Allow reversal. This will allow the cashier to do a payment reversal for this specific payment type only.
- Once you are done with the setup, go back to the POS.
- Click the dropdown on your account on the upper right.
- Click Server sync.
Doing a payment reversal:
- On the checkout screen, you will see the payment reversal icon. You can click this when you have an added payment that you want to reverse.
- You will see a popup appear.
-
Check the Reverse checkbox if you want to reverse the entire payment. e.g. if the customer paid $10 and you have not issued change yet.
And then check the Include change checkbox as well if you already have issued change to the customer, and they are returning this as well (this is necessary for the till).
-
Click the Save button.
-
After clicking Save, you will notice the reversal reflected in the checkout total.