Using the KRISP POS
POS: Guide to the workspace
KRISP POS is divided into two sections: 1) the workspace, and 2) the cart.
Workspace:
The workspace is located on the left side of the KRISP POS.

A. Breadcrumbs navigation: It allows the users to keep track and maintain awareness of their location within the workspace.
B. Search bar: search different items, customers and transaction available at the current store.
C. Recent transaction: View past transactions within the same day for the current store.
D. Hotkeys: Provide a shortcut to items within the workspace.
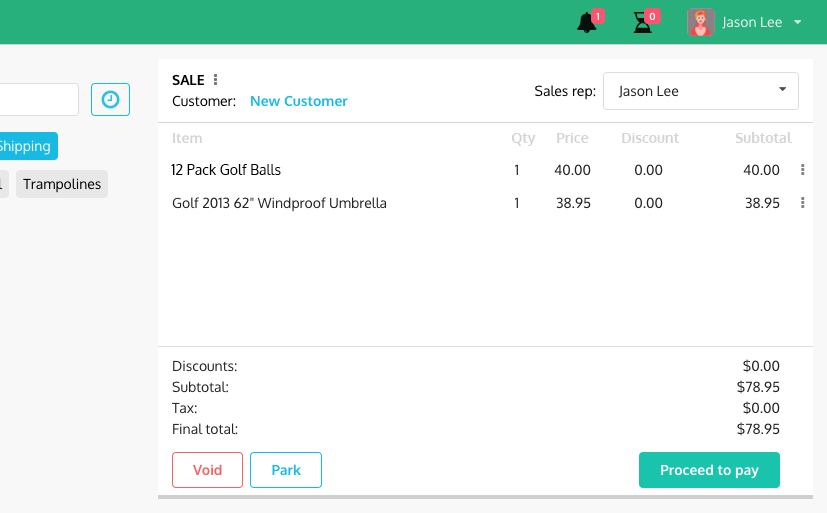
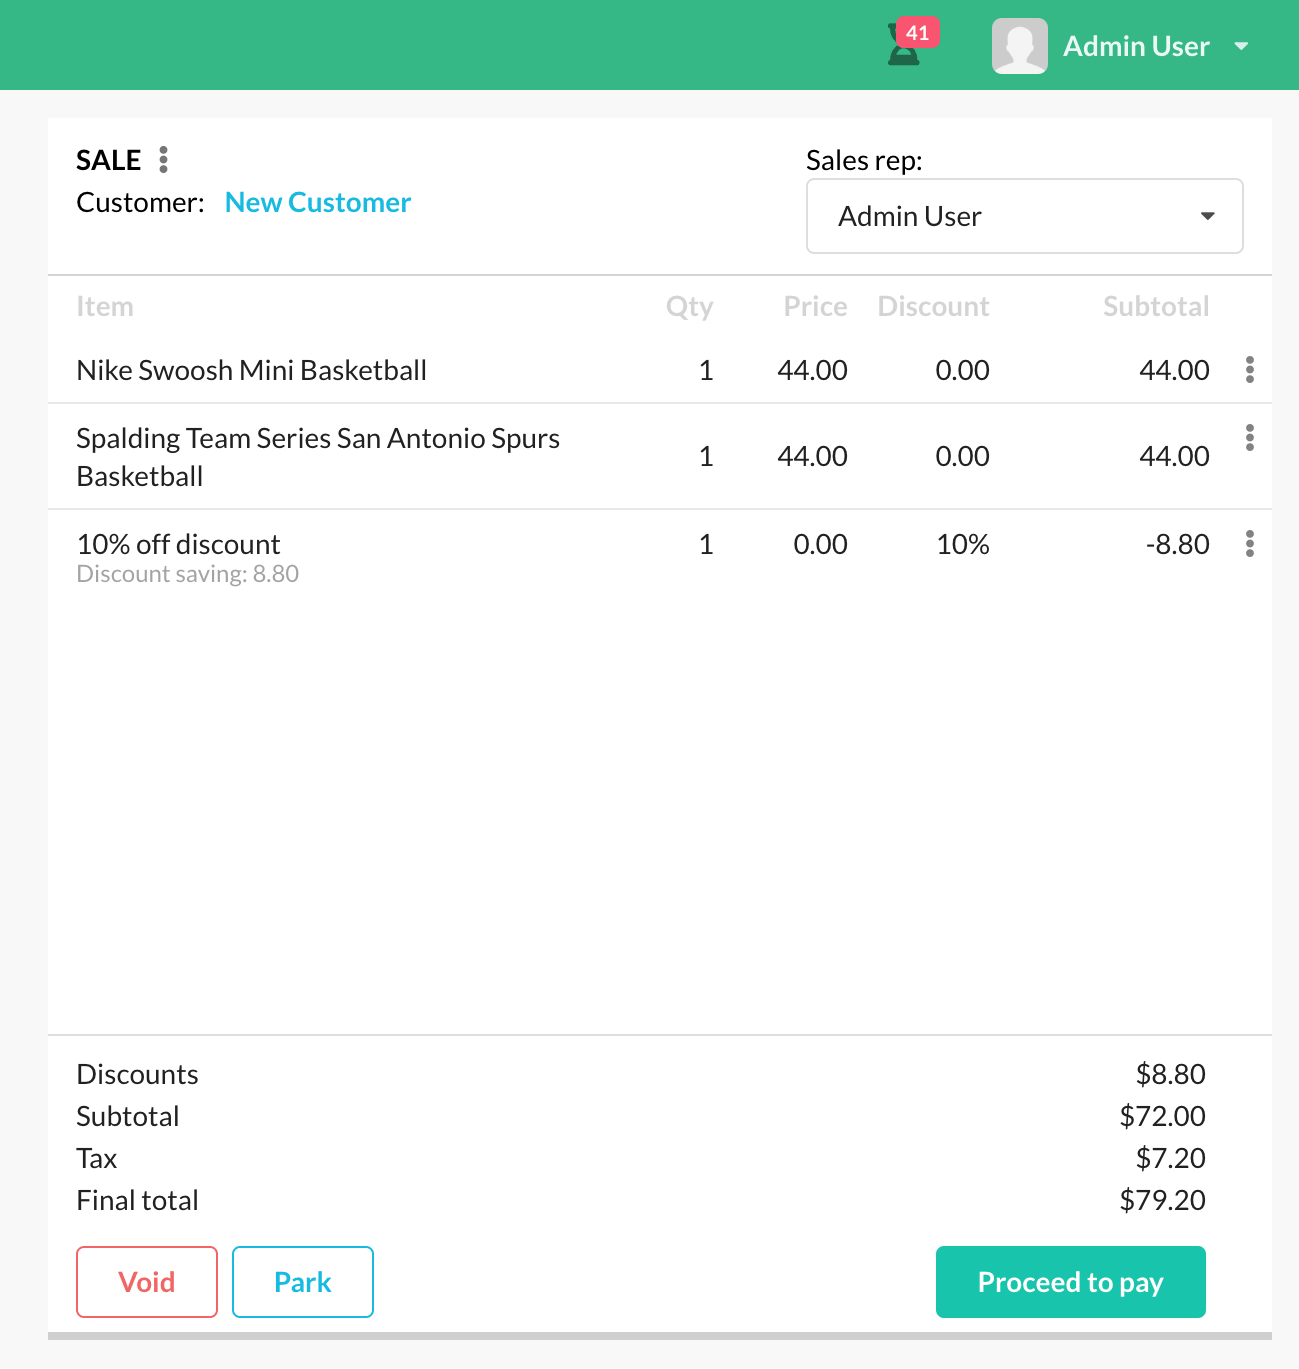
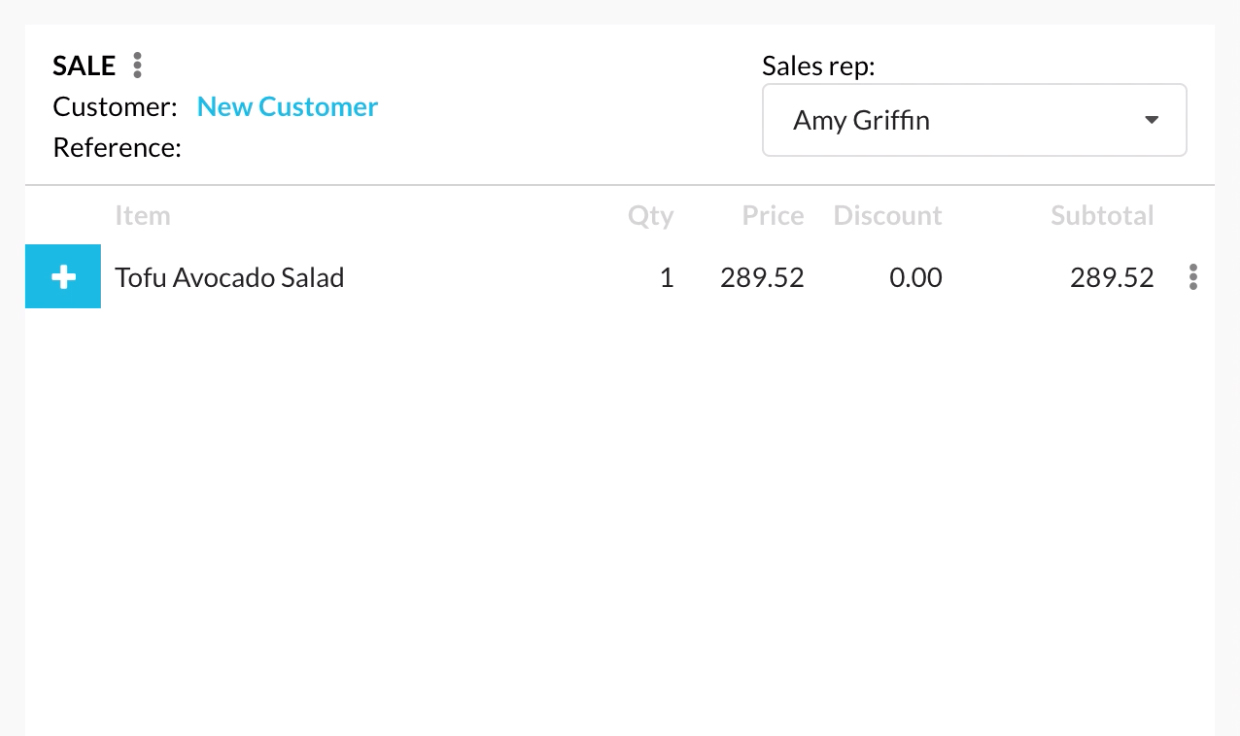
Cart:
The cart is located on the right side of KRISP POS.

A. Customer: An existing or new customer can be added to the cart. Alternatively, the customer entry may be left blank.
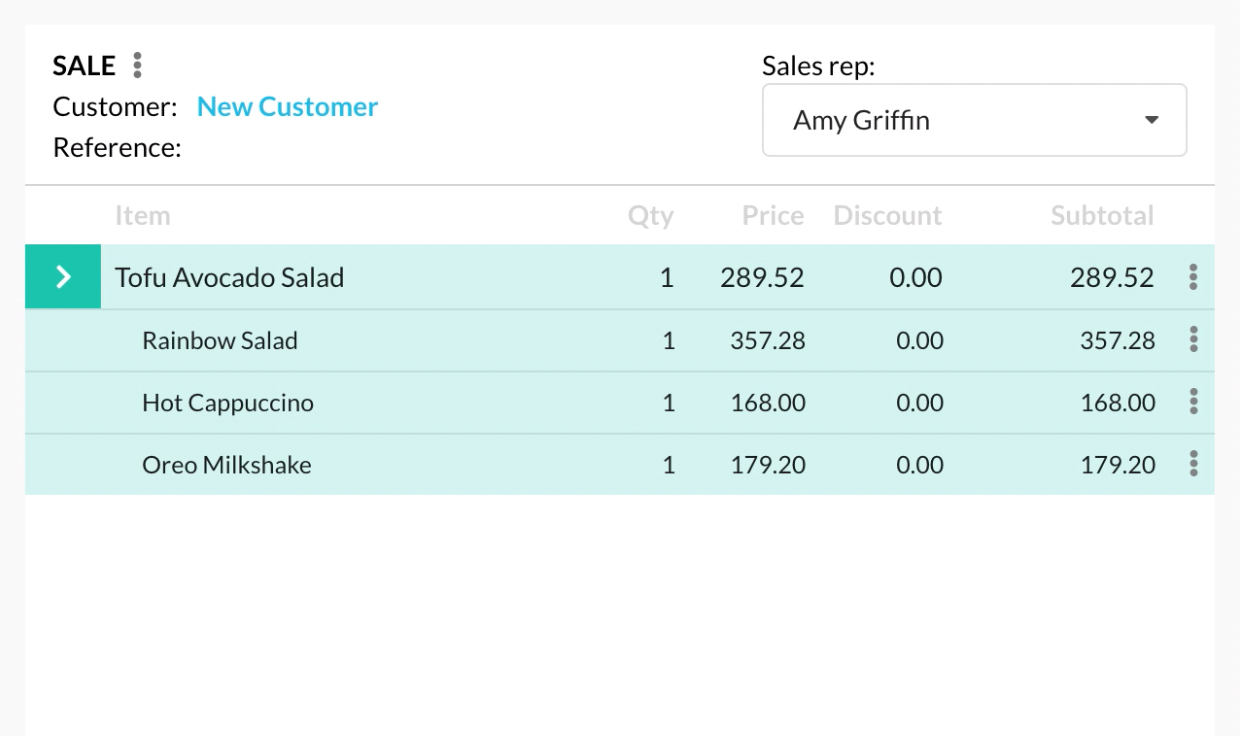
B. Sales representative: A sales representative is assigned to the entire sale. Additionally, a different sales representative can be assigned to a sale item.
C. Sale details: This serves as the repository for the items to be sold. It includes the:
- Items to be sold
- Quantities
- Retail price
- Discounts
- Sale price
Additionally, an ellipsis provides the ability to enter further transaction and line level actions.
A summary of transaction is located at the bottom of the cart. It contains the total discounts, subtotal, tax and final total.
Completing a sale
When a customer has approached your register:
- You can start adding their items to the cart by scanning them. You can also use the hotkeys and the search bar to find items. For more details, refer to Adding items to the cart.
-
Added items should appear on the cart on the right side of your screen. You can edit the item's quantity, discount, or sales price.
You can edit more sales attributes of the item by clicking the more options icon
 .
. -
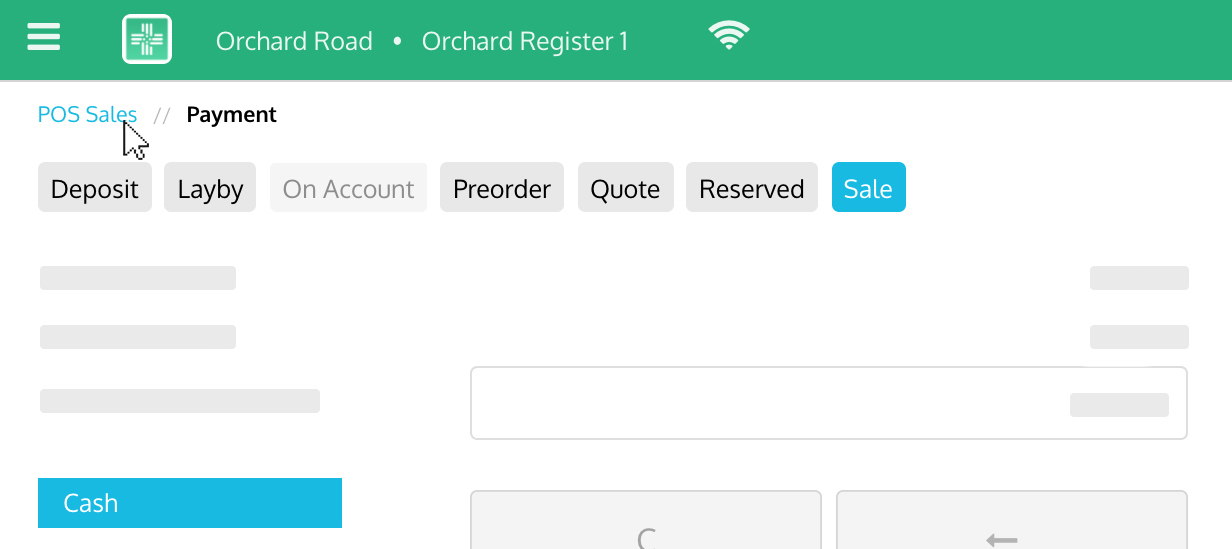
Once you're done, you can click the Proceed to pay button at the bottom of the screen. This brings you to checkout.
-
The transaction type defaults to sale (you can always change the transaction type if you need to by clicking on the tabs above).
This help topic is for a sale transaction, but you can read about other types here in Transaction types.
-
Click the payment method, and use the keypad on your screen to enter the tender amount.
-
Click the Add payment button.
If tendering the cash and chance is due, the customer's change will be indicated on the cart.
-
You can print, email, or print & email if a receipt is required.
-
Click the Done button. You have now completed a sale transaction.
After a transaction, the application will always bring you back to an empty cart, so that you're ready to do your next transactions.
Changing the sales rep
A sales rep can be changed both in the transaction and on an item line.
Changing sales rep in the transaction:
A change in transaction sales rep may be needed if the person processing the transaction is not the same person at the cash register.
- On the upper part of the cart, click on the Sales rep dropdown.
-
Choose from the list of available sales rep names.

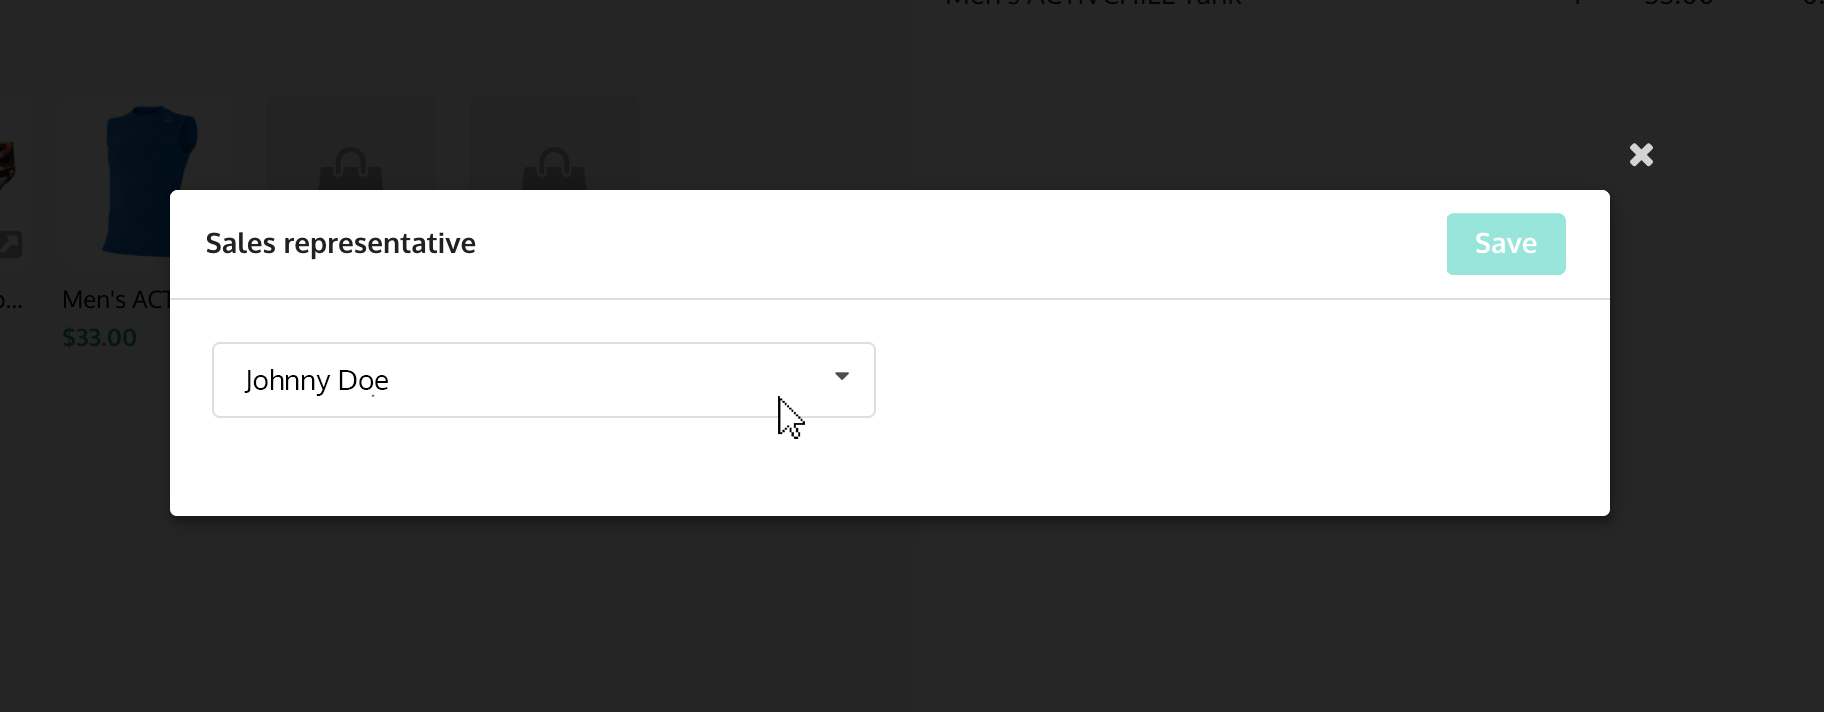
Sales rep in an item line:
Change an item line sales rep when the person processing the transaction is different from the person fulfilling the item on the cart. An example may apply for service-oriented sales, i.e. a hairdresser who cut the client's hair while a manicurist provides nail treatment.
- Find the item you want to assign a different sales rep to.
- Click on the more options icon on the right side of the item.
-
Choose the Edit line sales rep from the dropdown.

-
A popup will appear where you can choose from the sales rep dropdown.
-
Click the Save button.
Using the global search
The search bar on the KRISP POS is used to search for customers, items, and transactions. At least three (3) characters are required to be typed in before searching and displaying results starts.
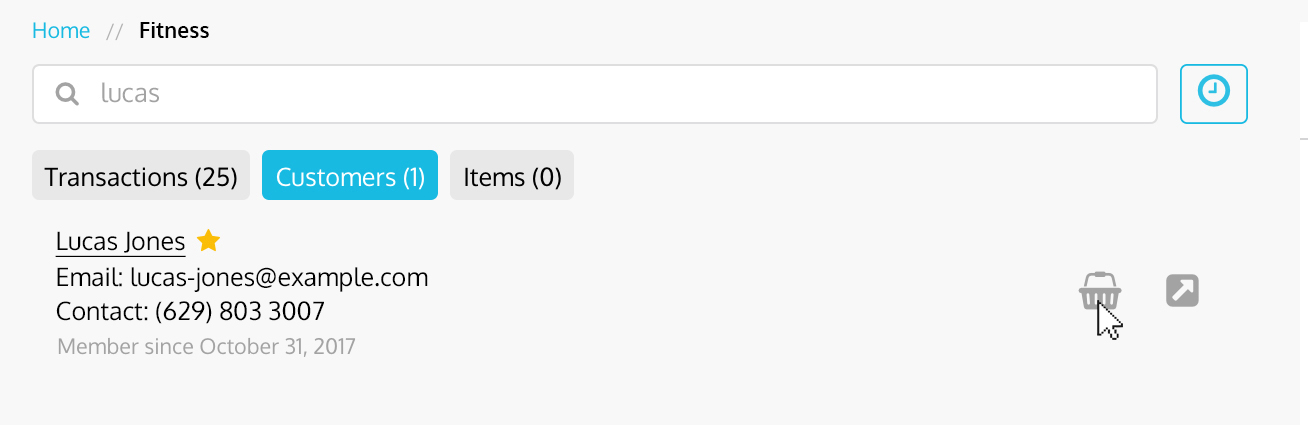
Searching for a customer:
- Using the global search bar, type in the customer's loyalty number, name, email, membership, or contact number.
-
Make sure that the Customers tab is selected. Search results are listed below it.

-
Use the icons on the right to perform specific actions. To add the customer to the cart, you can click on the customer name or the add to cart icon
 . And you can view the customer detials by clicking the open popup icon
  .
.
Searching for items:
- Using the global search bar, type in the item's name, number, or UPC.
- Make sure that the Items tab is selected. Search results are listed below it.
- To add an item to the cart, click on the item name or the add to cart icon . View the item detials by clicking the open popup icon .
Searching for transactions:
- Using the global search bar, type in the transaction number, or the customer name tied to the transaction.
- Make sure that the Transactions tab is selected. Search results are listed below it.
-
Use the icons on the right to perform specific actions:
-
Open transactions: You can add an open transaction to the cart by either by clicking on the transaction name, or clicking the add to cart icon
. -
Closed transactions: If the transaction is closed, you can issue a return by clicking on the transaction name, or the return icon
 .
.
-
You can view transaction details by clicking the open popup icon ![]() .
.
Park and recall
Transactions can be parked, and then recalled at a later time. Parked transactions can be accessed from any register within the same store.
Parking a transaction:
To park a transaction:
-
On the KRISP POS screen, click on the Park button at the bottom of the cart to park the transaction.
Recalling a transaction:
When you are ready to get back to your parked transaction, you can recall by:
-
Searching for the parked transaction. You can search by doing one of the following methods:
-
Clicking the parked icon: You can click on the parked icon
 on top of the cart to recall the transaction. All parked transactions for the current store are listed here.
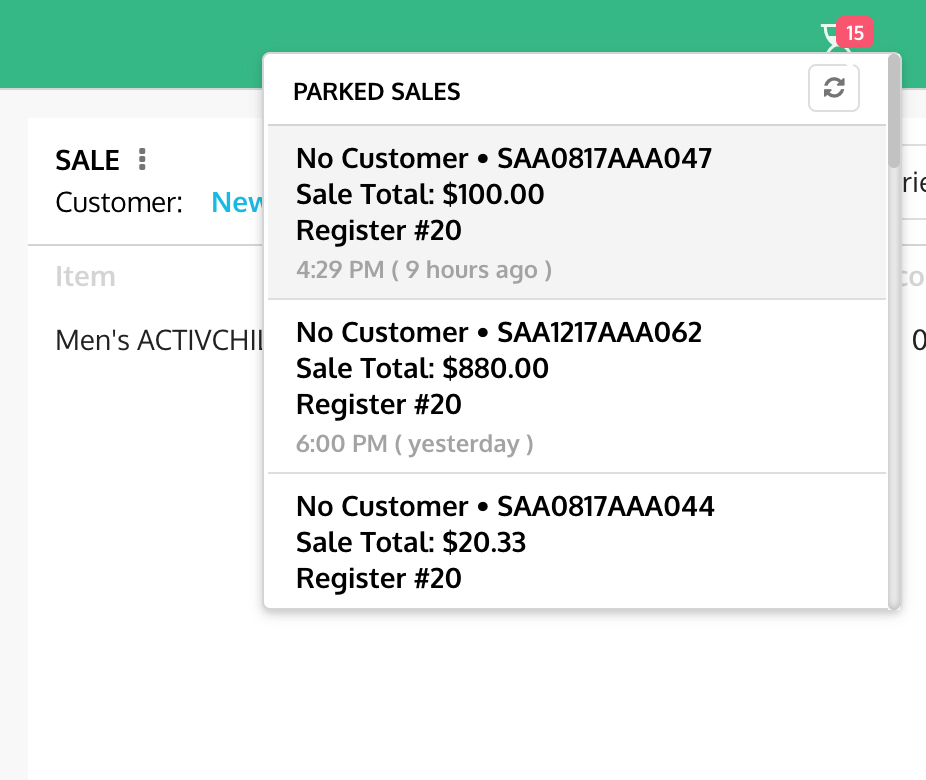
-
Clicking the recent transactions icon: Since this is a list of all the transactions that happened today, your parked transaction will also be accessible here.
-
Using the global search: You can also search for the transaction manually, and it will be displayed as a search result.
-
-
Once you have found the parked transaction you were looking for, just click on it to recall it to the cart.
Recent transactions for today
In KRISP POS, you can see all transactions that happened today. Recent transactions list transacations that happens from 12:00am to 11:59pm of that day.
To see the recent transactions:
-
Click on the recent transactions icon
 next to the search bar to show a list of today's transactions from the current location.
 -
You will see the list of today's recent transactions.

The transactions listed will have details including the transaction number, time, and customer's name.
Viewing customer's past transactions
You can view the details of a customer and also their past transactions.
Accessing the customer's past transactions:
-
Find a customer and open their details by clicking the open popup icon
.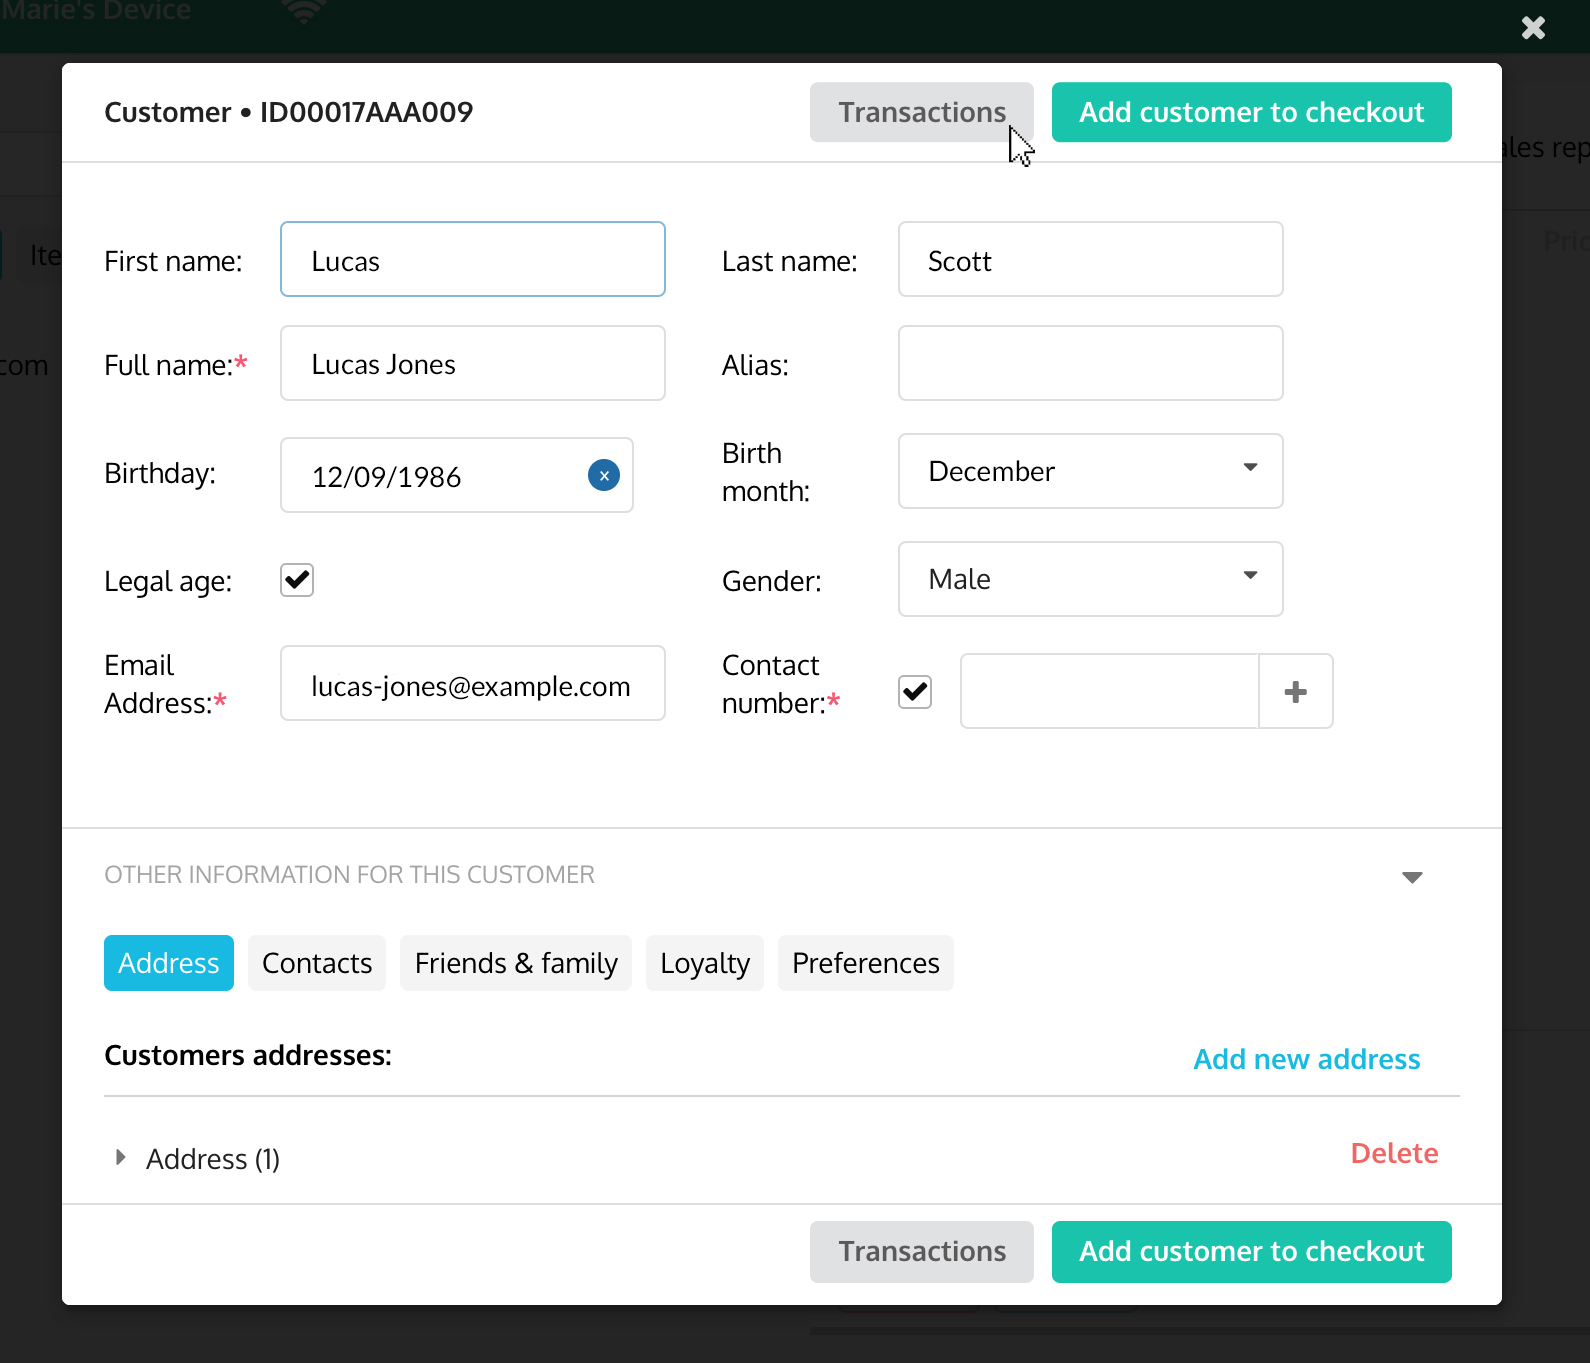
-
Click the Transaction button.
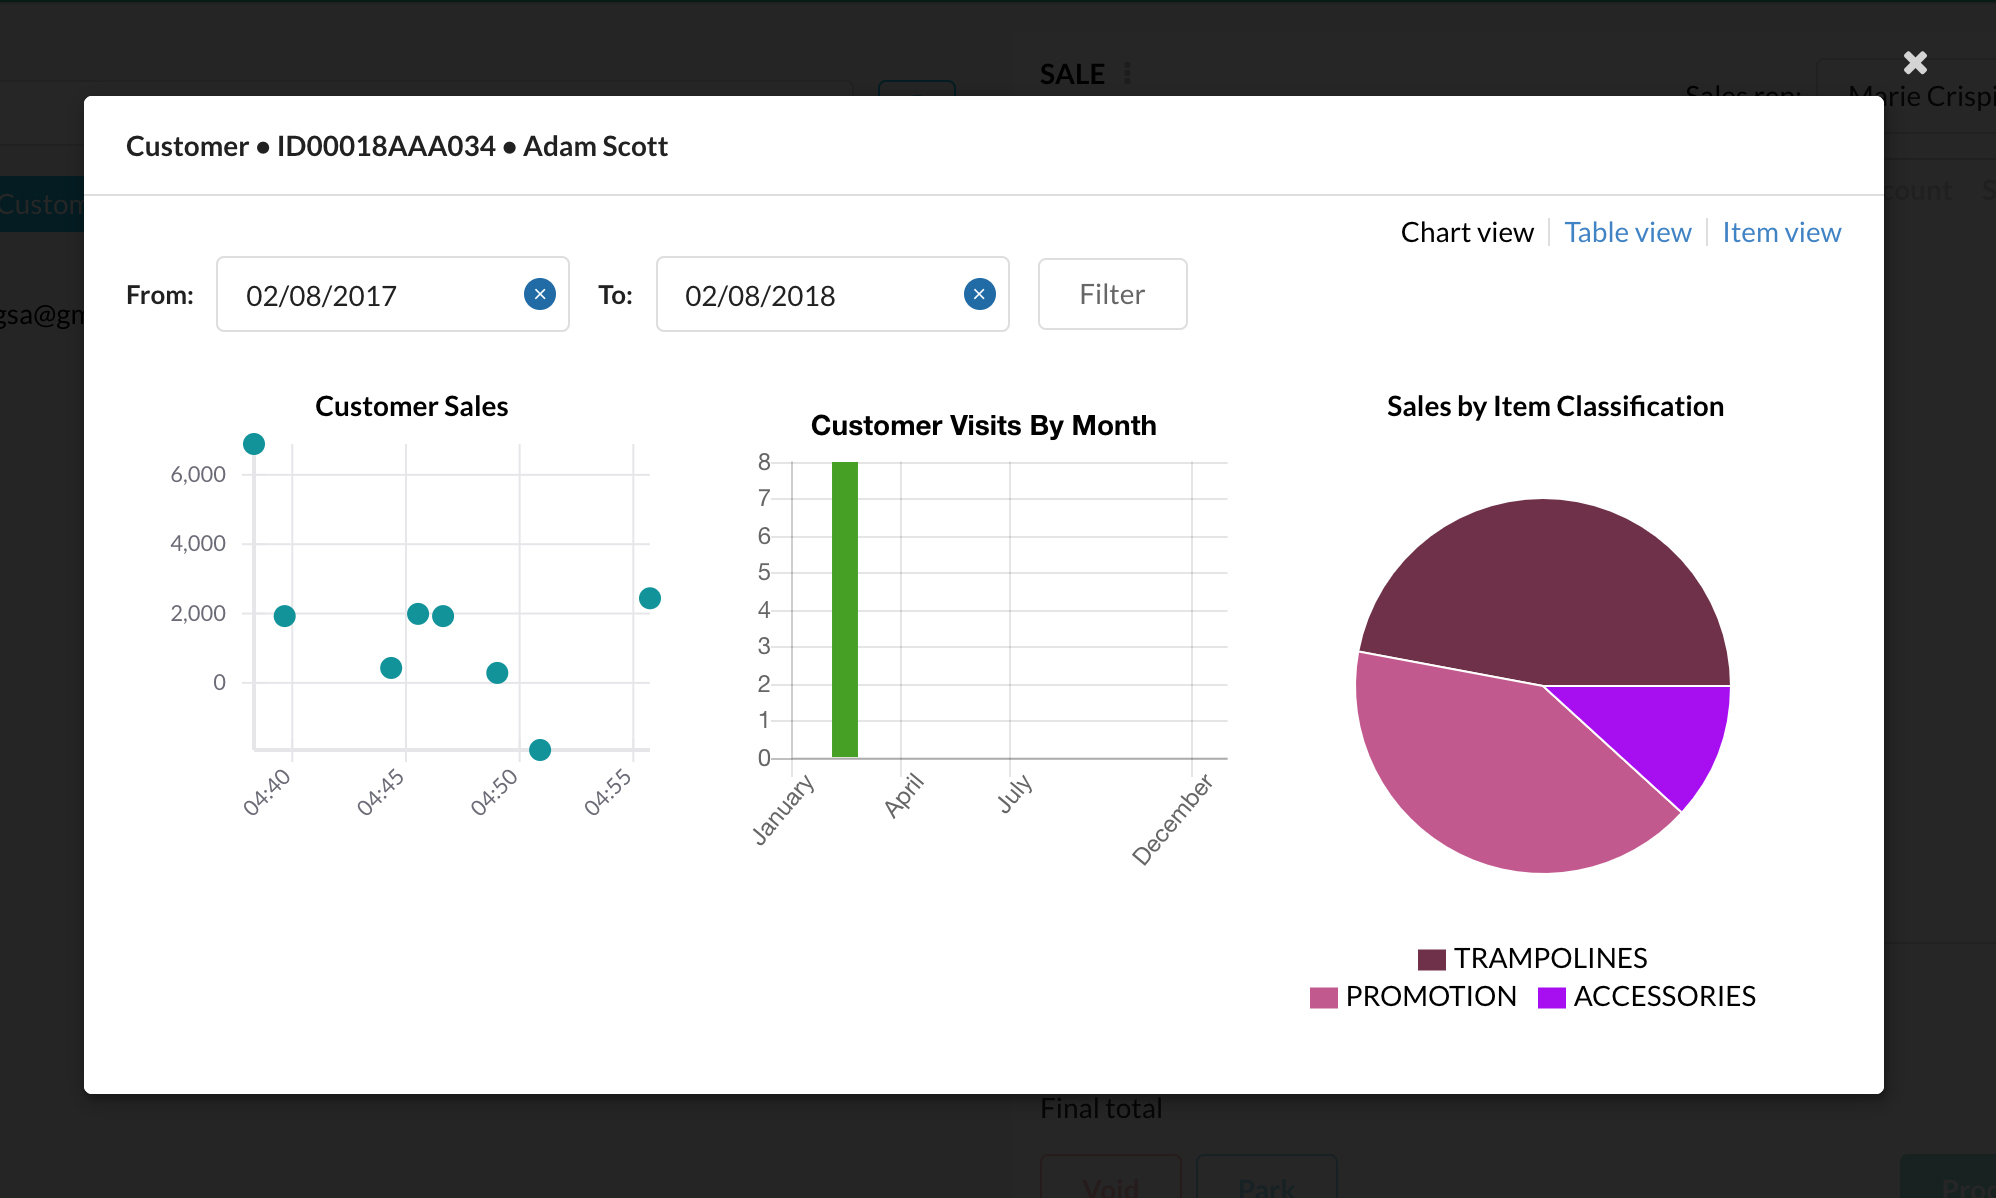
- You will see the customer's transactions in a popup. You can use the From and to filter to view a specific date range.
Chart view:
-
Customer sales: Shows all the transaction types and returns recorded on the customer. Each dot represents a transaction. Click on each dot to bring you to a separate view of the transaction.
-
Customer visits by month: Shows the number or transactions recorded on the customer, broken down into months.
-
Sales by item classification: Shows the breakdown of items bought by their classifications.
Table view:

This displays a table of the customer's past transactions. Use the icons to view details, or print/email the receipt.
Item view:

This displays a list of all items the customer has bought. Use the icons to view details or add to the cart.
Adding and removing a customer on the cart
Adding the customer to a transactions not only enables transactions to be linked to a customer, but additionally provides you insightful customer data for clienteling.
Adding a customer:
-
Search for a customer by using the global search. You can type in their first name, last name, email, contact number, or loyalty number. If the customer you're searching for doesn't exist yet, you can create a new customer.
-
Click the Customers tab below the search bar.
-
Add the customer to the transaction by either clicking on the customer name, or using the add to cart icon.
A customer can be added to the cart at any stage of the transaction.
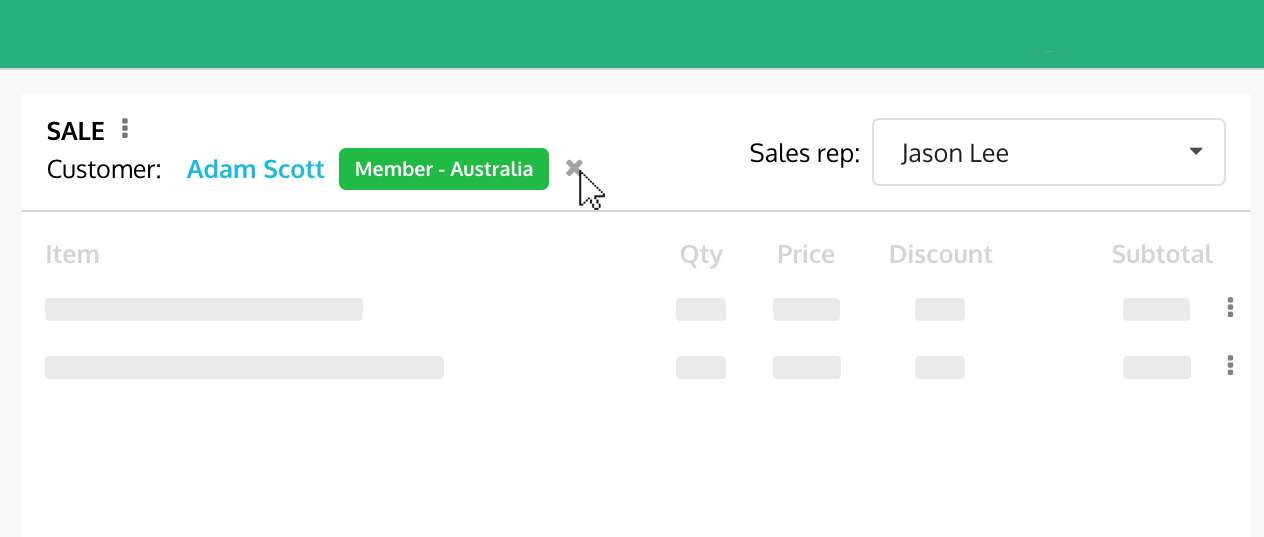
Removing a customer from the cart:
-
Click on the X icon next to the customer name.
Adding items to the cart
There are different ways to add items to the cart:
-
Scanning the barcode of the item: You can physically scan the barcode of the item. That exact item will be read and then automatically added to the cart. When you scan the same item again, it will be added on a new line.
-
Global search bar: Type in the item name, item number, or barcode of the item in KRISP POS search bar. If there are matching items, it will be displayed on the screen. You can then click on the item to add it to the cart.
-
Hotkeys: Hotkeys are displayed on the left side of the KRISP POS as thumbnails or images. If the item is available, you can click on it to add it to the cart. For more information on creating hotkeys, see Creating hotkey groups.
-
Changing quantities: Instead of scanning an item multiple times, you can add one item and then just change its quantity on the cart. When selling an item, the quantity should always be at least one.
Viewing item details
The item detail page shows some information about the item, and allows you to enable transaction-specific settings. To open the item detail page:
- Find an item in the search bar or in the hotkeys.
- Click the open popup icon .
-
You will see the popup that displays the item details.
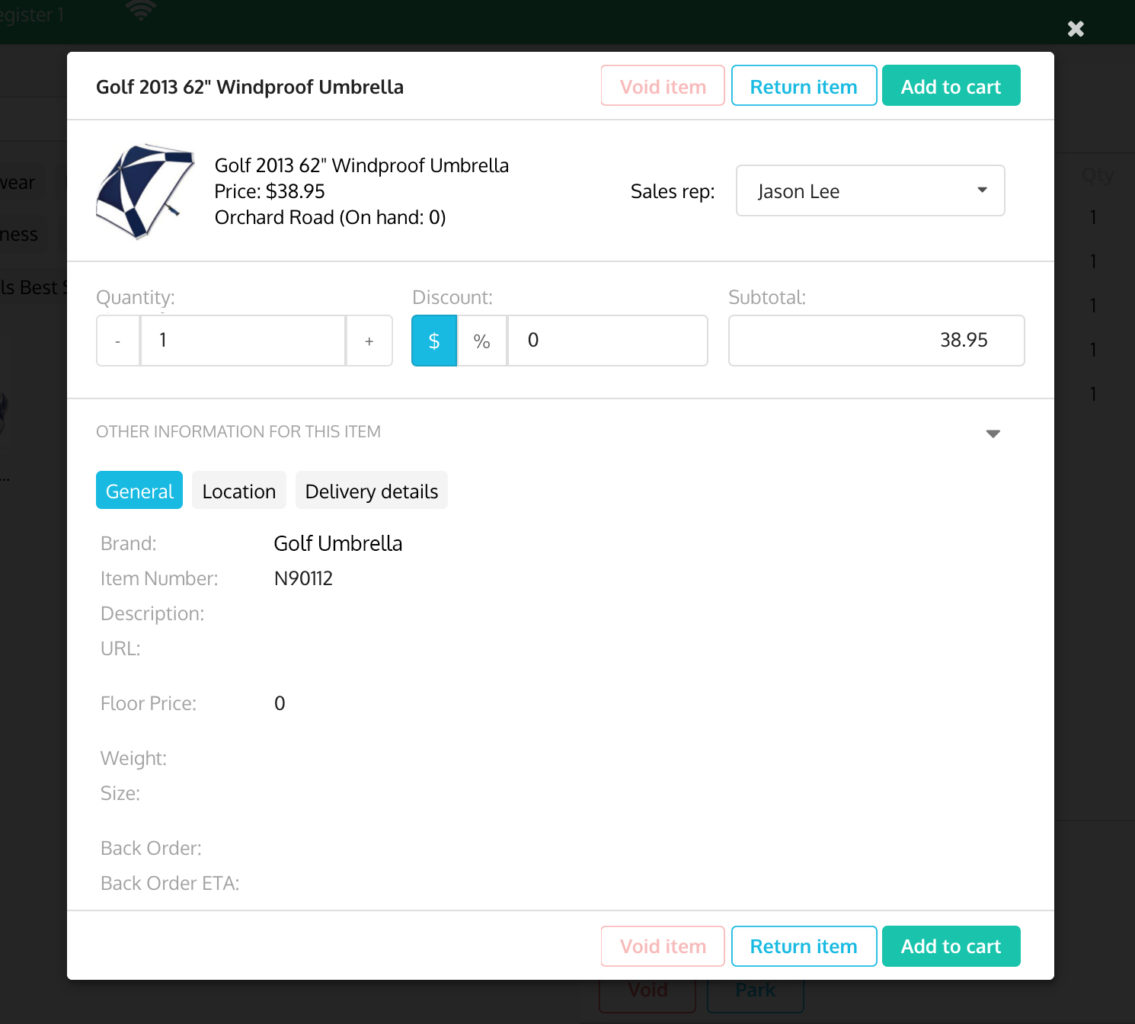
In the popup you will see more item details like the item photo, name, and location-specific price, among other things. You can also void an item, which will remove the shown item from cart. And you can also return an item, whcih will issue a return of this item.
You will see the following subtabs at the bottom part of the popup:
| Tabs | Description |
|---|---|
| General | Shows general item details. |
| Location | Shows inventory availability across locations. |
| Substitute items | Allows you to choose a substitute to the original item. |
| Correlated items | Allows you to view and choose other related items. |
| Delivery details | Allows you to view and edit delivery details for the item, including delivery options, delivery status and delivery notes. |
Lastly, you can close this popup by pressing the X icon on the upper right of the popup.
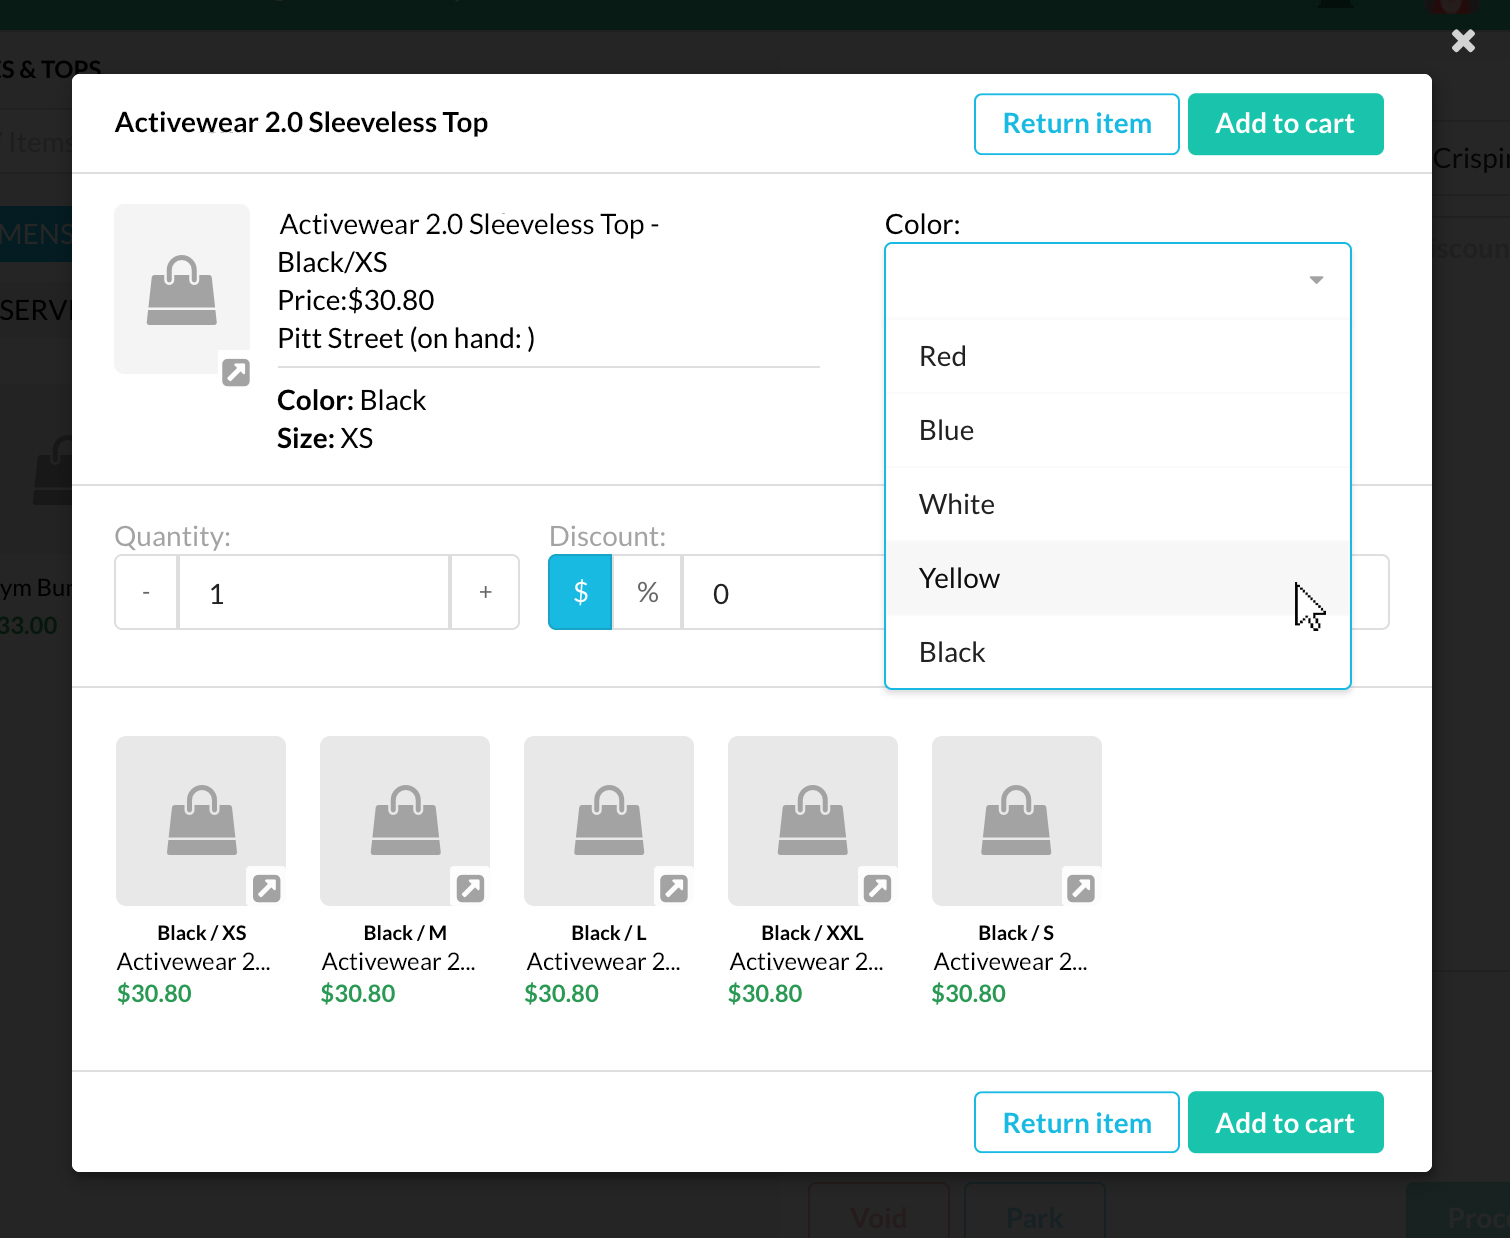
Selling a matrix item
A matrix item cannot be sold, but rather it provides a way of identifying underlying linked items which are often referred to as matrix 'child' items. Matrix 'child' items can be sold by:
- Scanning the item directly from the cart.
- Selecting an allocated hotkey.
Matrix items and system preferences:
System preferences can be set by your system administrator to determine how matrix items are displayed on the workspace:
- Display matrix parent items: When enabled, the parent items are shown on the hotkey workspace.
- Display matrix child items: When enabled, the child items are shown on the hotkey workspace.
When selecting a matrix parent from a hotkey, you will then be able to perform these actions:
-
Select the corresponding child item by filtering or by using the scrollbar.
-
View the item details by clicking on the open popup icon
. - Add the child item to cart.
- Return the child item.
Applying promotions
Promotions can be automatically or manually applied to the cart. Vouchers and coupons are examples of manual promotions.
Automatic promotions are triggered when the promotions criteria is met.
Manual promotions work in the following manner:
- Manually add promotions by using the search bar, the hotkeys, or the item scanner.
- Although you have added the promotion, it will ONLY be applied if, before the checkout, the cart fulfills the requirements of that promotion.
- If you have fulfilled the requirements, you will see the changes in your cart.
Promotion items:
Promotion items are used to link a promotions to a sale.
When a promotion is applied at the POS, the promotion item is added to the cart automatically. Promotion items can then be used to track promotions that have been applied.

A few notes:
- Creating a promotion item is similar to creating a service item.
- A promotion item is linked to a promotion by adding the promotion item to the promotion definition.
- There should be a 1:1 relationship between a promotion item and a promotion.
- A promotion item can be used to limit the locations where the promotion can be applied.
- On a sale, the promotion item displays the promotion impact, while the item which has received the promotion does not. However, the promotion impact on the item that received the promotion is still viewable in admin.
Manual discounts on the cart
You can apply manual discounts to items on the cart. A discount can either be a percentage or a value off the item price.
Applying line level discounts:
-
On the KRISP POS screen, find the item you want to edit and click on its Discount amount.

-
This expands to an input area, which allows you to choose either the $ or % icon. You can type in a value, or use the up and down arrow keys to adjust the discount.
-
Example 1: If an item price is $100.00, and you want to give a dollar discount of $10, tap on $ and enter in 10. Subtotal will show $90.

-
Example 2: If an item price is $100.00, and you want to give a percentage discount of 50%, tap on % and enter in 50. Subtotal will show $50.

-
-
Click on the Discount amount again to close this input line.
Applying transaction discounts:
-
On the KRISP POS, find the discount item from the hotkeys. You can also find it by using the search bar.
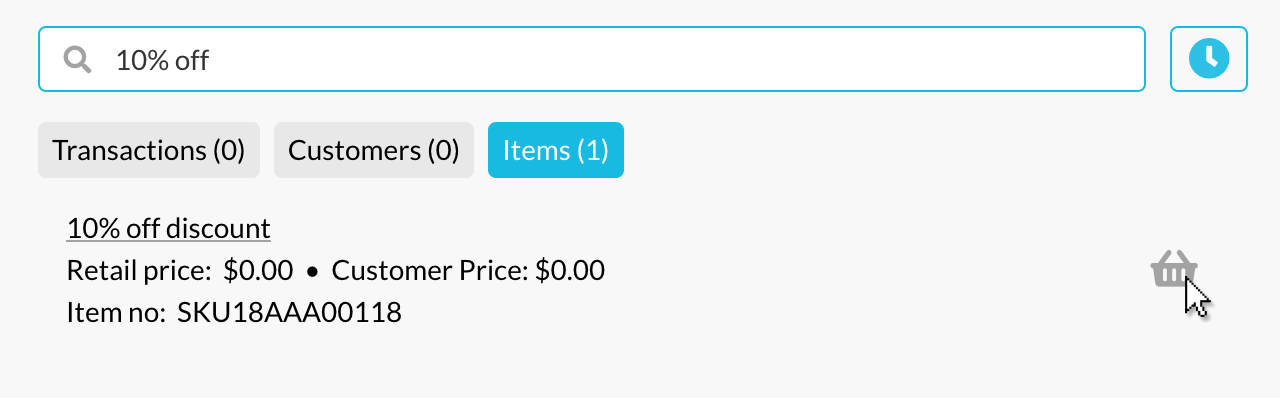
-
Click on the discount item to apply it on your cart. You will see the change in your cart total.
Vouchers and coupons
Vouchers and coupons can be created in KRISP via:
-
Coupon item (refer to creating new products). Coupon items:
- Are used for basic $ or % off the transaction.
- Are valid whilst active.
- Can be available for one or many stores.
-
Promotion (refer to creating promotions). Promotions:
- Are for complex product and transaction concessions.
- Are available whilst active and within the promotions defined available from and to period.
- Can be set to be applied once only per sale transaction.
- Can be available for one or many stores.
Voids and post-voids
You can remove an item or the entire transaction from the cart by doing a void or a post-void. To differentiate the two:
- Void: To remove a line item or the whole transaction from the cart, without creating a transaction impact.
- Post-void: To remove a line item or the whole transaction after they have already been processed, thus creating a transaction impact, i.e. partially paid transactions. Examples include layby, deposit, reserved, and pre-order transactions.
How to void an item:
When you want to remove an item from your cart:
- On the cart, click on the more options icon to the right of the item line.
- Click the Void line option.
-
A popup will appear to input the reason code and notes.
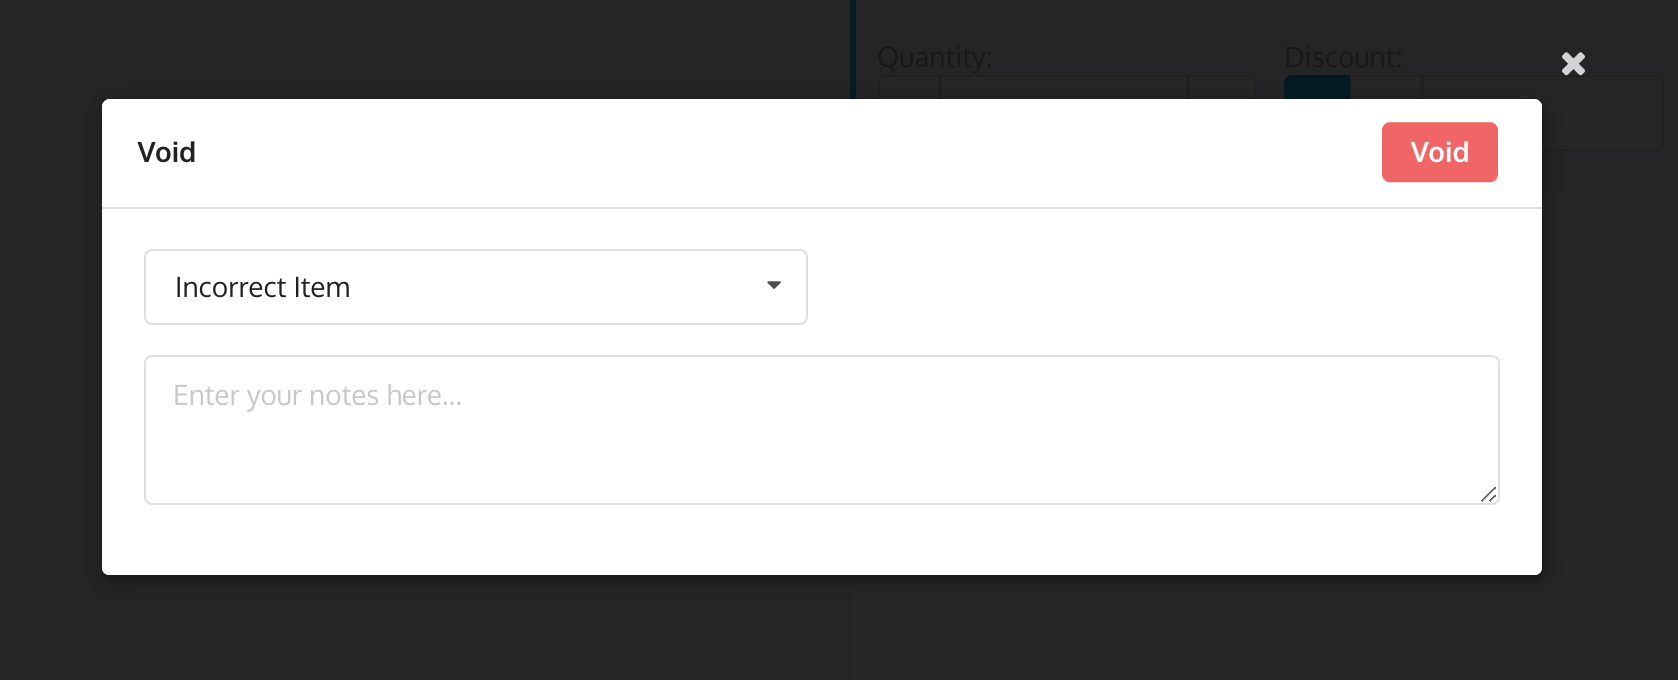
-
Press the Void button when you're done.
How to void a transaction:
When you want to cancel your current and active transaction on the cart:
- On the cart, click the Void button below.
- A popup will appear to input the reason code and notes.
How to post-void an item:
When a transaction has already been processed, but you need to remove an item from that transaction:
- Find an open transaction and put it on the cart.
- From the cart, click the more options icon to the right of the item name.
- Choose the Post-void line option.
- A popup will appear to input the reason code and notes.
- Click the Proceed to pay button to continue to checkout to complete the transaction.
How to post-void a transaction:
When you want to cancel a transaction that has already been processed:
- Find an open transaction and put it on the cart.
- From the cart, click the more options icon to the right of the item name.
- Choose the post-void line option.
- A popup will appear to input the reason code and notes.
- Click the Proceed to pay button to continue to checkout to complete the transaction.
Post-void (abandoning the sale):
When a transaction number has been applied to the sale and the customer decides to abandon the sale, you will have to do a post-void on the partial payments that have already been added:
-
If you're in the checkout, click on the POS Sale link on top to go back.
-
You will see a popup with an error message.
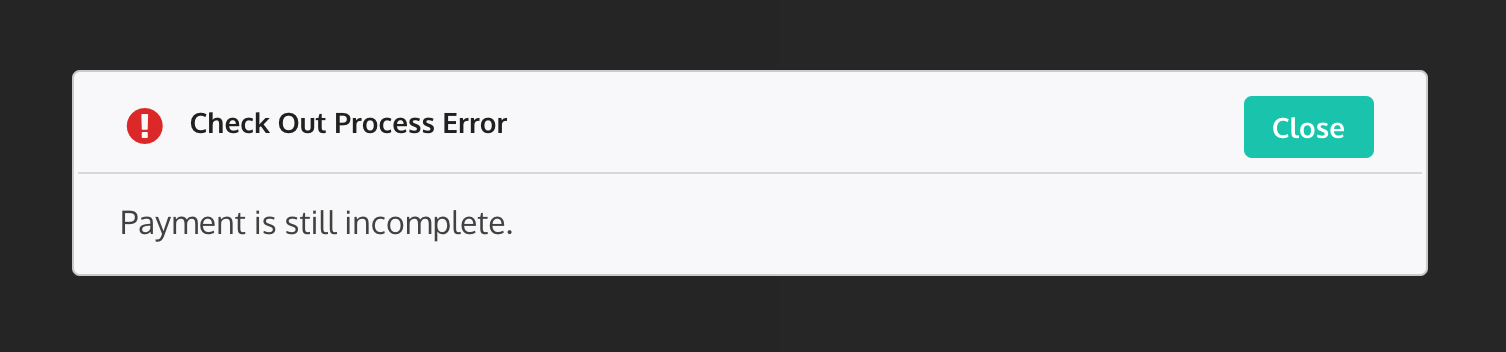
-
Close the popup to go back to the cart.
-
Do a post-void (make sure that the transaction is in the cart):
-
Transaction: If you want to void the entire transaction and abandon the sale, click on the more options icon
and choose the Post-void transaction option.
-
Item: If you want to remove an item but push through with the sale, click on the more options icon
and choose the post-void line option.
Note that if the amount voided is greater than the payment applied, you will see a Refund due amount. If the amount voided is less than the payment applied, you will see a Balance due amount.
-
-
Click on the Proceed to pay button.
- Choose the payment method.
- Click on the Add payment button.
- Click the Done button.
Reason codes
Reason codes can be recorded on certain transactions performed on both the KRISP POS and admin. For example, if a return is made, a preset reason code can be chosen by the user and this reason code is recorded on the transaction.
Reason codes can be defined for one or for many transaction types.
Creating reason codes on the admin side:
- Go to the menu.
- Go to Setup > Lists > Reason codes. Make sure you have the right permissions to access this page.
- Click on the Add button.
-
You will see a popup. Complete the details needed.

- Name: Enter in name of the reason code. The value entered here will be used and displayed throughout the application.
- Short name: The short name can be entered to help identify the reason code. It is not mandatory.
- Actions: Check on the actions which the reason code belongs to.
-
Click the Save button.
Viewing or editing reason codes on the admin side:
- Go to the menu.
- Go to Setup > Lists > Reason codes. Make sure you have the right permissions to access this page.
- Click on the edit icon
 .
. - You will see a popup with the details.
- Click the Save button if you made changes.
Sale transaction notes
Sale transaction notes are useful when you need to record any additional information on either a transaction or an item.
Adding transaction notes:
- Click on the more options icon on the top part of the cart.
- Choose the Edit transaction note option.
-
Enter in the notes field.

-
Click the Save button.
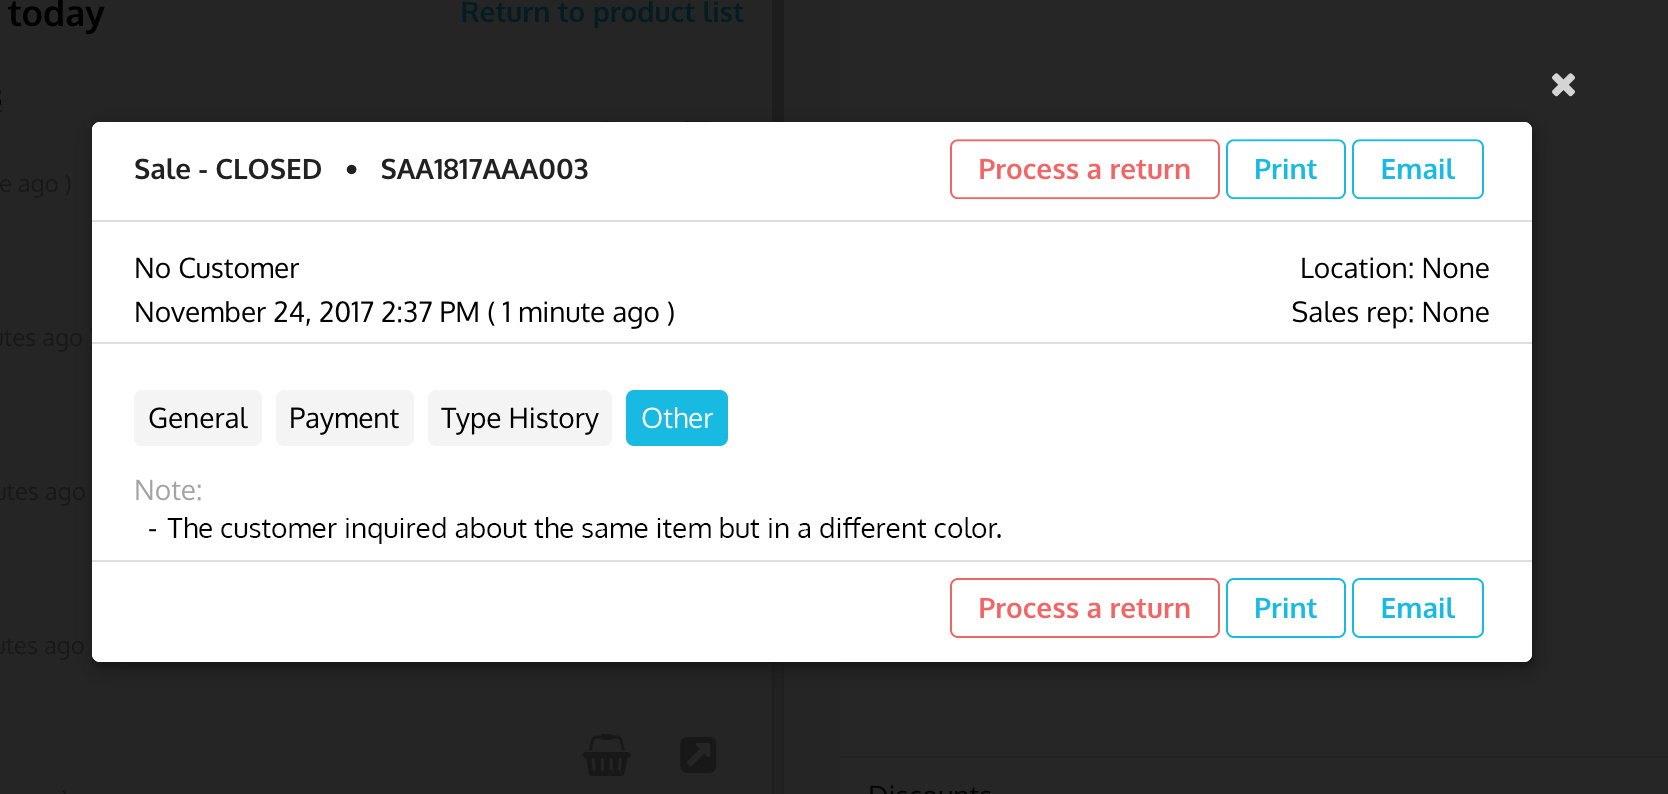
The notes can then be viewed later on on the Other tab in transaction details popup.
Adding transaction item notes:
- Click on the more options icon on the right side of the item name.
- Choose the Edit line notes option.
- Enter in the notes field.
- Click the Save button.
You will see the item note appear at the bottom of the item name.
Generating receipts
A receipt represents the current state of a customers transaction. Receipts can be generated from several areas with KRISP POS including:
- Checkout
- Transaction review
- Recent transactions
- Customer transaction details
Receipts can be emailed or printed by selecting the available options.

Receipt templates:
Templates for both emailed and printed receipts are defined from system preferences.
Emailing a receipt:
-
After selecting email receipt as the output option, a form will be shown, primed with the receipt template as well as the customers email address.
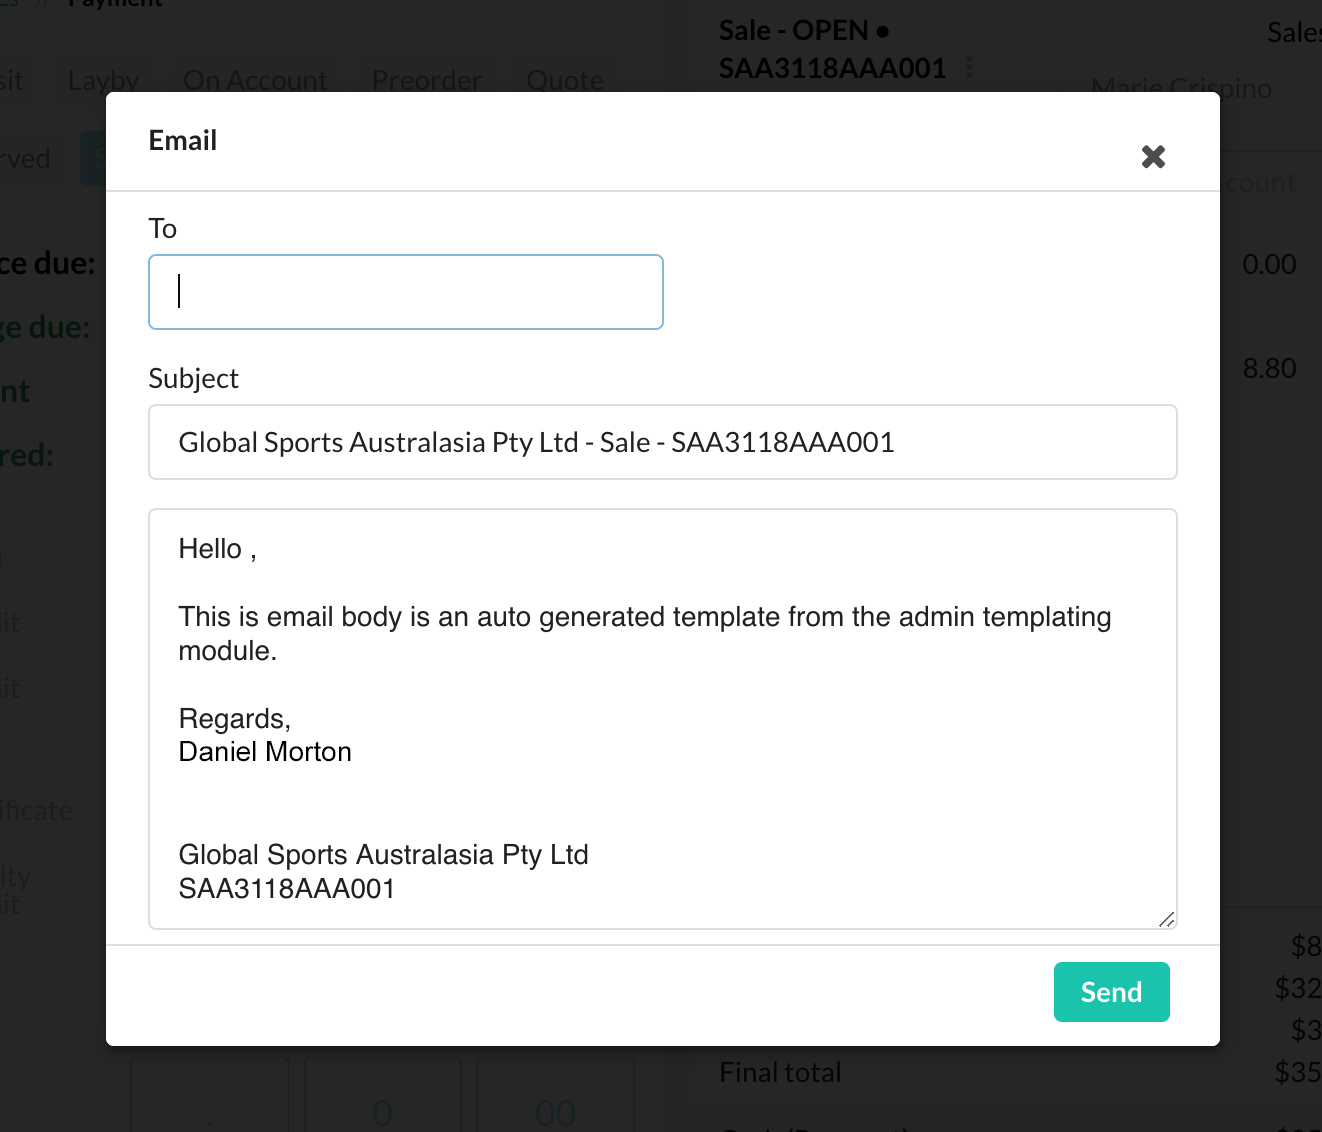
The defined template will prefill the subject, body, and attached receipt.
-
Edit the fields as needed.
- Click the Send button.
Issuing a gift receipt:
- Add the item being purchased to the cart.
- Click Proceed to pay.
- On the checkout, process the customer’s payment.
-
Click on the gift receipt button. The receipt will then print a receipt without the purchase price.
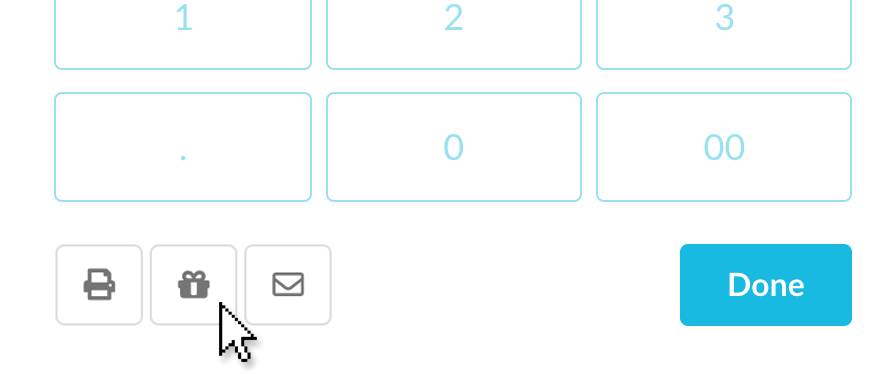
-
Click Done once you’re finished.
You can also re-issue a gift receipt for a past transactions.
- Find the customer’s past sale transaction.
- Click the gift receipt button.
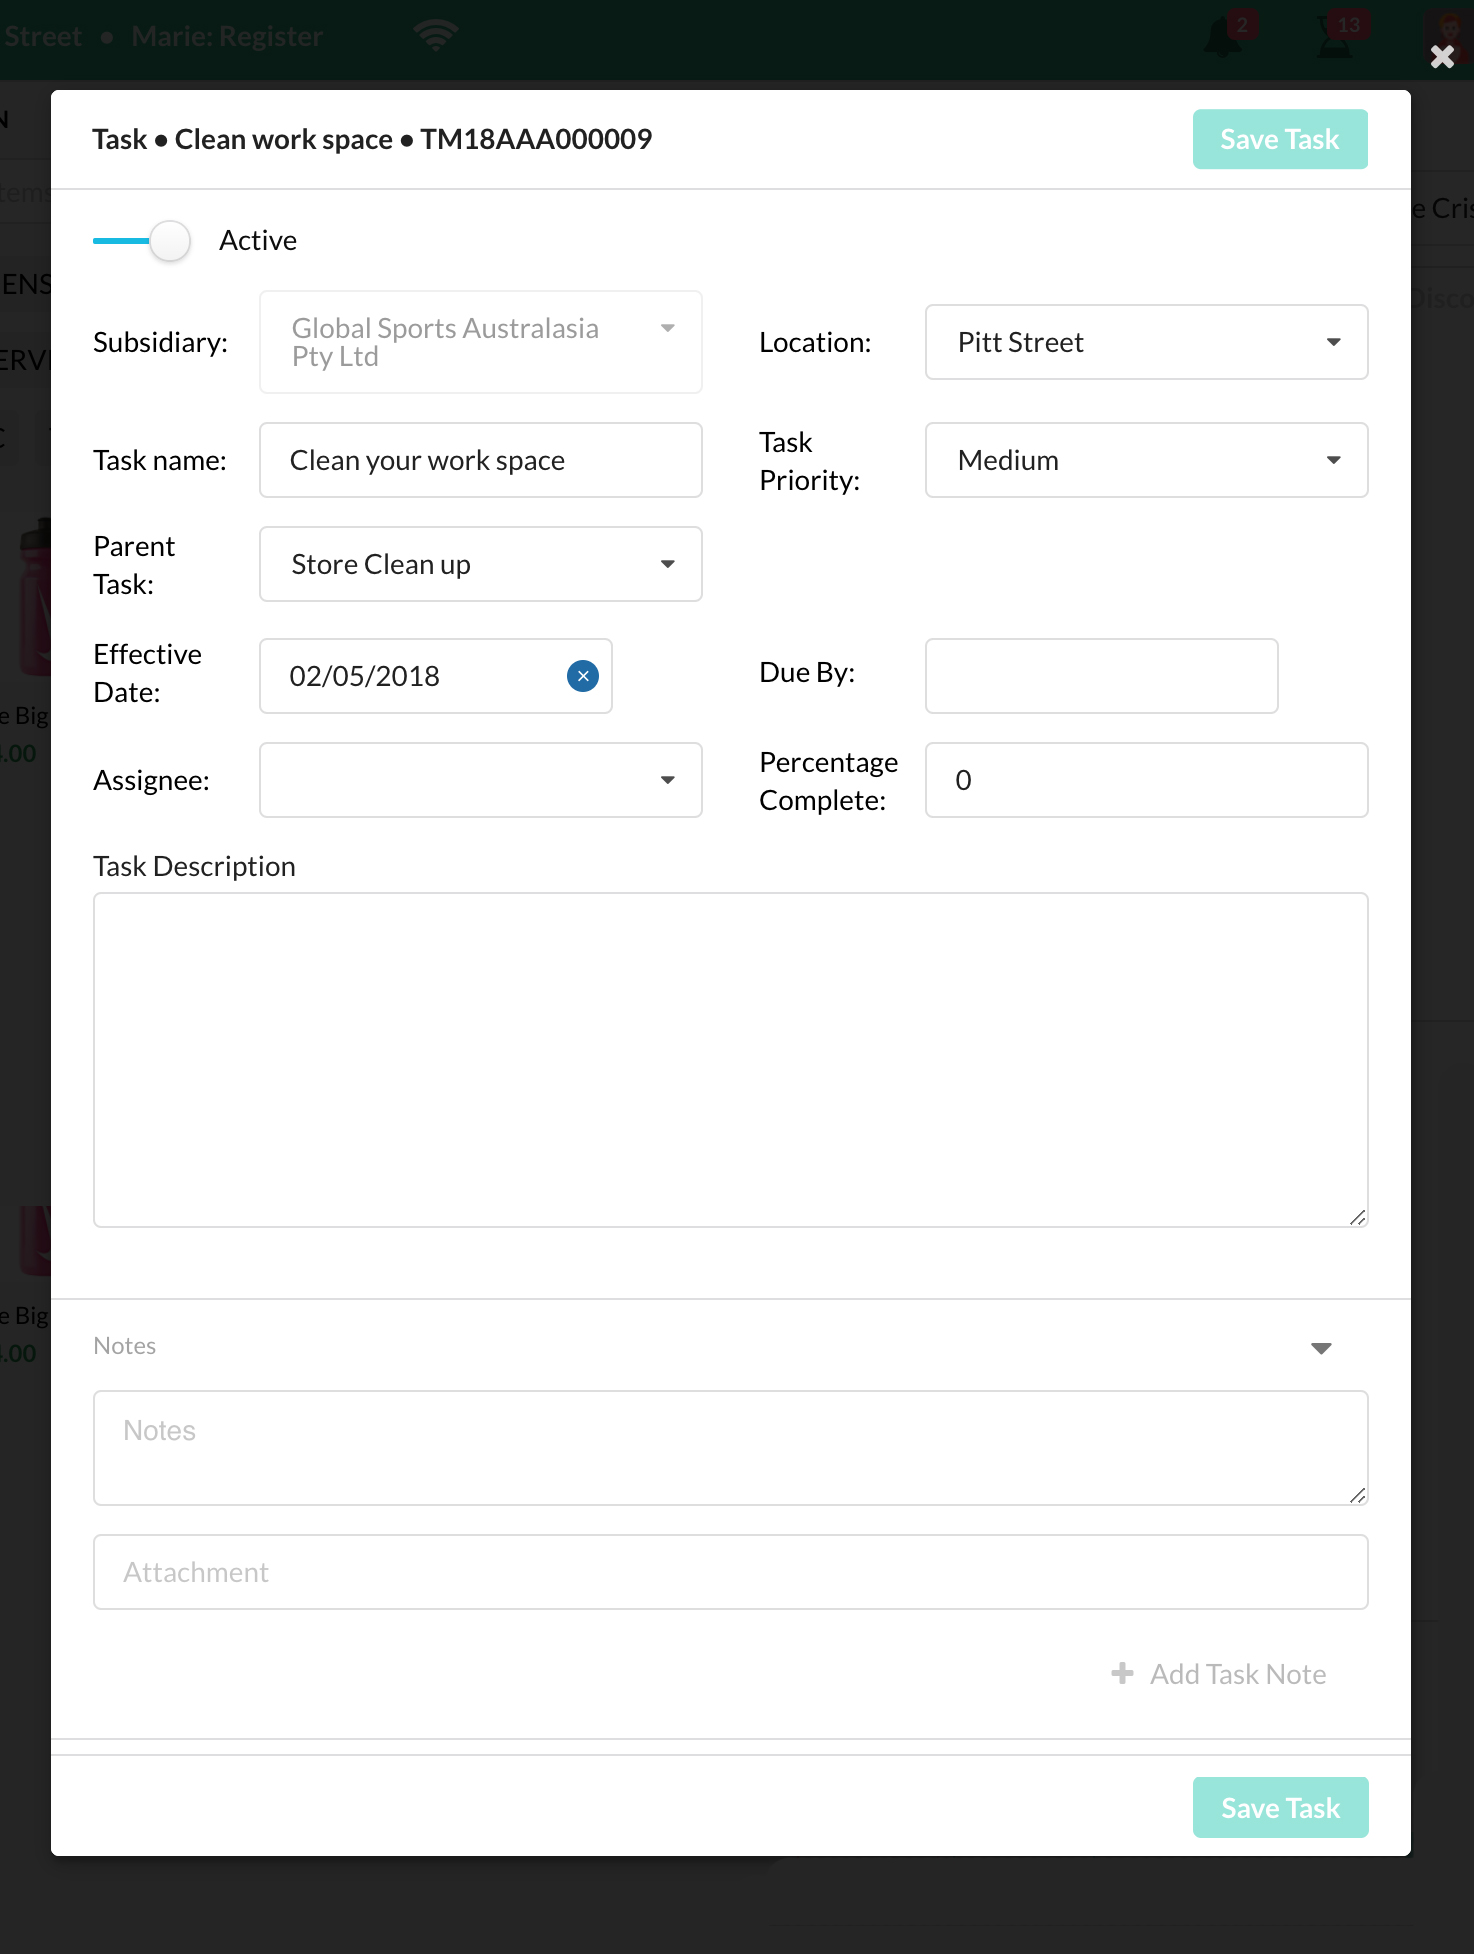
Editing or viewing tasks in KRISP POS
-
On the KRISP POS screen, click on the notifications icon to choose the tasks to view or edit.

-
You will see a dropdown of the tasks assigned to you. Click one you want to view or edit.

-
A popup will display your task details, and you can edit and update the task if needed.
-
Once you're done, click on Save.
Working offline
The KRISP POS register is available when the internet is not available or when poor internet connectivity is being experienced. Some functionalities are limited.
Note that a register must have been activated before it can be used in offline mode.
A connectivity indicator is available on the top bar to let you know if KRISP POS is offline or online. If offline, the the indicator will have an exclamation mark.
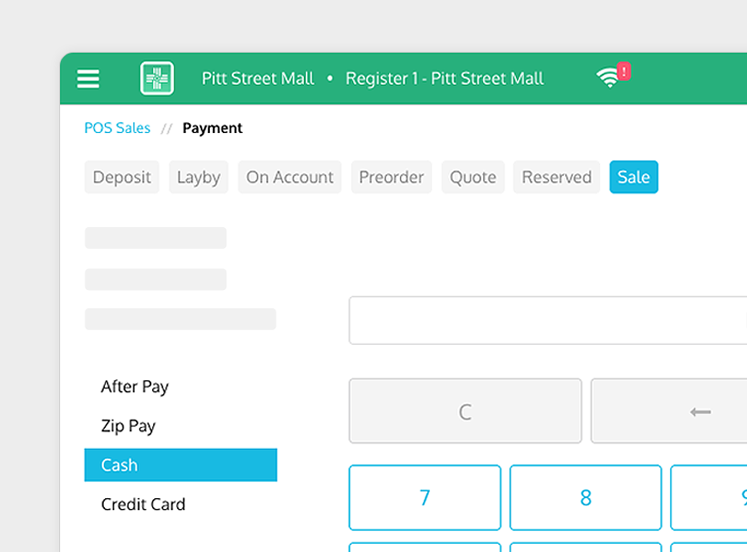
When offline, only PIN login access access will be available.
Key functions which will be available when you are offline:
- Hotkeys
- Item search
- Customer search
- Create new customer
- Making sales
- Deposit creation
- Layby creation
- On account
- Pre-order creation
- Reserve creation
- Quotes creation
- Non-validated returns
Key functions which will NOT be available when you are offline:
- View past sales transactions including:
- Global search
- Customer transaction history
- On hand values
- Transact on past sales including:
- Deposits
- Laybys
- On account
- Reserved
- Pre-orders
- Quotes
- Parked
- Validated returns
- Initiate a pickup or shipping
- Emailing of receipts
Item fulfillment
KRISP POS allows for items to be picked up or shipped from the main store or another store. On the occasions wherein there is no inventory available at your store, items can still be picked up or shipped from another location or transferred to your store to be fulfilled.
The following fulfilment options are available in KRISP POS:
- Pick up from another store
- Shipped from another store
- Pick up from own store
- Shipped from own store
A few things to remember:
- When you request that items are to be transferred to your store, you will need to action a manual ‘inventory transfer’ in admin.
- Transaction items assigned to be picked up or shipped, will be left with a ‘pending fulfilment’ status. The transaction will have a status of ‘open’, and cannot be closed, until all items have been fulfilled.
- Currently, shipping costs are manually calculated entered as a separate item.
Setting items to be picked up in-store:
On the POS cart:
- Open the item popup by clicking on the item name.
-
Click on the Location tab. You will see a list of other locations and on hand quantities.

-
Click on the desired pick up location.

-
Click Update to cart button.
- Repeat these steps for other items on the cart.
Fulfilling a pickup in-store:
- Using the POS, retrieve the transaction at the assigned store.
- Click on the item name to open the item details.
- Click on the delivery details and change the delivery status to ‘fulfilled’.
- Click on Update to cart button.
- Repeat these steps for other items on the cart if there are other items to be fulfilled.
- Click on Proceed to pay button.
- Just click the Done button.
Setting items to be shipped:
On the POS cart:
- Open the item popup by clicking on the item name.
- Click on Delivery details tab.
-
In the Delivery options field, choose ‘shipped’ from the dropdown, and enter the address it will be shipped to.

-
Click on the Update to cart button.
- Repeat these steps for other items on the cart if there are items to be fulfilled.
Fulfilling item to be shipped:
- Using the POS, retrieve the transaction at the assigned store.
- Click on the item name to open the item details.
- Click on the delivery details and change the delivery status to ‘fulfilled’.
- Click on Update to cart button.
- Repeat these steps for other items on the cart if there are other items to be fulfilled.
- Click on Proceed to pay button.
- Just click the Done button.
Issuing and redeeming credit notes
A credit note is a receipt given by a shop to a customer who has returned a good or service. It is typically used as a replacement for the original payment method. It can be used to offset against future sales.
A few things to note:
- The store must be set up to issue and receive credit notes.
- KRISP credit notes have a running balance and, therefore, the credit note can be used multiple times as long as the note is 1) not expired and 2) has a balance.
- A customer MUST be added to the sale in order to issue a credit note.
- KRISP can be setup to allow the credit note to be redeemed by someone other than the customer who received the credit note.
Issuing a credit note:
To issue a credit note:
- Retrieve the transaction using the search bar.
- Find the transaction you need, and click on the return icon .
- Do a return of the item/s.
- Click Save changes to cart button. You will see the cart updated with the return.
- Click the Proceed to pay button.
- On the checkout, select Credit from the payment methods to refund the customer via credit note.
- Click the Add payment button.
- You will notice a credit note amount displayed on the cart. This amount is automatically credited to the customer if you view their customer dashboard.
Redeeming a credit note:
A credit note can be redeemed as a payment method at checkout:
- On the checkout screen, click on Credit note from the payment types.
- Click on Add payment button.
- A popup will appear asking for the credit note number / certificate ID. Enter the correct number.
- Click Submit.
- Click the Add Payment button again.
- Click Done.
Validity of credit note:
The validity period of a credit note is set in system preferences.
- Go to menu.
- Go to Setup > Company > Preferences.
- On the left sidebar, click on Credit certificate.
- Click on Edit.
- Find the ‘credit note expiry’ option.
- Enter the new validity period (in days).
- Click Save.
Grouped items
The grouped items feature is used to associate, group, or link items at POS.
An item can be marked in the admin so that it can be grouped with other items. Even if items are grouped under a main (parent) item, all these items are still independent of each other – they’re just then grouped with and linked to the main item..
To setup an item to be grouped with other items:
- Go to menu.
- Go to Product > Items.
- Add a new item, or edited an existing one.
- Check the Allow Dynamic Link checkbox to make it as a parent item.
To use the grouped item in POS:
- Add the item to the cart.
-
If the item added is a linked item, you will notice an icon button appear beside the item name. To enable adding of subitems, just click the plus icon.
-
To add subitems, just add items normally and you will notice that all added items are indented to indicate grouping.
-
When you’re done, just click the icon again.
To ‘unlink' items, the item must be removed/voided.
Part quantity
In the KRISP POS, items have adjustable quantity. The item quantity can both be whole numbers (1), or decimal numbers (0.25). If enabled, this allows the sale of whole or partial items, e.g. coffee beans that are packed per bag by grams, etc.
To allow part quantity:
- Go to menu.
- Go to Setup > Company > Preferences.
- In the Item management tab, look for Enable item part quantity.
- Edit it and set it to True.
To setup an item to have part quantity in POS:
- Go to menu.
- Go to Product > Items.
- Add a new item or edit an existing one.
- In General tab, check the Enable part quantity checkbox.

Part quantity can be used also for the following features:
- Inventory which includes adjustment, transfers, and counts/stocktake.
- Purchase orders, return, and receipt.
Using part quantity in POS:
- Add an item to the cart.
- Click the current quantity of the item.
-
This will show a new area. Enter the new quantity in the respective field.
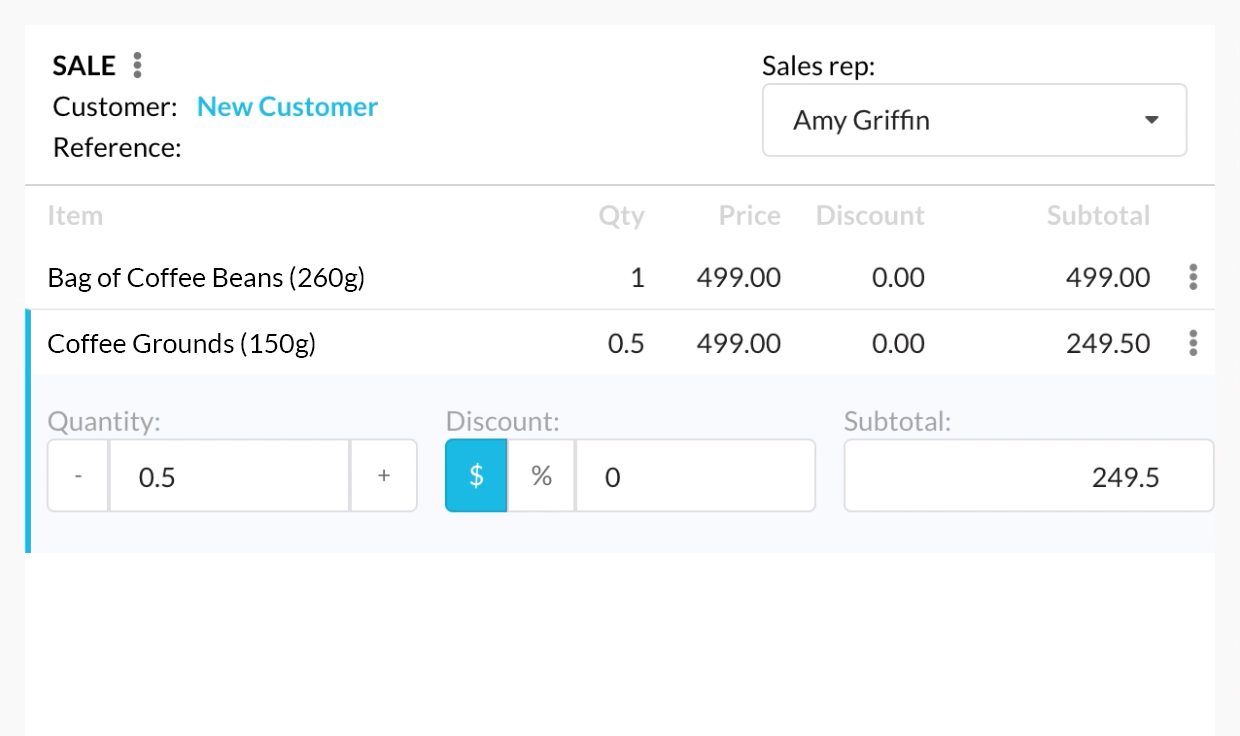
- Notice that the new subtotal will change.
- Proceed to checkout and finish the transaction.